background image

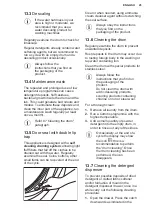
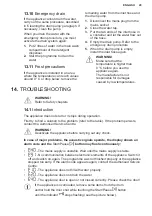
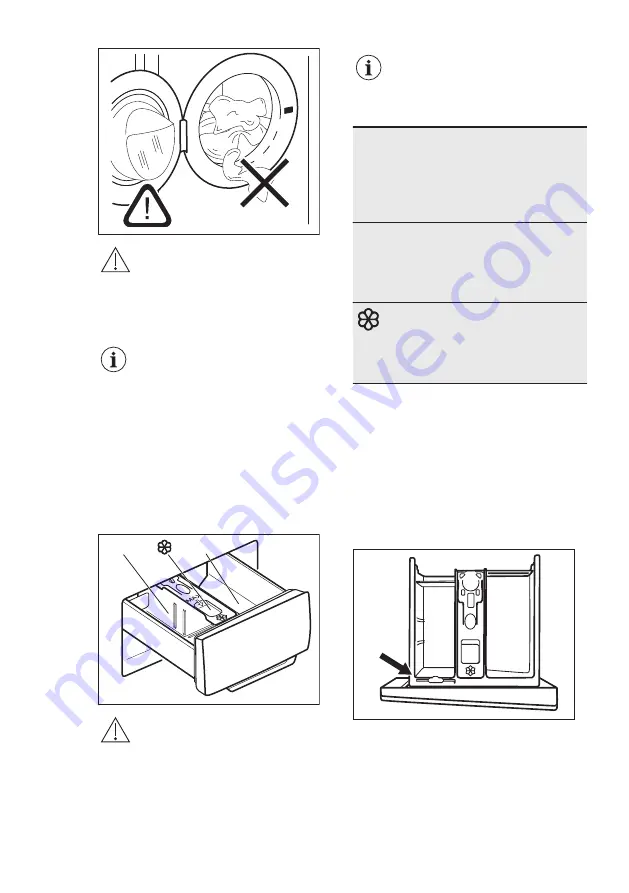
CAUTION!

Make sure that no laundry

gets caught between the

seal and the door to avoid

risk of water leakage and

damage to the laundry.

Washing heavily oiled,

greasy stains could cause

damage to rubber parts of

the washing machine.

11.3 Using detergent and

additives

1. Measure out the detergent and the

fabric conditioner.

2. Put the detergent and the fabric

conditioner into the compartments.

3. Carefully close the detergent drawer

2

1

CAUTION!

Use only specified

detergents for washing

machine.

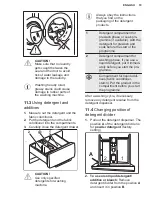
Always obey the instructions

that you find on the

packaging of the detergent

products.

1

Detergent compartment for

prewash phase or soak pro‐

gramme (if available). Add the

detergent for prewash and

soak before the start of the

programme.

2

Detergent compartment for

washing phase. If you use a

liquid detergent, put it immedi‐

ately before you start the pro‐

gramme.
Compartment for liquid addi‐

tives (fabric conditioner,

starch). Put the product in the

compartment before you start

the programme.

After a washing cycle, if necessary,

remove any detergent residue from the

detergent dispenser.

11.4 Changing position of

detergent divider

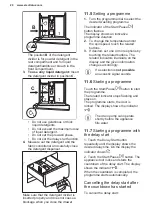
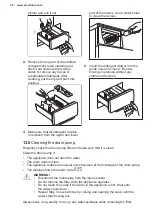
1. Pull out the detergent dispenser. The

position A of the detergent divider is

for powder detergent (factory

setting).

2

1

MAX

A

2. To use also liquid detergent/

additive or bleach: Remove

detergent divider from the position A

and insert it in position B.

ENGLISH

19

Содержание EW6S4603BM

Страница 1: ...EW6S4603BM EN Washing Machine User Manual ...

Страница 2: ...nd So whenever you use it you can be safe in the knowledge that you ll get great results every time Welcome to Electrolux Visit our website to Get usage advice brochures trouble shooter service and repair information www electrolux com support Register your product for better service www registerelectrolux com Buy Accessories Consumables and Original spare parts for your appliance www electrolux c...

Страница 3: ...nd the hazards involved Children between 3 and 8 years of age and persons with very extensive and complex disabilities shall be kept away from the appliance unless continuously supervised Children of less than 3 years of age should be kept away from the appliance unless continuously supervised Do not let children play with the appliance Keep all packaging away from children and dispose of it appro...

Страница 4: ... manufacturer its Authorised Service Centre or similarly qualified persons to avoid an electrical hazard Before any maintenance operation deactivate the appliance and disconnect the mains plug from the socket Do not use high pressure water sprays and or steam to clean the appliance Clean the appliance with a moist cloth Use only neutral detergents Do not use abrasive products abrasive cleaning pad...

Страница 5: ... of the installation Make sure that there is access to the mains plug after the installation Do not touch the mains cable or the mains plug with wet hands Do not pull the mains cable to disconnect the appliance Always pull the mains plug 2 3 Water connection Do not cause damage to the water hoses Before connection to new pipes pipes not used for a long time where repair work has been carried out o...

Страница 6: ...yrene packaging materials 3 Open the door Remove all the items from the drum Montagean weisung Achtung Lesen Sie vor Beginn der Installation die Sicherheitsh inweise in der Gebrauchsa nweisung Installation Instruction Warning the safety information in the User Manual Montagean weisung Achtung Lesen Sie vor Beginn der Installation die Sicherheitsh inweise in der Gebrauchsa nweisung Installation Ins...

Страница 7: ...and levelling Adjust the appliance correctly to prevent vibration noise and movement of the appliance when it operates 1 Install the appliance on a flat hard floor The appliance must be levelled and stable Make sure that the appliance does not touch the wall or other units and there is air circulation below the appliance 2 Loosen or tighten the feet to adjust the level All feet must rest firmly on...

Страница 8: ...tact the authorised service centre for the other drain hose and the extension It is possible to connect the drain hose in different ways 1 Make a U shape with the drain hose and put it around the plastic hose guide 2 On the edge of a sink Fasten the guide to the water tap or to the wall Make sure that the plastic guide cannot move when the appliance drains and the drain hose end is not immersed in...

Страница 9: ...amp Refer to the illustration Make sure that the drain hose makes a loop to prevent particles going into the appliance from the sink 6 Position the hose directly to a built in drain pipe in the room wall and tighten it with a clamp 4 ACCESSORIES 4 1 Available in www electrolux com shop or from authorised dealer Only appropriate accessories approved by ELECTROLUX ensure the safety standards of the ...

Страница 10: ...ction 10 Mains cable 11 Transit bolts 12 Hose support 6 CONTROL PANEL 6 1 Special features Your new washing machine meets all modern requirements for an effective treatment of laundry with low water energy and detergent consumption and will care for fabrics The SensiCare System automatically adjusts the programme duration to the laundry in the drum to achieve perfect washing results in the minimum...

Страница 11: ...ouch button 5 Start Pause touch button 6 Soft Plus touch button 7 Extra Rinse touch button 8 Prewash touch button 9 Spin reduction options touch button No Spin option Rinse Hold option Night option 10 Temp touch button 11 On Off push button 6 3 Display A B C D E F G A Door locked indicator B Delay start indicator ENGLISH 11 ...

Страница 12: ...inutes to reduce the energy consumption you may need to activate the appliance again For more details refer to Stand by paragraph in Daily Use chapter 7 3 Temp When you select a washing programme the appliance automatically proposes a default temperature The indicator Cold cold water The indicator of the set temperature comes on 7 4 Spin When you set a programme the appliance automatically sets th...

Страница 13: ...ergent residues and with sensitive skin This option increases the programme duration The corresponding indicator above the touch button illuminates and also stays permanently on during next cycles until this option is deactivated 7 7 Permanent Soft Plus Set this option to optimise the fabric softener distribution and improve fabric softness Recommended when you use fabric softener This option incr...

Страница 14: ...rature range Reference spin speed Spin speed range rpm Maxi mum load Programme description Type of load and soil level Cottons 40 C 90 C Cold 1000 rpm 1000 400 6 kg White cotton and coloured cotton Normal and heavy soil Cottons Eco1 40 C 60 C 40 C 1000 rpm 1000 400 6 kg White cotton and fast coloured cotton Nor mal soil The energy consumption decreases and the time of the washing programme is ex t...

Страница 15: ...xcept woollens and delicate fabrics Anti Allergy Vapour 60 C 1000 rpm 1000 400 6 kg White cotton items This programme re moves micro organisms thanks to a washing phase with the temperature maintained above 60 C for some minutes This helps in remov ing germs bacteria micro organism and parti cles The addition of vapour together with an additional rinsing phase ensures a proper re moval of detergen...

Страница 16: ... follows Pour the washing detergent in the compart ment Pour a special water repellency restorer for fabric into the softener compartment of the drawer Reduce the laundry load to 1 kg To further improve the water re pellency restoring action dry the laundry in a tumble dryer by set ting the Outdoor drying pro gramme if available and if the garment care label permits tum ble drying Denim 30 C 40 C ...

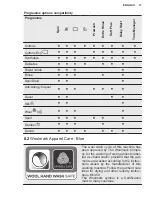
Страница 17: ...Woolmark Apparel Care Blue The wool wash cycle of this machine has been approved by The Woolmark Compa ny for the washing of wool garments label led as hand wash provided that the gar ments are washed according to the instruc tions issued by the manufacturer of this washing machine Follow the garment care label for drying and other laundry instruc tions M1459 The Woolmark symbol is a Certification...

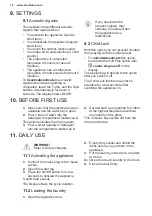
Страница 18: ...default to this option after you switch it off The Child Lock function may not be available for a few seconds after switching the appliance on 10 BEFORE FIRST USE 1 Make sure that the electrical power is available and the water tap is open 2 Pour 2 litres of water into the detergent compartment marked as 2 This action activates the drain system 3 Pour a small quantity of detergent into the compart...

Страница 19: ...nt compartment for prewash phase or soak pro gramme if available Add the detergent for prewash and soak before the start of the programme 2 Detergent compartment for washing phase If you use a liquid detergent put it immedi ately before you start the pro gramme Compartment for liquid addi tives fabric conditioner starch Put the product in the compartment before you start the programme After a wash...

Страница 20: ...e the temperature and or the spin speed touch the related buttons 3 If desired set one or more options by touching the related buttons The related indicators illuminate on the display and the given information changes accordingly If a selection is not possible an acoustic signal sounds 11 6 Starting a programme Touch the Start Pause button to start the programme The related indicator stops flashin...

Страница 21: ...ons When the programme is running you can change only some options 1 Touch the button Start Pause The related indicator flashes 2 Change the options The given information in the display changes accordingly 3 Touch the button Start Pause again The washing programme continues 11 10 Cancelling a running programme 1 Press the button On Off to cancel the programme and to deactivate the appliance 2 Pres...

Страница 22: ...ent creases in the laundry The door stays locked You must drain the water to open the door 1 If necessary touch the Spin button to decrease the spin speed proposed by the appliance 2 Press theStart Pause button If you have set Rinse Hold the appliance drains the water and spins If you have set Night the appliance only drains the water The option indicator Rinse Hold disappears 3 When the programme...

Страница 23: ...t sufficient We recommend that you pre treat these stains before you put the items in the appliance Special stain removers are available Use the special stain remover that is applicable to the type of stain and fabric 12 3 Detergent type and quantity The choice of detergent and use of correct quantities not only affects your wash performance but also helps to avoid waste and protect the environmen...

Страница 24: ...not necessary to use a water softener To find out the water hardness in your area contact your local water authority Use the correct quantity of water softener Follow the instructions that you find on the packaging of the product 13 CARE AND CLEANING WARNING Refer to Safety chapters 13 1 Periodic cleaning schedule Periodic cleaning helps to extend the life of your appliance After each cycle keep t...

Страница 25: ...en needed using ammonia cream cleanser agent without scratching the seal surface Always obey the instructions that you find on the packaging of the product 13 6 Cleaning the drum Regularly examine the drum to prevent unwanted deposits Rust deposits in the drum may occur due to rusting foreign body in the washing or tap water containing iron Clean the drum with special products for stainless steel ...

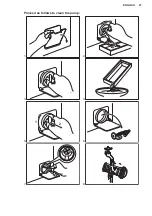
Страница 26: ... Cleaning the drain pump Regularly check the drain pump filter and make sure that it is clean Clean the drain pump if The appliance does not drain the water The drum does not turn The appliance makes an unusual noise because of the blockage of the drain pump The display shows the alarm code WARNING Disconnect the mains plug from the mains socket Do not remove the filter while the appliance operate...

Страница 27: ...Proceed as follows to clean the pump 1 2 3 4 5 1 2 6 7 8 ENGLISH 27 ...

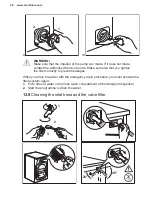
Страница 28: ...tighten the filter correctly to prevent leakages When you drain the water with the emergency drain procedure you must activate the drain system again 1 Put 2 litres of water in the main wash compartment of the detergent dispenser 2 Start the programme to drain the water 13 9 Cleaning the inlet hose and the valve filter 3 1 2 45 20 www electrolux com 28 ...

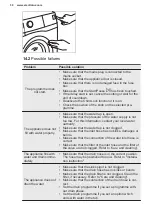
Страница 29: ...er is not responsible for damages caused by low temperatures 14 TROUBLESHOOTING WARNING Refer to Safety chapters 14 1 Introduction The appliance does not start or it stops during operation First try to find a solution to the problem refer to the table If the problem persists contact the Authorised Service Centre WARNING Deactivate the appliance before carrying out any check In case of major proble...

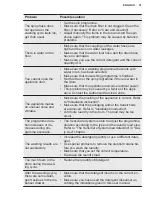
Страница 30: ... is not clogged Make sure that the inlet hose has no kinks damages or bends Make sure that the connection of the water inlet hose is correct Make sure that the filter of the inlet hose and the filter of the valve are not clogged Refer to Care and cleaning The appliance fills with water and drains imme diately Make sure that the drain hose is in the correct position The hose may be positioned too l...

Страница 31: ...horised Service Centre The appliance makes an unusual noise and vibrates Make sure the levelling of the appliance is correct Refer to Installation instruction Make sure that the packaging and or the transit bolts are removed Refer to Installation instruction Add more laundry in the drum The load may be too small The programme dura tion increases or de creases during pro gramme execution The SensiC...

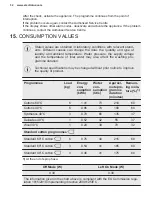
Страница 32: ...ffect the washing pro gramme duration Technical specifications may be changed without prior notice to improve the quality of product Programmes Load kg Energy con sumption kWh Water con sumption litre Approxi mate pro gramme duration minutes Remain ing mois ture 1 Cottons 60 C 6 1 41 73 210 60 Cottons 40 C 6 0 86 74 180 60 Synthetics 40 C 3 0 70 66 135 37 Delicates 40 C 1 0 52 42 55 37 Wool 30 C 1...

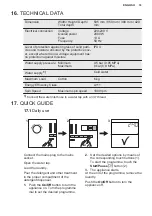
Страница 33: ...ciency Class A Spin Speed Maximum spin speed 1000 rpm 1 Connect the water inlet hose to a water tap with a 3 4 thread 17 QUICK GUIDE 17 1 Daily use 1 2 1 2 3 Connect the mains plug to the mains socket Open the water tap Load the laundry Pour the detergent and other treatment in the proper compartment of the detergent dispenser 1 Push the On Off button to turn the appliance on Turn the programme di...

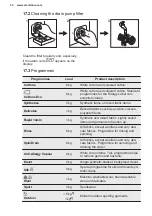
Страница 34: ...min 1 kg Synthetic and mixed fabric Lightly soiled items and garments to freshen up Rinse 6 kg All fabrics except woollens and very deli cate fabrics Programme for rinsing and spinning Spin Drain 6 kg All fabrics except woollens and very deli cate fabrics Programme for spinning and draining the water Anti Allergy Vapour 6 kg White cotton items This programme helps to remove germs and bacteria Duve...

Страница 35: ...le materials with the symbol Put the packaging in relevant containers to recycle it Help protect the environment and human health by recycling waste of electrical and electronic appliances Do not dispose of appliances marked with the symbol with the household waste Return the product to your local recycling facility or contact your municipal office ENGLISH 35 ...

Страница 36: ...www electrolux com shop 155280960 A 352019 ...

Отзывы: