background image

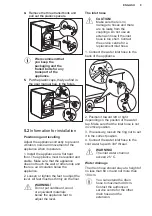
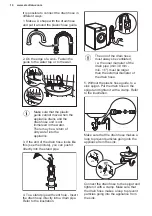
6. Position the hose directly to a built-in

drain pipe in the room wall and tighten it

with a clamp.

5.3 Electrical connection

At the end of installation you can connect

the mains plug to the mains socket.
The rating plate on the inner edge of the

appliance door and the 'Technical Data'

chapter indicate the necessary electrical

ratings. Make sure that they are

compatible with the mains power supply.
Check that your domestic electrical

installation can take the maximum load

required, also taking into account any

other appliances in use.
Connect the appliance to an earthed

socket.

The power supply cable must be easily

accessible after installing the appliance.
For any electrical work required to install

this appliance, contact our Authorised

Service Centre.
The manufacturer does not accept any

responsibility for damage or injury

through failure to comply with the above

safety precaution.

6. ACCESSORIES

6.1 Available in

www.electrolux.com/shop or

from authorised dealer

Read carefully the instructions supplied

with the accessory.

Only appropriate

accessories approved by

ELECTROLUX ensure the

safety standards of the

appliance. If unapproved

parts are used, any claims

will be invalidated.

6.2 Fixing plate kit

If you install the appliance on a plinth

that is not an accessory supplied by

ELECTROLUX, secure the appliance in

the fixing plates.
Read carefully the instructions supplied

with the accessory.

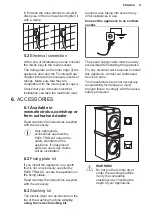
6.3 Stacking kit

The tumble dryer can be stacked on the

top of the washing machine only by

using the correct stacking kit.

WARNING!

Do not put the tumble dryer

under the washing machine.

Verify the compatible

stacking kit by checking the

depth of your appliances.

ENGLISH

11

Содержание EW6F4143FB

Страница 1: ...EW6F4143FB EN Washing Machine User Manual ...

Страница 2: ...with you in mind So whenever you use it you can be safe in the knowledge that you ll get great results every time Welcome to Electrolux Visit our website to Get usage advice brochures trouble shooter service and repair information www electrolux com support Register your product for better service www registerelectrolux com Buy Accessories Consumables and Original spare parts for your appliance ww...

Страница 3: ...nd the hazards involved Children between 3 and 8 years of age and persons with very extensive and complex disabilities shall be kept away from the appliance unless continuously supervised Children of less than 3 years of age should be kept away from the appliance unless continuously supervised Do not let children play with the appliance Keep all packaging away from children and dispose of it appro...

Страница 4: ...er supply cable is damaged it must be replaced by the manufacturer its Authorised Service Centre or similarly qualified persons to avoid an electrical hazard Before any maintenance operation deactivate the appliance and disconnect the mains plug from the socket Do not use high pressure water sprays and or steam to clean the appliance Clean the appliance with a moist cloth Use only neutral detergen...

Страница 5: ...ble need to be replaced this must be carried out by our Authorised Service Centre Connect the mains plug to the mains socket only at the end of the installation Make sure that there is access to the mains plug after the installation Do not touch the mains cable or the mains plug with wet hands Do not pull the mains cable to disconnect the appliance Always pull the mains plug 2 3 Water connection T...

Страница 6: ...d firmware including reset software door door hinge and seals other seals door locking assembly plastic peripherals such as detergent dispensers Please note that some of these spare parts are only available to professional repairers and that not all spare parts are relevant for all models Concerning the lamp s inside this product and spare part lamps sold separately These lamps are intended to wit...

Страница 7: ...se 9 Inlet hose connection 10 Mains cable 11 Transit bolts 12 Hose support 00000000 00A Mod xxxxxxxxx 000V 00Hz 0000 W 910000000 00 A B C Prod No D The rating plate reports the model name A product number B electrical ratings C and serial number D 4 TECHNICAL DATA Dimension Width Height Total depth 59 7 cm 84 7 cm 65 8 cm Electrical connection Voltage Overall power Fuse Frequency 230 V 2200 W 10 A...

Страница 8: ... Safety chapters 5 1 Unpacking 1 Open the door Remove all the items from the drum Accessories delivered with the appliance may vary depending on the model 2 Put the packaging element on the floor behind the appliance and carefully put it down onto its rear side Remove the polystyrene protection from the bottom 1 2 CAUTION Do not lay washing machine on its front 3 Put the appliance back into an upr...

Страница 9: ...od or equivalent materials below the appliance feet to adjust the level The inlet hose CAUTION Make sure there is no damage to hoses and there are no leaks from the couplings Do not use an extension hose if the inlet hose is too short Contact the service centre for a replacement inlet hose 1 Connect the water inlet hose to the back of the appliance 20º 20º 45º 45º 2 Position it toward left or righ...

Страница 10: ...d pipe with vent hole Insert the drain hose directly into a drain pipe Refer to the illustration The end of the drain hose must always be ventilated i e the inner diameter of the drain pipe min 38 mm min 1 5 must be larger than the external diameter of the drain hose 5 Without the plastic hose guide to a sink spigot Put the drain hose in the spigot and tighten it with a clamp Refer to the illustra...

Страница 11: ...rised Service Centre The manufacturer does not accept any responsibility for damage or injury through failure to comply with the above safety precaution 6 ACCESSORIES 6 1 Available in www electrolux com shop or from authorised dealer Read carefully the instructions supplied with the accessory Only appropriate accessories approved by ELECTROLUX ensure the safety standards of the appliance If unappr...

Страница 12: ...for fabrics Thanks to the Soft Plus option the fabric softener is uniformly spread out in the laundry and deeply penetrates the fabric fibres favouring a perfect softness The SensiCare System detects the laundry load weight defining the programme duration in 30 seconds The washing programme is tailored to the laundry load and the type of fabric without consuming more time energy and water than nec...

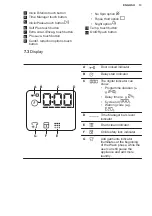
Страница 13: ...on 10 Temp touch button 11 On Off push button 7 3 Display A B C D E F G A Door locked indicator B Delay start indicator C The digital indicator can show Programme duration e g Delay time e g Cycle end Warning code e g D Time Manager bars level indicator E Drum clean indicator F Child safety lock indicator G Add garments indicator Illuminates at the beginning of the Wash phase while the user can st...

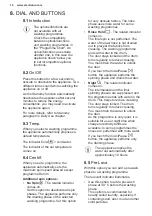
Страница 14: ...abrics The rinse phase uses more water for some washing programmes Rinse Hold The related indicator comes on The final spin is not performed The water of the last rinse is not drained out to prevent the fabrics from creasing The washing programme ends with water in the drum The door stays locked and the drum turns regularly to reduce creasing You must drain the water to unlock the door If you touc...

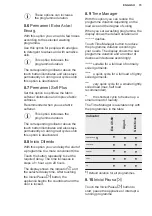
Страница 15: ...t the required delay The time increases in steps of 1 hour up to 20 hours The display shows the indicator and the selected delay time After touching the Inicio Pausa button the appliance begins the countdown and the door is locked 8 9 Time Manager With this option you can reduce the programme duration depending on the load size and the degree of soiling When you set a washing programme the display...

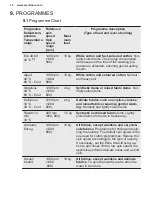
Страница 16: ...40 C Cold 1200 rpm 1200 800 2 kg Delicate fabrics such as acrylics viscose and mixed fabrics requiring gentler wash ing Normally and lightly soiled items Rápido 14 min 30 C 800 rpm 800 800 1 5 kg Synthetic and mixed fabric items Lightly soiled items and items to freshen up Aclarado Enxag 1400 rpm 1400 800 10 kg All fabrics except woollens and very deli cate fabrics Programme for rinsing and spin n...

Страница 17: ...s to a vapour phase an enhanced rinsing phase ensures a proper removal of detergent and micro organ ism residues This program ensures also a proper reduction of pollens allergenic items Edred 40 C 60 C Cold 800 rpm 800 800 3 kg Single synthetic blanket padded clothes duvets down jackets and similar items Seda 30 C 800 rpm 800 800 0 5 kg Special programme for silk and mixed syn thetic items Lana Lã...

Страница 18: ...ed laundry load is 2 5 kg Waterproof waterproof breathable and wa ter repellent fabrics This programme can al so be used as a water repellency restoring cy cle specifically tailored for treating clothes with a hydrophobic coating To perform the water repellency restoring cycle proceed as follows Pour the washing detergent in the compart ment Pour a special water repellency restorer for fabric into...

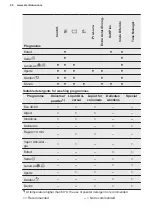
Страница 19: ... Consumption Values chapter The most efficient programmes in terms of energy consumption are generally those that perform at lower temperatures and longer duration 2 Tested for Staphylococcus aureus Enterococcus faecium Candida albicans Pseudomo nas aeruginosa and MS2 Bacteriophage in external test performed by Swissatest Testma terialien AG in 2021 Test Report No 202120117 3 During this cycle the...

Страница 20: ...washing programmes Programme Universal powder1 Liquid Uni versal Liquid for coloureds Delicates woollens Special Eco 40 60 Algod Sintéticos Delicados Rápido 14 min Vapor Anti Aler gia Edred Seda Lana Lãs Sports Outdoor Denim 1 At temperature higher than 60 C the use of powder detergent is recommended Recommended Not recommended www electrolux com 20 ...

Страница 21: ... set a one of the programme touch the Temp and the Centrif buttons simultaneously for about 2 seconds The display shows On Off If you deactivate the acoustic signals they continue to operate when the appliance has a malfunction 10 2 Child Lock With this option you can prevent children from playing with the control panel To activate deactivate this option hold down the Soft Plus button until comes ...

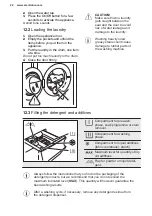
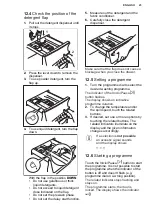
Страница 22: ...heavily oiled greasy stains could cause damage to rubber parts of the washing machine 12 3 Filling the detergent and additives Compartment for prewash phase soak programme or stain remover Compartment for washing phase Compartment for liquid additives fabric conditioner starch Maximum level for quantity of liq uid additives Flap for powder or liquid deter gent Always follow the instructions that y...

Страница 23: ...amme 1 Turn the programme dial to select the desired washing programme The indicator of the Inicio Pausa button flashes The display shows an indicative programme duration 2 To change the temperature and or the spin speed touch the related buttons 3 If desired set one or more options by touching the related buttons The related indicators illuminate on the display and the given information changes a...

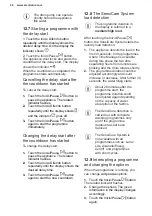
Страница 24: ... new countdown 12 8 The SensiCare System load detection The programme duration in the display is referred to a medium high load After touching the Inicio Pausa button the SensiCare System starts the laundry load detection 1 The appliance detects the load in the first 30 seconds In the programmes where Time Manager is available during this phase the two dots separating hours from minutes are blinki...

Страница 25: ...he water in the drum are too high and or the drum is still rotating you should not open the door While a programme or the delay start operates the appliance door is locked The display shows the indicator 1 Touch the Inicio Pausa button In the display the related door lock indicator goes off 2 Open the appliance door If necessary add or remove the items Close the door and touch the Inicio Pausa but...

Страница 26: ...ance again The display shows the end of the last programme Turn the programme dial to set a new cycle If the dial is rotated to the Reset position the appliance automatically turns off in 30 seconds If you set a programme or an option that ends with water in the drum the Stand by function doesn t deactivate the appliance to remind you to drain the water 13 HINTS AND TIPS WARNING Refer to Safety ch...

Страница 27: ...bric delicates woollens cottons etc the colour of clothes size of the load degree of soiling wash temperature and hardness of the water used Follow the instructions that you find on packaging of the detergents or other treatments without exceeding the indicated maximum level Do not mix different types of detergents Use less detergent if you are washing a small load the laundry is lightly soiled th...

Страница 28: ...s not used for a long time close the water tap and unplug the appliance Indicative periodic cleaning schedule Descaling Twice a year Maintenance wash Once a month Clean door seal Every two months Clean drum Every two months Clean detergent dispenser Every two months Clean drain pump filter Twice a year Clean the inlet hose and the valve filter Twice a year The following paragraphs explain how you ...

Страница 29: ...hen needed using ammonia cream cleanser agent without scratching the seal surface Always obey the instructions that you find on the packaging of the product 14 7 Cleaning the drum Regularly examine the drum to prevent unwanted deposits Rust deposits in the drum may occur due to rusting foreign body in the washing or tap water containing iron Clean the drum with special products for stainless steel...

Страница 30: ... 9 Cleaning the drain pump Regularly check the drain pump filter and make sure that it is clean Clean the drain pump if The appliance does not drain the water The drum does not turn The appliance makes an unusual noise because of the blockage of the drain pump The display shows the alarm code WARNING Disconnect the mains plug from the mains socket Do not remove the filter while the appliance opera...

Страница 31: ... 1 2 2 3 180 4 2 1 5 6 7 2 1 8 2 1 1 WARNING Make sure that the impeller of the pump can rotate If it does not rotate contact the Authorised Service Centre Make sure also that you tighten the filter correctly to prevent leakages ENGLISH 31 ...

Страница 32: ...ning water from the inlet hose and the drain pump 1 Disconnect the mains plug from the mains socket 2 Close the water tap 3 Put the two ends of the inlet hose in a container and let the water flow out of the hose 4 Empty the drain pump Refer to the emergency drain procedure 5 When the drain pump is empty install the inlet hose again WARNING Make sure that the temperature is higher than 0 C before ...

Страница 33: ...ter Make sure that the sink spigot is not clogged Make sure that the drain hose has no kinks or bends Make sure that the drain filter is not clogged Clean the fil ter if necessary Refer to Care and cleaning Make sure that the connection of the drain hose is correct Set the drain programme if you set a programme without drain phase Set the drain programme if you set an option which ends with water ...

Страница 34: ...Make sure that the couplings of the water hoses are tight and there is not water leakages Make sure that the water inlet hose and the drain hose have no damages Make sure you use the correct detergent and the correct quantity of it You cannot open the appliance door Make sure that a washing programme that ends with water in tub has not been selected Make sure that the washing programme is finished...

Страница 35: ... problem occurs again contact the Authorised Service Centre The necessary data for the service centre are on the rating plate 16 CONSUMPTION VALUES 16 1 Introduction See the web link www theenergylabel eu for detailed information about Energy Label The QR code on the energy label supplied with the appliance provides a web link to the information related to the performance of the appliance in the E...

Страница 36: ...ation Eu 2019 2023 Eco 40 60 pro gramme kg kWh Litres h mm C rpm1 Full load 10 0 860 70 3 50 53 34 1351 Half load 5 0 465 55 2 55 53 27 1351 Quarter load 2 5 0 305 40 2 35 54 25 1351 1 Maximum spin speed Power consumption in different modes Off W Stand by W Delay start W 0 50 0 50 4 00 Time to Off Standby mode is 15 minutes maximum 16 4 Common programmes These values are indicative only Programme ...

Страница 37: ...1 2 3 Connect the mains plug to the mains socket Open the water tap Load the laundry Pour the detergent and other treatment in the proper compartment of the detergent dispenser 1 Push the On Off button to turn the appliance on Turn the programme dial to set the desired programme 2 Set the desired options 1 by means of the corresponding touch buttons To start the programme touch the Inicio Pausa 2 ...

Страница 38: ...cate fabrics Programme for spinning and draining the water Vapor Anti Alergia 10 kg White cotton items This program removes more than 99 99 of bacteria and viru ses1 It also ensure a proper reduction of allergens Edred 3 kg Synthetic or feather and down filled blan kets padded clothes duvets Seda 0 5 kg Special programme for silk and mixed syn thetic items Lana Lãs 1 5 kg Machine washable wool han...

Страница 39: ...iners to recycle it Help protect the environment and human health by recycling waste of electrical and electronic appliances Do not dispose of appliances marked with the symbol with the household waste Return the product to your local recycling facility or contact your municipal office ENGLISH 39 ...

Страница 40: ...www electrolux com shop 135987160 A 332021 ...

Отзывы: