background image

Nettoyage

L’appareil étant convenablement installé, nous vous
conseillons de le nettoyer soigneusement avec de
l’eau tiède savonneuse, pour enlever l’odeur
caractéristique de «neuf».

N’utilisez pas de produits abrasifs, de
poudre à récurer ni d’éponge métallique.

Le congélateur est repéré par le symbole 

ce qui signifie qu’il est apte à la congélation de
denrées fraîches, au stockage de produits
surgelés et à la fabrication de cubes de glace.

Mise en service

Enfoncez la fiche dans la prise de courant (le voyant
(C) s’ allume en indiquant que l’appareil est sous
tension).

Tournez le bouton du thermostat (B) vers la droite
sur une position moyenne.

Pour arrêter l’appareil tournez le bouton du
thermostat sur la position «

».

UTILISATION

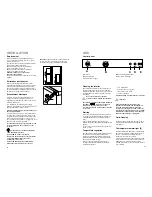
Tableau de commande 

min

MAX

C

A

B

D E

ALARM

SUPER

ON

N S

A. Bouton de mise en congélation

rapide/conservation (S/N)

B. Bouton du thermostat

C. Voyant de fonctionnement

D. Voyant de congélation rapide

E. Voyant d’alarme

16

SOMMAIRE

Avertissements et conseils importants

 . . . . . . . . . . . . . . . . . . . . . . . . . . . . . . . . . . . . . . . . . . . . . .14

Renseignements pour l’élimination des matériaux d’emballage  . . . . . . . . . . . . . . . . . . . . . . . . . .

15

Utilisation 

- Tableau de commande - Nettoyage - Mise en service - Réglage de la température  . . . .16

Utilisation - 

Congélation rapide - Voyant d’alarme - Thermomètre - Congélation  . . . . . . . . . . . . . . . .17

Utilisation

-Conservation produits surgelés -Décongelation -Glaçons -Accumulateurs thermiques  . .18

Conseils

- Conseils pour la congélation - Conseils pour la surgélation . . . . . . . . . . . . . . . . . . . . . . . .19

Entretien - 

Nettoyage - Arrêt prolongé

Dégivrage  . . . . . . . . . . . . . . . . . . . . . . . . . . . . . . . . . . . . . . .20

Anomalie de fonctionnement - Informations techniques

 . . . . . . . . . . . . . . . . . . . . . . . . . . . . . . .21

Installation - 

Emplacement - Entretoises postérieurs - Branchement électrique   . . . . . . . . . . . . . . . .22

Installation - 

Réversibilité de la porte  . . . . . . . . . . . . . . . . . . . . . . . . . . . . . . . . . . . . . . . . . . . . . . . . .23

Conditions de garantie

 . . . . . . . . . . . . . . . . . . . . . . . . . . . . . . . . . . . . . . . . . . . . . . . . . . . . . . . . . . . .24

Réglage de la température

La température est réglée automatiquement et peut
être augmentée (moine froid) en tournant le bouton
vers le minimum ou bien diminuée (plus froid) en le
tournant vers le maximum. En tout cas, l’exacte
position doit être repérée en considérant que la
température interne dépend des facteurs suivants:

température ambiante;

fréquence d’ouverture des portes;

quantité d’aliments conservés;

emplacement de l’appareil.

Une position moyenne est la plus indiquée.

49

Door reversal directions

1. Disconnect from the electricity supply.

2. Remove all loose items, including food, store

food in a cool place.

3. Gently lay the fridge/freezer on its back with the

top held away from the floor by 5-8 cm (2-3
inches) of packing;

4. Remove the feet (3)

5. Remove bottom hinge (1).

6. Slide out the  door from pin (G), unscrew the

latter and then screw it down into the hinge
provided on the opposite side, after having
removed the small plugs which should then be
fitted on the opposite side.

7. Refit the door and bottom hinge (1) on the

opposite side.

8. Refit the feet (3) on the opposite side.

9. Unscrew the handle. Refit it on the opposite side

after having pierced the plugs with a punch.
Cover the holes left open with the plugs
contained in the documentation pack.

Important

After completion of the door reversiing operation,
check that the door gasket adheres to the cabinet. If
the ambient temperature is cold (i.e. in Winter), the
gasket may not fit perfectly to the cabinet. In that
case, wait for the natural fitting of the gasket or
accelerate this process by heating up the part
involved with a normal hairdrier on a low setting.

PR228

D715 PIED/M

1

2

3

G

Содержание EU6830C

Страница 1: ...l a t e u r k o e l k a s t f r e e z e r f r y s s k å p GEBRAUCHSANWEISUNGEN MODE D EMPLOI GEBRUIKSAANWIJZINGEN INSTRUCTION BOOK BRUKSANVISNING 2222 113 87 EU 6830 C NL F D S Electrolux HemProdukter AB S 105 45 Stockholm www electrolux se ...

Страница 2: ...fier ou d essayer de modifier les caractéristiques de cet appareil Cet appareil contient des hydrocarbures dans son circuit de réfrigérant I entretien et la recharge ne doivent donc être effectués que par du personnel autorisé En cas de panne n essayez pas de réparer l appareil vous même Les réparations effectuées par du personnel non qualifié peuvent provoquer des dommages Contactez le Service Ap...

Страница 3: ... the consumer has under this legislation are not affected by this declaration of guarantee terms This declaration does not affect the vendor s statutory warranty to the end user The appliance is guaranteed within the context of and in adherence with the following terms 1 In accordance with provisions laid down in paragraphs 2 to 15 we will remedy free of charge any defect that occurs within 24 mon...

Страница 4: ...s Branchement électrique 22 Installation Réversibilité de la porte 23 Conditions de garantie 24 Réglage de la température La température est réglée automatiquement et peut être augmentée moine froid en tournant le bouton vers le minimum ou bien diminuée plus froid en le tournant vers le maximum En tout cas l exacte position doit être repérée en considérant que la température interne dépend des fac...

Страница 5: ...10 kg INSTALLATION Location The appliance should be installed well away from sources of heat such as radiators boilers direct sunlight etc For safety reasons minimum ventilation must be as shown in Fig Appliance positioned under overhanging kitchen wall units see Fig A Appliance positioned without overhanging kitchen wall units see Fig B Attention keep ventilation openings clear of obstruction Two...

Страница 6: ...s à glace Accumulateurs thermiques 2 accumulateurs thermiques sont fournis dans le congélateur ils permettent de prolonger le temps de conservation des aliments en cas de coupure de courant ou de panne Ils doivent être placés dans le compartiment supérieur 47 TECHNICAL INFORMATION 150 0 75 274 20 30 1240 550 600 Energy Consumption kWh 24h Energy Consumption kWh year Freezing Capacity kg Rising tim...

Страница 7: ...ved with the special plastic scraper provided whenever the thickness of the frost exceeds 4 mm During this operation it is not necessary to switch off the power supply or to remove the foodstuffs Never use sharp metal tools to scrape off frost from the evaporator as you could damage it However when the ice becomes very thick on the inner liner complete defrosting should be carried out as follows 1...

Страница 8: ...s Passez de temps en temps un produit à polir Dépoussiérez le condenseur situé à l arrière de l appareil à l aide d une brosse ou d un aspirateur Une accumulation de poussière risquerait de diminuer le rendement de l appareil Arrêt prolongé Lorsque l appareil doit rester à l arrêt pendant un certain temps prenez les précautions suivantes débranchez la prise de courant videz l appareil dégivrez le ...

Страница 9: ...em in the freezer compartment Do not use metallic instruments to remove the trays from the freezer Freezing fresh food The 4 star compartment is suitable for long term storage of commercially frozen food and for freezing fresh food To freeze fresh foods turn the fast freezing knob at least 24 hours before introducing the food into the freezer in order to ensure better freezing results Place the fo...

Страница 10: ...mperature alarm light turns on automatically whenever the temperature within the freezer rises above a certain value which might endanger satisfactory long term conservation It is perfectly normal for the temperature alarm light to remain lit up for a short time after the freezer is initially turned on It will remain lit up until the optimum temperature for the conservation of frozen food is attai...

Страница 11: ...Technical information 47 Installation Location Rear spacers Electrical connection 48 Installation Door reversibility 49 Guarantee 50 speed up the thawing process other than those recommended by the manufacturer Never use metal objects for cleaning your appliance as it may get damaged Installation During normal operation the condenser and compressor at the back of the appliance heat up considerably...

Страница 12: ... garantie n entraîne pas de prolongation de la période normale de garantie ni le départ d un nouveau cycle de garantie B 41 WARNINGS It is most important that this instruction book should be retained with the appliance for future reference Should the appliance be sold or transferred to another owner or should you move house and leave the appliance always ensure that the book is supplied with the a...

Страница 13: ...arborgperiode de herstelling van hetzelfde gebrek meermaals mislukt of de herstellingkosten disproportioneel zijn wordt in overleg met de gebruiker een gelijkwaardige vervanging geleverd In geval van vervanging behouden we ons het recht voor om een vergoeding te rekenen naar rato van de verstreken gebruiksperiode 13 Herstelling onder waarborg heeft geen verlenging van de waarborgtermijn noch aanva...

Отзывы: