background image

10

Maint

Maint

enance & Cleaning

enance & Cleaning

Before any maintenance or cleaning is

carried out you must DISCONNECT the

appliance from the electricity supply.

Internal Cleaning

Clean the inside and accessories with warm water and

bicarbonate of soda (5 ml to 0.5 litre of water).
Rinse and dry thoroughly.

NEVER use detergents, abrasive powders,

highly perfumed cleaning products or wax

polishes to clean the interior as these will

damage the surface and leave a strong 

odour.

External Cleaning

Wash the outer cabinet with warm soapy water.
Once or twice a year dust the condenser (black grille)

and the compressor at the back of the appliance with

a brush or vacuum cleaner, as an accumulation of dust

will affect the performance of the appliance and cause

excessive electricity consumption.

When the Appliance is not in Use

When the appliance is not in use for long periods,

disconnect from the electricity supply, empty all foods

and clean the appliance, leaving the door open to

prevent unpleasant smells.

Defrosting

The freezer compartment will become progressively

covered with frost. This should be removed with the

special plastic scraper provided whenever the

thickness of frost exceeds 6 mm (1/4“).
During this operation it is not necessary to switch off

the power supply or to remove the foodstuffs.
However, when the ice becomes very thick on the

inner liner, complete defrosting should be carried out

and it is advisable to peform this operation when the

appliance is empty.

F

F

To carry out complete defrosting:

1. Disconnect the appliance from the electrical

supply. If the plug is inaccessible turn the

thermostat control knob to „0“.

2. Remove any stored food, wrap in several layers

of newspaper and store in a cool place.

3. Leave the door open.
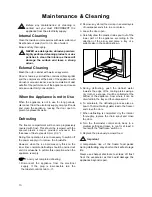
4. Carefully draw the plastic drain spout out of the

lower part of the appliance according to the

direction of the arrow and place a tray of a

suitable size in the position shown.

5. During defrosting, push the defrost water

towards the edge of the cooling plates using a

dry cloth or a sponge. It will be collected at the

bottom of the appliance, from where it can be

diverted into the tray and then disposed of.

6. To accelerate the defrosting process place a

bowl of hot (not boiling) water inside the freezer

and close the door.

7. When defrosting is completed, dry the interior

thoroughly, replace the drain spout and close

the door.

8. Turn the thermostat control knob back to a

medium setting and leave to run for at least 4

hours with the 'fast freeze' switch on.

9. Replace the previously removed food.

Important

A temperature rise of the frozen food packs

during defrosting may shorten their safe storage

life.
Never use sharp metal tools to scrape off frost

from the evaporator as this could damage the

appliance beyond repair.

Содержание EU 1341 T

Страница 1: ...A E 13 03 200364703 EU 1341 T FREEZER INSTRUCTION BOOK ...

Страница 2: ...se this appliance effectively and safely please read this instruction book carefully before installing or using this appliance and retain for future reference The symbols below help you to find things more easily Safety precautions Warnings and Safety information Hints useful information Environmental information ...

Страница 3: ... it has thawed out Do not place carbonated or fizzy drinks in the freezer Ice lollies can cause frost freezer burns if consumed straight from the freezer Do not remove items from the freezer if your hands are damp wet as this could cause skin abrasions or frost freezer burns Bottles and cans must not be placed int the freezer they can burst when the contents freeze Manufacturers recommended storag...

Страница 4: ...l 7 Freezing Fresh Food 7 Frozen Food Storage 8 Thawing 8 Making Ice Cubes 8 Hints and Tips 8 Food Storage 8 Energy Saving Advice 9 In the Event of a Power Failure 9 Maintenance and Cleaning 10 Internal cleaning 10 External cleaning 10 When the appliance is not in use 10 Defrosting 10 Something Not Working 11 Service and Spare Parts 11 Instructions for the Installer Technical Specifications 12 Ins...

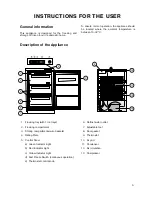
Страница 5: ...temperature is between 16 32 C Description of the Appliance 1 Freezing tray with 1 ice trays 2 Freezing compartment 3 Storing compartments wire baskets 4 Rating Plate 5 Control Panel a Green Indicator Light b Red Indicator Light c Yellow Indicator Light d Fast Freeze Switch continuous operation e Thermostat control knob 6 Defrost water outlet 7 Adjustable feet 8 Door gasket 9 Thermostat 10 Air gri...

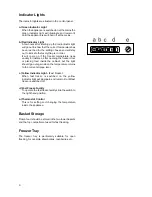
Страница 6: ... after opening the freezer door or placing food inside the cabinet but the light should go out again when the temperature returns to the correct storage level c Yellow Indicator Light Fast Freeze When fast freeze is switched on the yellow indicator light will illuminate and remain lit until fast freeze is switched off d Fast Freeze Facility To operate the fast freeze facility slide the switch to t...

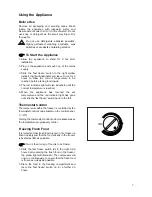
Страница 7: ...rect temperature is reached 5 When the appliance has reached the set temperature and the red indicator light has gone out slide the fast freeze switch back to the left Thermostat Control The temperature within the freezer is controlled by the thermostat control knob situated on the control panel 0 Off Turning the thermostat control knob clockwise makes the temperature progressively colder Freezing...

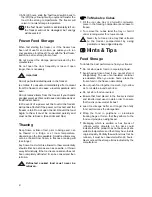
Страница 8: ...wed to thaw accidentally should either be eaten as soon as possible or thrown away Alternatively if the food is uncooked and has not been completely defrosted it can be cooked and then refrozen Defrosted cooked food must never be refrozen F FTo Make Ice Cubes 1 Fill the ice cube tray 3 4 full with cold water place in the freezing compartment and leave to freeze 2 To remove the cubes twist the tray...

Страница 9: ...ly often Ensure there are no obstructions preventing the door from closing properly In the Event of a Power Failure If there is a power failure during the storage of frozen foods keep the door closed If the temperature within your freezer should rise do not refreeze the food without checking its condition The following guidelines should assist you Ice Cream Once thawed should be discarded Fruits V...

Страница 10: ...ve the foodstuffs However when the ice becomes very thick on the inner liner complete defrosting should be carried out and it is advisable to peform this operation when the appliance is empty F FTo carry out complete defrosting 1 Disconnect the appliance from the electrical supply If the plug is inaccessible turn the thermostat control knob to 0 2 Remove any stored food wrap in several layers of n...

Страница 11: ... cut by checking the household lights Check the fuse has not blown Check the thermostat control knob setting Check the ambient temperature is within the appliances operating limits of 16 C to 32 C Check that the thermostat control knob is turned to the correct setting relative to ambient conditions Set the thermostat control knob to a lower position Check the door has not been left open Check noth...

Страница 12: ...es and the inside of the appliance with warm water and bicarbonate of soda 5 ml to 0 5 litres of water Rinse and dry thoroughly Do not use detergents abrasive powders highly perfumed cleaning products wax polishes or cleaning products containing bleach or alcohol Location The appliance should be positioned in a well ventilated dry room Energy use is affected by the ambient temperature The applianc...

Страница 13: ...crew the adjustable feet situated on both sides at the front 2 pieces Remove the lower door hinge plate by unscrewing the 3 retaining screws Remove the hinge pin from the bottom of the door Slot the hinge pin into the hole in the hinge plate Take the door off Ventilation Requirements The appliance must have adequate ventilation to ensure correct operation Diagram shows the ventilation requirements...

Страница 14: ...ng the retaining screws Refit the bottom hinge plate assembly on the opposite side taking care that the edge of the door is parallel with the side of the cabinet To reverse the handle proceed as follows Remove screw covers if fitted and handle retaining screws Remove blanking plugs on the opposite side Relocate the handle to the opposite side and refit retaining screws covers if fitted and replace...

Страница 15: ...he appliance is supplied with a 13 amp plug fitted In the event of having to change the fuse in the plug supplied a 13 amp ASTA approved BS 1362 fuse must be used Should the plug need to be replaced for any reason The wires in the mains lead are coloured in accordance with the following code Green and Yellow Earth Blue Neutral Brown Live The wire coloured green and yellow must be connected to the ...

Страница 16: ... is the world s largest producer of powered appliances for kitchen cleaning and outdoor use More than 55 million Electrolux Group products such as refrigerators cookers washing machines vacuum cleaners chain saws and lawn mowers are sold each year to a value of approx USD 14 billion in more than 150 countries around the world ...

Отзывы: