background image

4

This appliance complies with the following

E.E.C. Directives:
* 90/396 

(Gas Directive)

* 73/23 - 90/683 

(Low Voltage Directive);

* 93/68 

(General Directives);

* 89/336 

(Electromagnetical Compatibility

Directive)


.

and subsequent modifications

For the User

For the Installer

Contents

The following symbols will be found in the text to guide
you throughout the Instructions:

Safety Instructions

Step by step instructions for an

operation

Hints and Tips

Environmental information

Guide to Use the instructions

MANUFACTURER:

ELECTROLUX HOME PRODUCTS ITALY S.p.A.
Viale Bologna 298
47100 FORLI’ (Italia)

Important Safety Information

3

Description of the Appliance

5

Before the First Use

6

Using the Oven

6

Using the Gas Oven

7

Using the Gas Grill

8

Cleaning the Oven

9

Replacing the Oven Light

10

Something Not Working

10

Service and Spare Parts

11

Guarantee Conditions

12

Instructions for the Installer

13

Technical Data

13

Important Safety Requirements

13

Building in

13

Electrical Connection

15

Gas connection

16

Conversion from Natural to LPG Gas

17

Keep this instruction book for future reference

and ensure it is passed on to any new owner.

Содержание ESOGBR

Страница 1: ...GB Gas built in oven Models ESOGBR ESOGWH ESOGSS 35688 2801 Please read this instruction booklet before using the appliance INSTRUCTION BOOKLET ...

Страница 2: ......

Страница 3: ...ce sealed cans or aerosols inside the oven They may explode if they are heated Donothangtowels dishclothsorclothesfromtheoven or its handle Donotusethisovenifitisincontactwithwaterandnever operate it with wet hands Take great care when heating fats and oils as they will ignite if they become too hot Alwaysuseovenglovestoremoveandreplacefoodinthe oven Ensure that all control knobs are in the OFF po...

Страница 4: ... to Use the instructions MANUFACTURER ELECTROLUX HOME PRODUCTS ITALY S p A Viale Bologna 298 47100 FORLI Italia Important Safety Information 3 Description of the Appliance 5 Before the First Use 6 Using the Oven 6 Using the Gas Oven 7 Using the Gas Grill 8 Cleaning the Oven 9 Replacing the Oven Light 10 Something Not Working 10 Service and Spare Parts 11 Guarantee Conditions 12 Instructions for th...

Страница 5: ...kwise to the maximum time position then turn it back to the required time The minute minder will not affect in any way the oven operation if it is in use Mains on Light The mains on light will come on when the Gas Oven and Gas Grill Control Knob is set Description of the Appliance 1 Control panel 2 Minute Minder 3 Gas Oven and Gas Grill Control Knob 4 Mains on light 5 Gas Grill 6 Oven lamp 7 Ratin...

Страница 6: ...ed from the bottom of the oven as shown in the diagram It is important that these shelves are correctly positioned Attention Do not place objects directly on the ovenbaseanddonotcoveritwithaluminiumfoil while cooking as this could cause a heat build up which would affect the baking results and damage the oven enamel Always place pans heat resisting pans and aluminium foils on the grid which has be...

Страница 7: ...00 2 or 3 35 minutes BAKED 160 2 varies according to VEGETABLES the vegetable PASTRY Fruit Tart 175 2 35 minutes Fruit Pie 175 2 or 3 35 minutes Sausage Rolls 200 2 or 3 20 minutes Choux Pastry 190 2 or 3 25 30 minutes Vol au Vents 200 2 or 3 15 minutes Jam Tarts 200 2 or 3 10 15 minutes PUDDINGS Egg Custard in a Bain Marie 135 2 or 3 1 1 1 4 hours Pavlova 135 2 or 3 1 1 2 hours Meringues 135 2 or...

Страница 8: ...ed butter to keep them moist during cooking Accompaniments such as tomatoes and mushrooms may be placed underneath the grid when grilling meats When toasting bread we suggest that the top runner position is used with the grid in its high position The food should be turned over during cooking as required Bacon rashers 2 3 each side Beefburgers 6 10 each side Chicken joints 10 15 each side Chops 7 1...

Страница 9: ...e outer and inner door glass using warm soapy water Should the inner door glass become heavily soiled it is recommended that a cleaning product such as Hob Brite is used DO NOT clean the oven door while the glass panels are warm If this precaution is not observed the glass panel may shatter If the door glass panel becomes chipped or has deep scratches the glass will be weakened and must be replace...

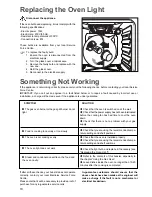
Страница 10: ...shelf positions Check the light bulb and replace it if necessary see Replacing the Oven Light Refer to the contents of this booklet especially to the chapter Using the Gas Oven Leave dishes inside the oven no longer than 15 20 minutes after the cooking is completed If after all these checks your hob still does not operate correctly contact your local Electrolux Service Force Centre Please note tha...

Страница 11: ...ails 1 Your name address and post code 2 Your telephone number 3 Clear and concise details of the fault 4 The model and serial number of the appliance found on the rating plate 5 The purchase date Service and Spare Parts For general enquiries concerning your Electrolux appliance or for further information on Electrolux products please contact our Customer Care Department by letter or telephone at ...

Страница 12: ...osts incurred for calls to put right an appliance which is improperly installed or calls to appliance outside the United Kingdom Appliances found to be in use within a commercial or similar environment plus those which are the subject to rental agreements Products of Electrolux manufacture which are not marketed by Electrolux European Guarantee If you should move to another country within Europe t...

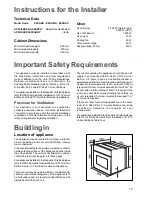
Страница 13: ... with BS 5440 Part 2 Current Edition All rooms require an openable window or equivalent and some rooms will require a permanent vent as well For room volumes up to 5m3 an air vent 100cm2 is required for room volumes between 5m3 and 10m3 an air vent with a minimum area of 50cm2 is required If the room has a door which opens directly to the outside no air vent is required For room volumes that excee...

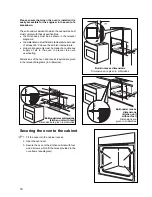
Страница 14: ...uous supply of air to the oven to prevent the oven overheating Dimensions of the oven and recess required are given in the relevant diagrams in millimetres 1 Fit the oven into the cabinet recess 2 Opentheovendoor 3 Secure the oven to the kitchen cabinet with four wood screws which fit the holes provided in the ovenframe seediagram Securing the oven to the cabinet Built in recess dimensions Dimensi...

Страница 15: ... RR F 13 A It is necessary that you install a double pole switch betweentheovenandtheelectricitysupply mains with aminimumgapof3mmbetweentheswitchcontactsand ofatypesuitablefortherequiredloadincompliancewith the current rules The switch must not break the yellow green earth wire at any point The earth wire should be 2 cm longer than the live and neutral wires Important After installation and conne...

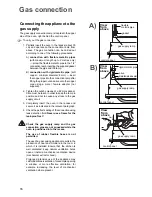
Страница 16: ...ss to the gas supply circuit 3 Completely insert the oven in the recess and secure it as indicated in the relevant paragraph 4 Check the perfect sealing of the connection using leak detection fluid Never use a flame for the leak proof test Check the gas supply ramp and the gas connection pipe are not squeezed while the oven is positioned into the recess The use of rubber flexible hoses is not perm...

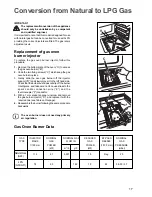
Страница 17: ...place 3 Gently slide the oven gas burner off the injector support D and slowly move it to the left hand side Check that the burner bush does not slip off the burner mouthpiece and take care not to cause stress to the spark candle connection wire E and the thermocouple F conductor 3 With a 7 mm socket spanner unscrew and remove the gas burner injector D and replace it with the required one see Tabl...

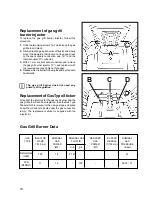
Страница 18: ...is page 4 Reassemble the burner following the same procedure backwards The gas grill burner does not need any primary air regulation GAS INJECTOR NOMINAL NOMINAL GAS REDUCED BY PASS NOMINAL TYPE MARK GAS FLOW IN GAS NEEDLE GAS 1 100 mm POWER POWER 1 100 mm PRESSURE kW m3 h g h kW mbar 098 1 9 0 181 20 71 1 9 138 28 30 37 Gas Grill Burner Data Natural Gas G20 LPG G30 G31 B C D ReplacementofGasTypeS...

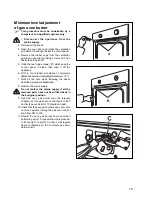
Страница 19: ...ed screwdriver completely tighten the minimum level adjustment screw C 7 Refit all the oven parts following the above described procedure backwards 8 Restore the mains supply Do not restore the mains supply if all the removed parts have not been fitted back in their original position 9 Light the oven gas burner see the relevant chapter set the gas oven control knob on 240 and let the oven heat for...

Страница 20: ...rld s No 1 choice The Electrolux Group is the world s largest producer of powered appliances for kitchen cleaning and outdoor use More than 55 Group products such as refrigerators cookers washing machines vacuum cleaners chain saws and lawn mowers are sold each year to a value of approx USD 14 billion in more than 150 countries around the world 09 04 ...

Отзывы: