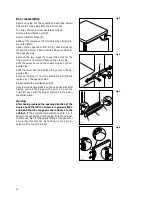
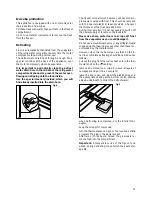
Electrolux ER 2821 B Скачать руководство пользователя страница 5

40

Door reversibility

Before carrying out the operations described below,
pull out the mains plug from the wall socket.

To carry out door reversal operate as follows:

Remove the ventilation grill (D);

Remove bottom hinge (E);

Slide out the lower door from middle hinge (H) and re-
move the latter;

Slide out the upper door from pin (5), unscrew the lat-
ter and then screw it down into the hinge provided on
the opposite side;

Remove the two plugs, to reveal the holes for the
hinge pivots, and remount them on the other side;

Refit the upper door and the middle hinge on the op-
posite side;

Refit the lower door and bottom hinge (E) on the op-
posite side.

Remove the plug (F) from the ventilation grill (D) and
replace it on the opposite side.

Re-assemble the ventilation grill (D).

Unscrew the handle. Refit it on the opposite side after
having pierced the plugs with a punch. Cover the
holes left open with the plugs contained in the docu-
mentation pack.

Warning:

After having reversed the opening direction of the
doors check that all the screws are properly tight-
ened and that the magnetic seal adheres to the
cabinet.
 If the ambient temperature is cold (i.e. in
Winter), the gasket may not fit perfectly to the cabinet.
In that case, wait for the natural fitting of the gasket or
accelerate this process by heating up the part in-
volved with a normal hairdrier.

Fig. 3

Fig. 4

Fig. 5

Fig. 6

5

D548

D405

H

E

F

D

D640 

F

F

F

PR228

Содержание ER 2821 B

Страница 1: ...N S T R U K C J A O B S L U G I R U K O V O D S T V O P O È K S P L U A T A C I I I N S T A L L A T I O N A N D I N S T R U C T I O N M A N U A L HUTO FAGYASZTÓSZEKRÉNY ER 2821 B CHLADNICKA MRAZÁK ER 2821 B CHLODZIARKO ZAMRAQARKA ER 2821 B HOLODILWNIK MOROZILWNIK ER 2821 B REFRIGERATOR FREEZER ER 2821 B 2222 251 09 ...

Страница 2: ...1 Operation Temperature adjustment page 41 N S knob page 41 Fresh food refrigeration page 41 Movable shelves page 42 Freezing fresh food page 42 Storage of frozen food page 42 Thawing page 42 Ice cube production page 43 Defrosting page 43 Maintenance page 44 Internal cleaning page 44 External cleaning page 44 Periods of non operation page 44 Interior light page 44 Customer service page 44 Printed ...

Страница 3: ...nstallation instructions ª Parts which heat up should not be exposed Wher ever possible the back of the appliance should be against a wall ª Before any cleaning or maintenance work is carried out be sure to switch off and unplug the appliance ª If the appliance is transported horizontally it is possible that the oil contained in the compressor flows in the refrigerant circuit It is advisable to wa...

Страница 4: ...head then re tighten the screws Fig 2 Electrical connection Before plugging in ensure that the voltage and fre quency shown on the serial number plate correspond to your domestic power supply Voltage can vary by 6 of the rated voltage For operation with different voltages a suitably sized auto transformer must be used The appliance must be earthed The power supply cable plug is provided with a con...

Страница 5: ...and bottom hinge E on the op posite side Remove the plug F from the ventilation grill D and replace it on the opposite side Re assemble the ventilation grill D Unscrew the handle Refit it on the opposite side after having pierced the plugs with a punch Cover the holes left open with the plugs contained in the docu mentation pack Warning After having reversed the opening direction of the doors chec...

Страница 6: ...the back wall of the refrig erator compartment In such a case it is necessary to set the thermostat on a lesser cold setting so as to en able automatic defrosting to take place and conse quently save electric energy N S knob For correct operation even at low ambient tempera tures the appliance is fitted with a special knob with control located on the control panel When the ambient temperature is b...

Страница 7: ... removal from the freezer compartment can possibly cause the skin to be freeze burnt it is advisable to show the freezing in date on each in dividual pack to enable you to keep tab of the storage time on the inner door or special card if supplied you will find sketches of various animals and food types to gether with the recommended storage time in months from the time of freezing do not put carbo...

Страница 8: ...hickness of the frost exceeds 4 mm During this operation it is not necessary to switch off the power supply or to remove the foodstuffs Never use sharp metal tools to scrape off frost from the evaporator as you could damage it Do not use a mechanical device or any artificial means to speed up the thawing process other than those rec ommended by the manufacturer However when the ice becomes very th...

Страница 9: ...nnect from the mains empty and clean leaving the door ajar to prevent unpleasant smells Interior light To access the bulb unscrew the screw depress the removable part with your fingers as shown in the fig ure and pull it out The rating is shown on the light bulb cover Fig 10 D196 CUSTOMER SERVICE What to do if the appliance is not function ing properly If something is not working properly check th...

Отзывы: