background image

7.1 

General warnings

CAUTION!

Unplug the appliance before

carrying out any maintenance

operation.

This appliance contains

hydrocarbons in its cooling

unit; maintenance and

recharging must therefore

only be carried out by

authorized technicians.

The accessories and parts of

the appliance are not suitable

for washing in a dishwasher.

7.2 

Initial power on

CAUTION!

Before inserting the power

plug in to the outlet and

switching on the cabinet for

the first time, leave the

appliance standing upright for

at least 4 hours. This will

assure a sufficient amount of

time for the oil to return to the

compressor. Otherwise the

compressor or electronic

components may sustain

damage.

7.3 

Cleaning the interior

Before using the appliance for the first

time, the interior and all internal

accessories should be washed with

lukewarm water and some neutral soap to

remove the typical smell of a brand-new

product, then dried thoroughly.

CAUTION!

Do not use detergents or

abrasive powders, as these

will damage the finish.

7.4 

Periodic cleaning

CAUTION!

Do not pull, move or damage

any pipes and/or cables

inside the cabinet.

CAUTION!

Take care of not to damage

the cooling system.

CAUTION!

When moving the cabinet, lift

it by the front edge to avoid

scratching the floor.

The equipment has to be cleaned

regularly:

1.

Clean the inside and accessories with

lukewarm water and some neutral

soap.

2.

Regularly check the door seals and

wipe clean to ensure they are clean

and free from debris.

3.

Rinse and dry thoroughly.

4.

If accessible, clean the condenser and

the compressor at the back of the

appliance with a brush. 

This operation will improve the

performance of the appliance and

save electricity consumption.

7.5 

Periods of non-operation

When the appliance is not in use for long

periods, take the following precautions:

1.

Disconnect the appliance from

electricity supply.

2.

Remove all food.

3.

Defrost (if necessary) and clean the

appliance and all accessories.

4.

Clean the appliance and all

accessories.

5.

Leave the door/doors open to prevent

unpleasant smells.

WARNING!

If the cabinet will be kept on,

ask somebody to check it

once in a while to prevent the

food inside from spoiling in

case of a power failure.

7.6 

Defrosting of the refrigerator

Frost is automatically eliminated from the

evaporator of the refrigerator

compartment every time the motor

compressor stops, during normal use. The

defrost water drains out through a trough

into a special container at the back of the

www.electrolux.com

30

Содержание EN3611OOW

Страница 1: ...EN3611OOW EN3611OOX NL KOEL VRIESCOMBINATIE GEBRUIKSAANWIJZING 2 EN FRIDGE FREEZER USER MANUAL 21 FR RÉFRIGÉRATEUR CONGÉLATEUR NOTICE D UTILISATION 38 DE KÜHL GEFRIERSCHRANK BENUTZERINFORMATION 57 ...

Страница 2: ...r fantastische resultaten zult krijgen Welkom bij Electrolux Ga naar onze website voor Advies over gebruik brochures het oplossen van problemen en onderhoudsinformatie www electrolux com Registreer uw product voor een betere service www registerelectrolux com Koop accessoires verbruiksartikelen en originele reserveonderdelen voor uw apparaat www electrolux com shop KLANTENSERVICE Gebruik altijd or...

Страница 3: ... begrijpen Laat kinderen niet met het apparaat spelen Reiniging en onderhoud mag niet worden uitgevoerd door kinderen zonder toezicht Houd alle verpakkingsmaterialen uit de buurt van kinderen 1 2 Algemene veiligheid Dit apparaat is bedoeld voor huishoudelijk gebruik of gelijksoortige toepassingen zoals boerderijen personeelskeukens in winkels kantoren of andere werkomgevingen Door gasten in hotels...

Страница 4: ...abijheid van radiators fornuizen ovens of kookplaten De achterzijde van het apparaat moet tegen de muur worden geplaatst Installeer het apparaat niet op een plaats met direct zonlicht Gebruik dit apparaat niet in gebieden die te vochtig of te koud zijn zoals bijgebouwen garages of kelders Til de voorkant van het apparaat op als u hem wilt verplaatsen om krassen op de vloer te voorkomen 2 2 Aanslui...

Страница 5: ...e voedingswaren nooit opnieuw in Bewaar de voedingswaren volgens de instructies op de verpakking 2 4 Binnenverlichting Het type lampje gebruikt voor dit apparaat is niet geschikt voor de verlichting van huishoudelijke ruimten 2 5 Onderhoud en reiniging WAARSCHUWING Gevaar voor letsel of schade aan het apparaat Schakel het apparaat uit en trek de stekker uit het stopcontact voordat u onderhoudshand...

Страница 6: ...NG 4 1 Inschakelen Steek de stekker in het stopcontact Draai de thermostaatknop op een gemiddelde stand 4 2 Uitschakelen Draai de temperatuurknop op de stand O om het apparaat uit te schakelen 4 3 Temperatuurregeling De temperatuur wordt automatisch geregeld Ga als volgt te werk om het apparaat in werking te stellen zet de temperatuurknop op een lagere stand om de minimale koelte te verkrijgen www...

Страница 7: ...onditie komt de temperatuur in het koelkastgedeelte mogelijk onder de 0 C Als dit het geval is stelt u de thermostaatknop weer in op een warmere instelling Plaats het verse in te vriezen voedsel in het onderste vak De maximale hoeveelheid voedsel die in 24 uur ingevroren kan worden staat vermeld op het typeplaatje een etiket dat zich aan de binnenkant van het apparaat bevindt Het invriesproces duu...

Страница 8: ...ratuurlampje het bericht OK weergeeft Juiste temperatuur OK Indien OK niet wordt weergegeven stel dan de temperatuur in op een lagere temperatuur en wacht 12 uur alvorens de temperatuur nogmaals te controleren Thermostaat moet bijgesteld worden Het is normaal dat het bericht OK verdwijnt nadat u voedsel in het apparaat geplaatst hebt of na herhaaldelijk openen van de deur 5 5 FREESTORE functie Met...

Страница 9: ...oorgeplaatste schap Plaats alleen dichte flessen 5 9 Koude accumulators De vriezer is uitgerust met minstens een koude accumulator die de bewaartijd verlengt in geval van een stroomonderbreking of stroomuitval 5 10 Vriesmandjes uit de vriezer verwijderen De vriesmandjes hebben een limietstop om te voorkomen dat ze per ongeluk verschuiven of vallen Trek de korf naar u toe om het uit de vriezer te h...

Страница 10: ...en in de speciaal daarvoor bedoelde lade n geplaatst worden Boter en kaas dit moet in speciale luchtdichte bakjes gelegd of in aluminiumfolie of plastic zakjes gewikkeld worden om zoveel mogelijk lucht in te sluiten Flessen deze moeten een dop hebben en opgeslagen worden oftewel in het flessenrek of het deurflessenrek indien voorzien Bananen aardappelen uien en knoflook indien niet verpakt mogen n...

Страница 11: ...n afwasmachine gewassen te worden 7 2 Eerste inschakeling LET OP Laat voordat u de stekker in het stopcontact steekt en de koelkast voor de eerste keer aanzer het apparaat eerst minimaal 4 uur rechtop staan De olie heeft dan genoeg tijd om terug te keren naar de compressor Anders kunnen de compressor of de elektronische onderdelen beschadigd raken 7 3 De binnenkant schoonmaken Voordat u het appara...

Страница 12: ...a een gootje in een speciale opvangbak aan de achterkant van het apparaat boven de compressormotor waar het verdampt Het is belangrijk om het afvoergaatje van het dooiwater in het midden van het koelvak regelmatig schoon te maken om te voorkomen dat het water overloopt en op het voedsel in de koelkast gaat druppelen 7 7 De vriezer ontdooien LET OP Gebruik nooit scherpe metalen hulpmiddelen om de r...

Страница 13: ...e voedsel terug in het vriesvak 8 PROBLEEMOPLOSSING WAARSCHUWING Raadpleeg de hoofdstukken Veiligheid 8 1 Wat moet u doen als Probleem Mogelijke oorzaak Oplossing Het apparaat werkt niet Het apparaat is uitge schakeld Zet het apparaat aan De stekker zit niet goed in het stopcontact Steek de stekker goed in het stopcontact Er staat geen spanning op het stopcontact Sluit een ander elektrisch ap para...

Страница 14: ...aterafvoer is ver stopt Reinig de waterafvoer Producten verhinderen dat het water in de water opvangbak loopt Zorg ervoor dat de producten de achterwand niet raken Er ligt water op de vloer De dooiwaterafvoer is niet aangesloten op de ver damperbak boven de compressor Maak de dooiwaterafvoer vast op de verdamperbak De deur is verkeerd uitge lijnd of komt tegen het ven tilatierooster aan Het appara...

Страница 15: ...transparante deksel zachtjes omhoog en omlaag en haak deze los in de richting van de pijlen 1 1 2 2 Vervang het kapotte lampje door een nieuw lampje met hetzelfde vermogen en vorm dat specifiek bedoeld is voor huishoudelijke apparaten het maximale vermogen wordt getoond op de afdekking van het lampje 3 Plaats de afdekking van het lampje terug 4 Steek de stekker in het stopcontact 5 Open de deur Co...

Страница 16: ...wandkast zetten De afstelbare voetjes aan de onderkant van het apparaat garanderen een nauwkeurig horizontale uitlijning A B 100 mm min 20 mm LET OP Om een goede werking te garanderen bij omgevingstemperaturen van meer dan 38 C raden we aan om een afstand van 30 mm rond de zijkanten van het apparaat te handhaven 9 3 Aansluiting op het elektriciteitsnet Zorg er vóór het aansluiten voor dat het volt...

Страница 17: ...ven van het bovenste scharnier 1 los 2 1 3 Verwijder de deur van de draaipen van het middelste scharnier 2 4 Plaats de deksel van het bovenste scharnier in de gaten aan de tegenoverliggende zijde 5 Draai de schroeven van het middelste scharnier los 3 6 Verwijder de pluggen aan de bovenzijde van beide deuren en verplaats deze naar de andere kant 7 Verwijder de onderkant van de deur van de draaipen ...

Страница 18: ... de draaipen van het onderste scharnier 9 13 Schroef de middelste afdekpluggen los en schroef ze in het gat aan de andere zijde 10 14 Plaats het middelste scharnier aan de andere zijde en maak het vast d m v de schroeven 11 10 9 180 o 11 15 Plaats de bovenkant van de deur op de draaipen van het middelste scharnier 12 16 Bevestig de deur aan het bovenste scharnier en maak vast d m v de schroeven 13...

Страница 19: ...irichting van de deuren op uw kosten veranderen 10 TECHNISCHE INFORMATIE 10 1 Technische gegevens Hoogte mm 1845 Breedte mm 595 Diepte mm 642 Maximale bewaartijd bij stroomuitval uur 30 Spanning Volt 230 240 Frequentie Hz 50 De technische gegevens staan op het typeplaatje aan de bonne of buitenkant van het apparaat en op het energielabel 11 MILIEUBESCHERMING Recycle de materialen met het symbool G...

Страница 20: ...milieustation bij u in de buurt of neem contact op met de gemeente www electrolux com 20 ...

Страница 21: ...wledge that you ll get great results every time Welcome to Electrolux Visit our website for Get usage advice brochures trouble shooter service information www electrolux com Register your product for better service www registerelectrolux com Buy Accessories Consumables and Original spare parts for your appliance www electrolux com shop CUSTOMER CARE AND SERVICE Always use original spare parts When...

Страница 22: ...g and user maintenance shall not be made by children without supervision Keep all packaging away from children 1 2 General Safety This appliance is intended to be used in household and similar applications such as Farm houses staff kitchen areas in shops offices and other working environments By clients in hotels motels bed and breakfast and other residential type environments Keep ventilation ope...

Страница 23: ...olds such as the construction appendices garages or wine cellars When you move the appliance lift it by the front edge to avoid scratching the floor 2 2 Electrical connection WARNING Risk of fire and electrical shock The appliance must be earthed Make sure that the electrical information on the rating plate agrees with the power supply If not contact an electrician Always use a correctly installed...

Страница 24: ...mination 2 5 Care and cleaning WARNING Risk of injury or damage to the appliance Before maintenance deactivate the appliance and disconnect the mains plug from the mains socket This appliance contains hydrocarbons in the cooling unit Only a qualified person must do the maintenance and the recharging of the unit Regularly examine the drain of the appliance and if necessary clean it If the drain is ...

Страница 25: ...4 1 Switching on Insert the electrical plug into a wall socket Turn the temperature regulator clockwise to a medium setting 4 2 Switching off To turn off the appliance turn the temperature regulator to the O position 4 3 Temperature regulation The temperature is automatically regulated To operate the appliance proceed as follows turn the Temperature regulator towards lower settings to obtain the m...

Страница 26: ... food that can be frozen in 24 hours is specified on the rating plate a label located on the inside of the appliance The freezing process lasts 24 hours during this period do not add other food to be frozen 5 2 Storage of frozen food When first starting up or after a period out of use before putting the products in the compartment let the appliance run at least 2 hours The freezer drawers ensure t...

Страница 27: ...OK message to disappear 5 5 FREESTORE function The FREESTORE function let food cool quickly and a more uniform temperature in the compartment Switch on the FREESTORE function when the ambient temperature exceeds 25 C Press the switch A to switch on the FREESTORE The green light B comes on A B 5 6 Positioning the door shelves To permit storage of food packages of various sizes the door shelves can ...

Страница 28: ...ards yourself and upon reaching the end point remove the basket by tilting its front upwards 2 1 At the time of putting it back slightly lift the front of the basket to insert it into the freezer Once you are over the end points push the baskets back in their position 6 HINTS AND TIPS 6 1 Normal operating sounds The following sounds are normal during operation A faint gurgling and bubbling sound f...

Страница 29: ...food which can be frozen in 24 hrs is shown on the rating plate the freezing process takes 24 hours No further food to be frozen should be added during this period freeze only top quality fresh and thoroughly cleaned foodstuffs prepare food in small portions to enable it to be rapidly and completely frozen and to make it possible subsequently to thaw only the quantity required wrap up the food in ...

Страница 30: ...amage the cooling system CAUTION When moving the cabinet lift it by the front edge to avoid scratching the floor The equipment has to be cleaned regularly 1 Clean the inside and accessories with lukewarm water and some neutral soap 2 Regularly check the door seals and wipe clean to ensure they are clean and free from debris 3 Rinse and dry thoroughly 4 If accessible clean the condenser and the com...

Страница 31: ...s form on the freezer shelves and around the top compartment Defrost the freezer when the frost layer reaches a thickness of about 3 5 mm 1 Switch off the appliance or pull out electrical plug from the wall socket 2 Remove any stored food wrap it in several layers of newspaper and put it in a cool place WARNING Do not touch frozen goods with wet hands Hands can freeze to the goods 3 Leave the door...

Страница 32: ...t incor rectly Refer to Operation chapter Many food products were put in at the same time Wait some hours and then check the temperature again The room temperature is too high Refer to climate class chart on the rating plate Food products placed in the appliance were too warm Allow food products to cool to room temperature before storing The door is not closed correctly Refer to Closing the door T...

Страница 33: ...efrost the appliance The door has been opened often Open the door only if neces sary There is no cold air circu lation in the appliance Make sure that there is cold air circulation in the appli ance If the advice does not lead to the desired result contact the nearest Authorised Service Centre 8 2 Closing the door 1 Clean the door gaskets 2 If necessary adjust the door Refer to Installation 3 If n...

Страница 34: ...nd the back of the cabinet To ensure best performance if the appliance is positioned below an overhanging wall unit the minimum distance between the top of the cabinet and the wall unit must be at least 100 mm Ideally however the appliance should not be positioned below overhanging wall units Accurate levelling is ensured by one or more adjustable feet at the base of the cabinet A B 100 mm min 20 ...

Страница 35: ... the doors of the appliance during the operations 1 Open the door and empty the shelves 2 Unscrew the screws of the upper hinge 1 2 1 3 Remove the door from the middle hinge pivot 2 4 Place the cover of the upper hinge into the holes on the opposite side 5 Screw off the screws of the middle hinge 3 6 Remove the plugs on the upper side of both doors and move them to the other side 7 Remove the lowe...

Страница 36: ...ace the lower door on the lower hinge pivot 9 13 Screw off the middle cover plugs and screw them into the hole on the opposite side 10 14 Put the middle hinge on the opposite side and fix it with the screws 11 10 9 180 o 11 15 Place the upper door on the middle hinge pivot 12 16 Fix the door with upper hinge and fix it with screws of it 13 12 13 17 Attach the door handles and plugs on the opposite...

Страница 37: ...at your cost 10 TECHNICAL INFORMATION 10 1 Technical data Height mm 1845 Width mm 595 Depth mm 642 Rising time Hours 30 Voltage Volts 230 240 Frequency Hz 50 The technical information are situated in the rating plate on the external or internal side of the appliance and in the energy label 11 ENVIRONMENT CONCERNS Recycle the materials with the symbol Put the packaging in applicable containers to r...

Страница 38: ...faction Bienvenue chez Electrolux Visitez notre site Internet pour Obtenir des conseils d utilisation des brochures de l aide des informations www electrolux com Enregistrer votre produit pour obtenir un meilleur service www registerelectrolux com Acheter des accessoires consommables et pièces de rechange d origine pour votre appareil www electrolux com shop SERVICE APRÈS VENTE N utilisez que des ...

Страница 39: ...urité leur ont été données et si les risques encourus ont été appréhendées Les enfants ne doivent pas jouer avec l appareil Le nettoyage et l entretien par l usager ne doivent pas être effectués par des enfants sans surveillance Ne laissez pas les emballages à la portée des enfants 1 2 Consignes générales de sécurité Cet appareil est conçu uniquement pour un usage domestique et des utilisations te...

Страница 40: ...areil endommagé Suivez scrupuleusement les instructions d installation fournies avec l appareil Soyez toujours vigilants lorsque vous déplacez l appareil car il est lourd Portez toujours des gants de sécurité Assurez vous que l air circule autour de l appareil Attendez au moins 4 heures avant de brancher l appareil sur le secteur Cela permet à l huile de refouler dans le compresseur N installez pa...

Страница 41: ...lateur Cela engendrerait une pression sur le récipient de la boisson Ne stockez jamais de gaz ou de liquide inflammable dans l appareil Ne placez pas de produits inflammables ou d éléments imbibés de produits inflammables à l intérieur ou à proximité de l appareil ni sur celui ci Ne touchez pas le compresseur ni le condenseur Ils sont chauds Ne retirez pas et ne touchez pas les éléments du compart...

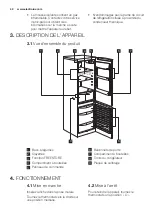
Страница 42: ...EIL 3 1 Vue d ensemble du produit 7 6 8 9 1 2 5 4 3 1 Bacs à légumes 2 Clayettes 3 Fonction FREESTORE 4 Compartiment à bouteilles 5 Panneau de commande 6 Balconnets de porte 7 Compartiment à bouteilles 8 Tiroirs du congélateur 9 Plaque de calibrage 4 FONCTIONNEMENT 4 1 Mise en marche Insérez la fiche dans la prise murale Tournez le thermostat vers la droite sur une position médiane 4 2 Mise à l ar...

Страница 43: ...lés ou surgelés Pour congeler des aliments frais il n est pas nécessaire de modifier le réglage moyen Toutefois pour une congélation plus rapide tournez le thermostat sur la position maximale pour obtenir plus de froid Dans ce cas la température du compartiment réfrigérateur est susceptible de descendre en dessous de 0 C Si cela se produit repositionnez le thermostat sur une position inférieure po...

Страница 44: ...frigérateur La zone la plus froide s étend de la clayette en verre du bac à fruits et légumes au symbole ou à la clayette positionnée à la même hauteur que le symbole Pour un bon stockage des aliments assurez vous que l indicateur de température affiche OK Température correcte OK Si OK n est pas affiché réglez le thermostat sur une température inférieure et attendez 12 heures avant de vérifier à n...

Страница 45: ...erre située au dessus du bac à légumes afin de garantir une circulation d air optimale 5 8 Compartiment à bouteilles Placez les bouteilles ouverture vers l avant sur la clayette prévue à cet effet Placez y uniquement des bouteilles fermées 5 9 Accumulateurs de froid Le congélateur est équipé d au moins un accumulateur de froid qui permet d augmenter l autonomie de conservation de votre appareil en...

Страница 46: ...teur couvrez ou enveloppez soigneusement les aliments surtout s ils sont aromatiques placez correctement les aliments pour que l air puisse circuler librement autour 6 4 Conseils pour la réfrigération Conseil utiles Viande tous types de viande enveloppez la dans des sachets en plastique et placez la sur la clayette en verre au dessus du bac à légumes Pour des raisons de sécurité ne la conservez de...

Страница 47: ...nts surgelés Pour obtenir les meilleures performances possibles assurez vous que les denrées surgelées achetées dans le commerce ont été correctement entreposées par le revendeur prévoyez un temps réduit au minimum pour le transport des denrées du magasin d alimentation à votre domicile évitez d ouvrir trop souvent la porte du congélateur et ne la laissez ouverte que le temps nécessaire une fois d...

Страница 48: ...es de l appareil et permet des économies d électricité 7 5 En cas de non utilisation prolongée Si l appareil n est pas utilisé pendant de longues périodes prenez les précautions suivantes 1 Débranchez l appareil de l alimentation électrique 2 Retirez tous les aliments 3 Dégivrez si nécessaire et nettoyez l appareil ainsi que tous les accessoires 4 Nettoyez l appareil et tous les accessoires 5 Lais...

Страница 49: ...eur 2 Sortez les denrées congelées enveloppez les dans plusieurs feuilles de papier journal et conservez les dans un endroit frais AVERTISSEMENT Ne touchez pas les produits congelés et les surfaces givrées avec les mains humides Risque de brûlures ou d arrachement de la peau 3 Maintenez la porte ouverte et utilisez la spatule en plastique comme gouttière en l insérant dans l emplacement prévu à ce...

Страница 50: ...re Reportez vous au chapitre Fonctionnement Trop de produits ont été introduits simultanément Attendez quelques heures et vérifiez de nouveau la tempér ature La température ambiante est trop élevée Reportez vous au tableau des classes climatiques de la plaque signalétique Les aliments introduits dans l appareil étaient trop chauds Laissez refroidir les aliments à température ambiante avant de les ...

Страница 51: ...aliments refroidir à température ambiante avant de les placer dans l appareil Trop de produits ont été introduits simultanément Introduisez moins de produits en même temps L épaisseur de givre est supérieure à 4 5 mm Dégivrez l appareil La porte a été ouverte trop souvent N ouvrez la porte qu en cas de nécessité L air froid ne circule pas dans l appareil Assurez vous que de l air froid circule dan...

Страница 52: ...rtains types de modèles fonctionnant hors de cette plage de températures Seul le respect de la plage de températures spécifiée peut garantir un bon fonctionnement de l appareil En cas de doute concernant l emplacement d installation de l appareil veuillez contacter le vendeur notre service après vente ou le centre de maintenance le plus proche 9 2 Emplacement L appareil doit pouvoir être débranché...

Страница 53: ...ant n est pas mise à la terre branchez l appareil à une mise à la terre séparée conformément aux réglementations en vigueur en consultant un électricien spécialisé Le fabricant décline toute responsabilité en cas de non respect de ces consignes de sécurité Cet appareil est conforme aux directives CEE 9 4 Mise de niveau Lorsque vous installez l appareil veillez à le placer de niveau Servez vous des...

Страница 54: ...rnière inférieure 5 et vissez le gond de la charnière inférieure 6 dans l orifice gauche de la charnière inférieure 5 6 9 Dévissez les vis de la charnière inférieure et retirez la charnière 8 10 Dévissez les caches inférieurs et vissez les dans les orifices du côté opposé 7 11 Placez la charnière inférieure du côté opposé et vissez la 8 7 8 12 Placez la porte inférieure sur le gond de la charnière...

Страница 55: ...es Le joint magnétique adhère bien à l appareil La porte s ouvre et se ferme correctement Si la température ambiante est basse par exemple en hiver il se peut que le joint n adhère pas parfaitement Dans ce cas attendez que le joint reprenne sa taille naturelle Si vous ne voulez pas effectuer personnellement les opérations décrites ci dessus contactez le service après vente agréé le plus proche Un ...

Страница 56: ... appareil et sur l étiquette énergétique 11 EN MATIÈRE DE PROTECTION DE L ENVIRONNEMENT Recyclez les matériaux portant le symbole Déposez les emballages dans les conteneurs prévus à cet effet Contribuez à la protection de l environnement et à votre sécurité recyclez vos produits électriques et électroniques Ne jetez pas les appareils portant le symbole avec les ordures ménagères Emmenez un tel pro...

Страница 57: ...sse erzielen werden Willkommen bei Electrolux Besuchen Sie uns auf unserer Website um Anwendungshinweise Prospekte Fehlerbehebungs und Service Informationen zu erhalten www electrolux com Ihr erworbenes Produkt zu registrieren um den besten Service dafür zu gewährleisten www registerelectrolux com Zubehör Verbrauchsmaterial und Original Ersatzteile für Ihr Gerät zu erwerben www electrolux com shop...

Страница 58: ...eräts eingewiesen wurden und die mit dem Gerät verbundenen Gefahren verstanden haben Kinder dürfen nicht mit dem Gerät spielen Wartung oder Reinigung des Geräts dürfen nicht von Kindern ohne Aufsicht erfolgen Alle Verpackungsmaterialien von Kindern fernhalten 1 2 Allgemeine Sicherheit Dieses Gerät ist für die Verwendung im Haushalt und ähnliche Zwecke vorgesehen wie z B Bauernhöfe Personalküchenbe...

Страница 59: ...lten Sie sich an die mitgelieferte Montageanleitung Seien Sie beim Umsetzen des Geräts vorsichtig denn es ist schwer Tragen Sie stets Sicherheitshandschuhe Stellen Sie sicher dass die Luft um das Gerät zirkulieren kann Warten Sie mindestens 4 Stunden bevor Sie das Gerät an das Stromnetz anschließen Dies ist erforderlich damit das Öl in den Kompressor zurückfließen kann Stellen Sie das Gerät nicht ...

Страница 60: ... keine heißen Gegenstände auf die Kunststoffteile des Geräts Legen Sie Erfrischungsgetränke nicht in das Gefrierfach Dadurch entsteht Druck auf den Getränkebehälter Bewahren Sie keine entzündbaren Gase und Flüssigkeiten im Gerät auf Platzieren Sie keine entflammbaren Produkte oder Gegenstände die mit entflammbaren Produkten benetzt sind im Gerät auf dem Gerät oder in der Nähe des Geräts Berühren S...

Страница 61: ...Gas Für Informationen zur korrekten Entsorgung des Gerätes wenden Sie sich an Ihre kommunale Behörde Achten Sie darauf dass die Kühleinheit in der Nähe des Wärmetauschers nicht beschädigt wird 3 GERÄTEBESCHREIBUNG 3 1 Geräteübersicht 7 6 8 9 1 2 5 4 3 1 Obst und Gemüseschubladen 2 Geräteablagen 3 Funktion FREESTORE 4 Flaschenhalter 5 Bedienfeld 6 Türablagen 7 Flaschenablage 8 Gefrierschubladen 9 T...

Страница 62: ...erndem Betrieb des Geräts an der Rückwand zu Reifbildung kommen In diesem Fall muss eine höhere Temperatur gewählt werden die ein automatisches Abtauen ermöglicht und damit auch einen niedrigeren Energieverbrauch 5 TÄGLICHER GEBRAUCH 5 1 Einfrieren frischer Lebensmittel Der Gefrierraum eignet sich zum Einfrieren von frischen Lebensmitteln und zum längerfristigen Lagern von bereits gefrorenen und t...

Страница 63: ...friergutteile können sogar direkt aus dem Gefriergerät entnommen und anschließend sofort gekocht werden In diesem Fall dauert der Garvorgang allerdings etwas länger 5 4 Temperaturanzeige Um Ihnen bei der Kontrolle Ihres Geräts zu helfen ist der Kühlraum mit einer Temperaturanzeige ausgestattet Das Symbol daneben zeigt den kältesten Bereich im Kühlraum an Der kälteste Bereich liegt zwischen der Gla...

Страница 64: ...ks sind mit einer Anzahl von Führungsschienen ausgestattet die verschiedene Möglichkeiten für das Einsetzen der Ablagen bieten Einige Ablagen müssen zum Herausnehmen an der hinteren Kante angehoben werden Die Glasablage über der Gemüseschublade sollte jedoch nicht verstellt werden um eine korrekte Luftzirkulation zu gewährleisten 5 8 Flaschenhalter Im voreingestellten Flaschenhalter können Flasche...

Страница 65: ...urren und ein pulsierendes Geräusch vom Kompressor wenn das Kältemittel durch die Leitungen gepumpt wird Ein plötzliches Knackgeräusch aus dem Geräteinneren verursacht durch thermische Ausdehnung eine natürliche und nicht gefährliche physikalische Erscheinung Leises Klicken des Temperaturreglers wenn sich der Kompressor ein oder ausschaltet 6 2 Energiespartipps Öffnen Sie die Tür nicht zu häufig u...

Страница 66: ...efrieren und Sie später nur die Menge auftauen müssen die Sie benötigen Verpacken Sie die einzufrierenden Lebensmittelportionen stets luftdicht in Alufolie oder in Gefrierbeuteln und achten Sie darauf dass die Verpackung so wenig Luft wie möglich enthält Achten Sie beim Hineinlegen von frischen noch ungefrorenen Lebensmitteln darauf dass sie keinen Kontakt mit Gefriergut bekommen da dieses sonst a...

Страница 67: ... lauwarmem Wasser und einer neutralen Seife Sorgfältig nachtrocknen ACHTUNG Verwenden Sie keine Reinigungsmittel oder Scheuerpulver da diese die Oberfläche beschädigen 7 4 Regelmäßige Reinigung ACHTUNG Ziehen Sie nicht an Leitungen und oder Kabeln im Innern des Geräts und achten Sie darauf diese nicht zu verschieben oder zu beschädigen ACHTUNG Bitte achten Sie darauf das Kühlsystem nicht zu beschä...

Страница 68: ...elagerten Lebensmittel tropft 7 7 Abtauen des Gefriergeräts ACHTUNG Entfernen Sie Reif und Eis vom Verdampfer niemals mit scharfen metallischen Gegenständen da dieser dadurch beschädigt werden könnte Versuchen Sie nicht den Abtauvorgang durch andere als vom Hersteller empfohlene mechanische oder sonstige Hilfsmittel zu beschleunigen Ein Temperaturanstieg des Gefrierguts während des Abtauens des Ge...

Страница 69: ...ten Sie das Gerät ein Der Netzstecker wurde nicht richtig in die Steck dose gesteckt Stecken Sie den Netzstecker richtig in die Steckdose Es liegt keine Spannung an der Steckdose an Testen Sie ob ein anderes Gerät an dieser Steckdose funktioniert Wenden Sie sich an eine Elektrofachkraft Das Gerät erzeugt Geräu sche Das Gerät ist nicht ord nungsgemäß aufgestellt Kontrollieren Sie ob das Ger ät stab...

Страница 70: ...der Verdampfer schale über dem Kom pressor verbunden Befestigen Sie den Tauwas serablauf an der Verdampfer schale Die Tür ist nicht richtig aus gerichtet oder berührt das Belüftungsgitter Das Gerät ist nicht aus gerichtet Siehe hierzu Ausrichten des Gerätes Die Temperatur im Gerät ist zu hoch niedrig Der Temperaturregler ist nicht richtig eingestellt Stellen Sie eine höhere niedri gere Temperatur ...

Страница 71: ...ximal erlaubte Leistung finden Sie auf der Lampenabdeckung 3 Bringen Sie die Lampenabdeckung wieder an 4 Stecken Sie den Netzstecker in die Steckdose 5 Öffnen Sie die Tür Prüfen Sie ob die Lampe brennt 9 MONTAGE WARNUNG Siehe Kapitel Sicherheitshinweise 9 1 Standort Installieren Sie dieses Gerät in einem trockenen gut belüfteten Raum in dem die Umgebungstemperatur mit der Klimaklasse übereinstimmt...

Страница 72: ...olgen A B 100 mm min 20 mm ACHTUNG Um einen einwandfreien Betrieb bei Umgebungstemperaturen über 38 C zu gewährleisten muss zwischen den Geräteseiten und den angrenzenden Küchenmöbeln ein Abstand von 30 mm eingehalten werden 9 3 Elektrischer Anschluss Kontrollieren Sie vor der ersten Benutzung des Geräts ob die Netzspannung und frequenz Ihres Hausanschlusses mit den auf dem Typenschild angegebenen...

Страница 73: ...genüberliegenden Seite 5 Lösen Sie die Schrauben des mittleren Türscharniers 3 6 Entfernen Sie die Kappen an der Oberseite beider Türen und befestigen Sie diese an der anderen Seite 7 Entfernen Sie die untere Tür aus dem Stift des unteren Scharniers 4 4 3 8 Schrauben Sie den Stift des unteren Scharniers 5 ab und schrauben Sie den Stift des unteren Scharniers 6 in das linke Loch des unteren Scharni...

Страница 74: ...zen Sie das mittlere Scharnier an der gegenüberliegenden Seite an und befestigen Sie es mit den Schrauben 11 10 9 180 o 11 15 Setzen Sie die obere Tür auf den Stift 12 des mittleren Scharniers 16 Befestigen Sie die Tür am oberen Scharnier und schrauben Sie sie mit den Schrauben 13 fest 12 13 17 Bringen Sie die Türgriffe und Abdeckungen an der gegenüberliegenden Seite an A A C C B B www electrolux ...

Страница 75: ...urchführen möchten Ein autorisierter Kundendiensttechniker wird die Türen dann auf Ihre Kosten umbauen 10 TECHNISCHE DATEN 10 1 Technische Daten Höhe mm 1845 Breite mm 595 Tiefe mm 642 Lagerzeit bei Störung Stunden 30 Spannung Volt 230 240 Frequenz Hz 50 Die technischen Daten befinden sich auf dem Typenschild auf der Außen oder Innenseite des Geräts sowie auf der Energieplakette 11 UMWELTTIPPS Rec...

Страница 76: ...Ihrer örtlichen Sammelstelle oder wenden Sie sich an Ihr Gemeindeamt www electrolux com 76 ...

Страница 77: ...DEUTSCH 77 ...

Страница 78: ...www electrolux com 78 ...

Страница 79: ...DEUTSCH 79 ...

Страница 80: ...www electrolux com shop 280154066 A 282014 ...

Отзывы: