background image

• Do not pull the mains cable to

disconnect the appliance. Always pull

the mains plug.

• Use only correct isolation devices: line

protecting cut-outs, fuses (screw type

fuses removed from the holder), earth

leakage trips and contactors.

• The electrical installation must have an

isolation device which lets you

disconnect the appliance from the

mains at all poles. The isolation device

must have a contact opening width of

minimum 3 mm.

• This appliance complies with the E.E.C.

Directives.

2.3 

Use

WARNING!

Risk of injury, burns and

electrical shock or explosion.

• Use this appliance in a household only.

• Do not change the specification of this

appliance.

• Make sure that the ventilation openings

are not blocked.

• Do not let the appliance stay

unattended during operation.

• Deactivate the appliance after each

use.

• Be careful when you open the

appliance door while the appliance is in

operation. Hot air can release.

• Do not operate the appliance with wet

hands or when it has contact with

water.

• Do not apply pressure on the open

door.

• Do not use the appliance as a work

surface or as a storage surface.

• Open the appliance door carefully. The

use of ingredients with alcohol can

cause a mixture of alcohol and air.

• Do not let sparks or open flames to

come in contact with the appliance

when you open the door.

• Do not put flammable products or

items that are wet with flammable

products in, near or on the appliance.

WARNING!

Risk of damage to the

appliance.

• To prevent damage or discoloration to

the enamel:

– do not put ovenware or other

objects in the appliance directly on

the bottom.

– do not put aluminium foil directly

on the bottom of the appliance.

– do not put water directly into the

hot appliance.

– do not keep moist dishes and food

in the appliance after you finish the

cooking.

– be careful when you remove or

install the accessories.

• Discoloration of the enamel has no

effect on the performance of the

appliance. It is not a defect in the

sense of the warranty law.

• Use a deep pan for moist cakes. Fruit

juices cause stains that can be

permanent.

• This appliance is for cooking purposes

only. It must not be used for other

purposes, for example room heating.

• Always cook with the oven door

closed.

2.4 

Care and cleaning

WARNING!

Risk of injury, fire, or damage

to the appliance.

• Before maintenance, deactivate the

appliance and disconnect the mains

plug from the mains socket.

• Make sure the appliance is cold. There

is the risk that the glass panels can

break.

• Replace immediately the door glass

panels when they are damaged.

Contact the Service.

• Be careful when you remove the door

from the appliance. The door is heavy!

• Clean regularly the appliance to

prevent the deterioration of the surface

material.

• Remaining fat or food in the appliance

can cause fire.

• Clean the appliance with a moist soft

cloth. Only use neutral detergents. Do

not use abrasive products, abrasive

cleaning pads, solvents or metal

objects.

• If you use an oven spray, obey the

safety instructions on the packaging.

ENGLISH

5

Содержание EBL80

Страница 1: ...EBL80 EN OVEN USER MANUAL ...

Страница 2: ... you use it you can be safe in the knowledge that you ll get great results every time Welcome to Electrolux Visit our website for Get usage advice brochures trouble shooter service information www electrolux com Register your product for better service www registerelectrolux com Buy Accessories Consumables and Original spare parts for your appliance www electrolux com shop CUSTOMER CARE AND SERVIC...

Страница 3: ...n play with the appliance Keep all packaging away from children Keep children and pets away from the appliance when it operates or when it cools down Accessible parts are hot If the appliance has a child safety device we recommend you activate it Cleaning and user maintenance shall not be made by children without supervision Children of less than 3 years should be kept away unless continuously sup...

Страница 4: ...l the appliance by the handle Keep the minimum distance from the other appliances and units Make sure that the appliance is installed below and adjacent safe structures The sides of the appliance must stay adjacent to appliances or to units with the same height 2 2 Electrical connection WARNING Risk of fire and electrical shock All electrical connections should be made by a qualified electrician T...

Страница 5: ... the appliance WARNING Risk of damage to the appliance To prevent damage or discoloration to the enamel do not put ovenware or other objects in the appliance directly on the bottom do not put aluminium foil directly on the bottom of the appliance do not put water directly into the hot appliance do not keep moist dishes and food in the appliance after you finish the cooking be careful when you remo...

Страница 6: ...mitted during the cleaning process of all Pyrolytic Ovens Remove any pets especially birds from the vicinity of the appliance location during and after the Pyrolytic cleaning and first use maximum temperature operation to a well ventilated area Small pets can also be highly sensitive to the localized temperature changes in the vicinity of all Pyrolytic Ovens when the Pyrolytic self cleaning progra...

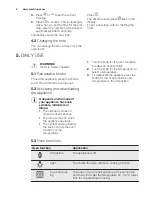
Страница 7: ...s and removable shelf supports from the appliance Refer to Care and cleaning chapter Clean the appliance before first use Put the accessories and the removable shelf supports back to their initial position 4 2 Setting the time After the first connection to the mains all symbols in the display are on for some seconds For the subsequent few seconds the display shows the software version After the so...

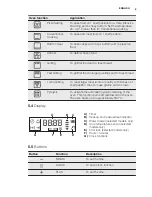
Страница 8: ...ends on the model if your appliance has knob symbols indicators or lamps The indicator comes on when the oven heats up The lamp comes on when the appliance operates The symbol shows whether the knob controls the oven functions or the temperature 1 Turn the knob for the oven functions to select an oven function 2 Turn the knob for the temperature to select a temperature 3 To deactivate the applianc...

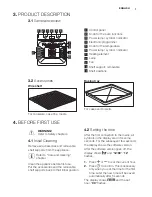
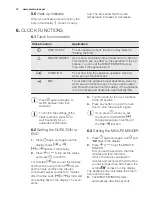
Страница 9: ...ties and to toast bread Turbo Grilling To roast larger meat joints or poultry with bones on 1 shelf position Also to make gratins and to brown Pyrolysis To activate the automatic pyrolytic cleaning of the oven This function burns off residual dirt in the oven The oven heats up to approximately 500 C 5 4 Display A B C D E F G A Timer B Heat up and residual heat indicator C Water drawer selected mod...

Страница 10: ... seconds for an automatic confirmation 6 2 Setting the DURATION or END 1 Press again and again until the display shows or or flashes in the display 2 Press or to the set the values and press to confirm For Duration first you set the minutes and then the hours for End first you set the hours and then the minutes An acoustic signal sounds for 2 minutes after the time ends or symbol and time setting ...

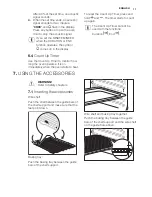
Страница 11: ...mmediately when the oven starts to heat To reset the Count Up Timer press and hold and The timer starts to count up again The Count Up Timer cannot be used with the functions Duration End 7 USING THE ACCESSORIES WARNING Refer to Safety chapters 7 1 Inserting the accessories Wire shelf Push the shelf between the guide bars of the shelf support and make sure that the feet point down Baking tray Push...

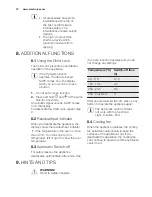
Страница 12: ...e appliance the display shows the residual heat indicator if the temperature in the oven is more than 40 C Turn the knob for the temperature left or right to show the oven temperature 8 3 Automatic Switch off For safety reasons the appliance deactivates automatically after some time if an oven function operates and you do not change any settings Temperature C Switch off time h 30 115 12 5 120 195 ...

Страница 13: ...g When the trays become cold again the distortions are gone 9 2 Tips on baking Baking results Possible cause Remedy The bottom of the cake is not browned sufficiently The shelf position is incor rect Put the cake on a lower shelf The cake sinks and be comes soggy lumpy or streaky The oven temperature is too high The next time you bake set a slightly lower oven tem perature The cake sinks and be co...

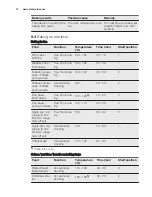
Страница 14: ...tless sponge cake Fatless sponge cake Conventional Cooking 160 35 50 2 Flan base short pastry True Fan Cook ing 170 1801 10 25 2 Flan base sponge mixture True Fan Cook ing 150 170 20 25 2 Apple pie Ap ple pie 2 tins Ø20 cm diago nally off set True Fan Cook ing 160 60 90 2 Apple pie Ap ple pie 2 tins Ø20 cm diago nally off set Conventional Cooking 180 70 90 1 Cheesecake Conventional Cooking 170 190...

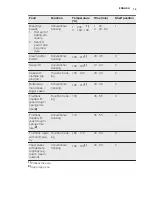
Страница 15: ...h crumble top ping dry True Fan Cook ing 150 160 20 40 3 Buttered al mond cake Sugar cakes Conventional Cooking 190 2101 20 30 3 Fruit flans made with yeast dough sponge mix ture 2 True Fan Cook ing 150 35 55 3 Fruit flans made with yeast dough sponge mix ture 2 Conventional Cooking 170 35 55 3 Fruit flans made with short pas try True Fan Cook ing 160 170 40 80 3 Yeast cakes with delicate toppings...

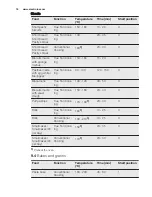
Страница 16: ...e Fan Cook ing 80 100 120 150 3 Macaroons True Fan Cook ing 100 120 30 50 3 Biscuits made with yeast dough True Fan Cook ing 150 160 20 40 3 Puff pastries True Fan Cook ing 170 1801 20 30 3 Rolls True Fan Cook ing 1601 10 25 3 Rolls Conventional Cooking 190 2101 10 25 3 Small cakes Small cakes 20 per tray True Fan Cook ing 1501 20 35 3 Small cakes Small cakes 20 per tray Conventional Cooking 1701 ...

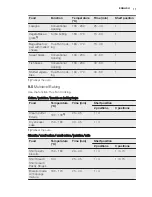
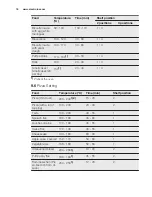
Страница 17: ... 30 60 1 1 Preheat the oven 9 5 Multilevel Baking Use the function True Fan Cooking Cakes pastries breads on baking trays Food Temperature C Time min Shelf position 2 positions 3 positions Cream puffs Eclairs 160 1801 25 45 1 4 Dry streusel cake 150 160 30 45 1 4 1 Preheat the oven Biscuits small cakes small cakes pastries rolls Food Temperature C Time min Shelf position 2 positions 3 positions Sh...

Страница 18: ...Preheat the oven 9 6 Pizza Setting Food Temperature C Time min Shelf position Pizza thin crust 200 2301 2 15 20 2 Pizza with a lot of topping 180 200 20 30 2 Tarts 180 200 40 55 1 Spinach flan 160 180 45 60 1 Quiche Lorraine 170 190 45 55 1 Swiss Flan 170 190 45 55 1 Cheesecake 140 160 60 90 1 Apple cake covered 150 170 50 60 1 Vegetable pie 160 180 50 60 1 Unleavened bread 230 2501 10 20 2 Puff p...

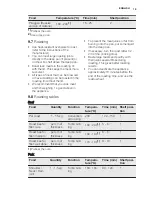
Страница 19: ...put some liquid into the deep pan If necessary turn the roast after 1 2 2 3 of the cooking time Baste large roasts and poultry with their juices several times during roasting This gives better roasting results You can deactivate the appliance approximately 10 minutes before the end of the roasting time and use the residual heat 9 8 Roasting tables Beef Food Quantity Function Tempera ture C Time mi...

Страница 20: ...ntity kg Function Tempera ture C Shelf posi tion Time min Shelf posi tion Leg of lamb Roast lamb 1 1 5 Turbo Grilling 150 170 100 120 1 Saddle of lamb 1 1 5 Turbo Grilling 160 180 40 60 1 Game Food Quantity Function Tempera ture C Time min Shelf posi tion Saddle Leg of hare up to 1 kg Conventional Cooking 2301 30 40 1 Saddle of venison 1 5 2 kg Conventional Cooking 210 220 35 40 1 Haunch of veniso...

Страница 21: ...Cooking 210 220 40 60 1 9 9 Grilling Always grill with the maximum temperature setting Set the shelf into the shelf position as recommended in the grilling table Always set the pan to collect the fat into the first shelf position Grill only flat pieces of meat or fish Always preheat the empty oven with the grill functions for 5 minutes CAUTION Always grill with the oven door closed Grilling Food T...

Страница 22: ...g Food Temperature C Time min Shelf position Pizza frozen 200 220 15 25 2 Pizza American fro zen 190 210 20 25 2 Pizza chilled 210 230 13 25 2 Pizza Snacks fro zen 180 200 15 30 2 French Fries thin 200 220 20 30 3 French Fries thick 200 220 25 35 3 Wedges Cro quettes 220 230 20 35 3 Hash Browns 210 230 20 30 3 Lasagne Cannello ni fresh 170 190 35 45 2 Lasagne Cannello ni frozen 160 180 40 60 2 Ove...

Страница 23: ...d on a plate Use the first shelf position from the bottom Do not cover the food with a bowl or a plate as this can extend the defrost time Food Quantity Defrosting time min Further de frosting time min Comments Chicken 1 kg 100 140 20 30 Put the chicken on an upturned saucer in a big plate Turn half way through Meat 1 kg 100 140 20 30 Turn halfway through Meat 500 g 90 120 20 30 Turn halfway throu...

Страница 24: ...tone fruit Food Temperature C Cooking time until simmering min Continue to cook at 100 C min Pears Quinces Plums 160 170 35 45 10 15 Vegetables Food Temperature C Cooking time until simmering min Continue to cook at 100 C min Carrots1 160 170 50 60 5 10 Cucumbers 160 170 50 60 Mixed pickles 160 170 50 60 5 10 Kohlrabi Peas Asparagus 160 170 50 60 15 20 1 Leave standing in the oven after it is deac...

Страница 25: ...al cleaning agent Clean the appliance interior after each use Fat accumulation or other food remains may result in a fire Clean stubborn dirt with a special oven cleaner Clean all accessories after each use and let them dry Use a soft cloth with warm water and a cleaning agent If you have nonstick accessories do not clean them using aggressive agents sharp edged objects or a dishwasher It can caus...

Страница 26: ...he oven lamp is off 5 To change the default length of the procedure P1 or P2 press to set and then press or to set the length of the cleaning procedure 6 When the oven is at its set temperature the door locks The display shows the symbol and the bars of the heat indicator until the door unlocks 7 When Pyrolysis is completed the display shows the time of day The oven door stays locked 8 When the ap...

Страница 27: ... out of the guide 9 Clean the glass panel with water and soap Dry the glass panel carefully When the cleaning is completed install the glass panels and the door Do the above steps in the opposite sequence Install the smaller panel first then the larger 10 6 Replacing the lamp Put a cloth on the bottom of the interior of the appliance It prevents damage to the lamp glass cover and the cavity WARNIN...

Страница 28: ... does not operate The lamp is defective Replace the lamp It takes too long to cook the dishes or they cook too quickly The temperature is too low or too high Adjust the temperature if necessary Follow the ad vice in the user manual Steam and condensation settle on the food and in the cavity of the oven You left the dish in the oven for too long Do not leave the dishes in the oven for longer than 1...

Страница 29: ... If you cannot find a solution to the problem yourself contact your dealer or an Authorised Service Centre The necessary data for the service centre is on the rating plate The rating plate is on the front frame of the appliance cavity Do not remove the rating plate from the appliance cavity We recommend that you write the data here Model MOD Product number PNC Serial number S N 12 INSTALLATION WAR...

Страница 30: ...m A 567 mm N min 550 mm A 595 mm N 585 592 mm 50 mm 3 Use a minimum of 2 screws to attach the oven on the 2 sides A A 12 3 Installing the oven under a work surface Before the installation connect the oven to the electrical supply Refer to Electrical connection During installation in combustible matter NIN SEV 1000 and fire protection guidelines and regulations of the Association of Cantonal Fire I...

Страница 31: ...h a socket supply line If there is no socket supply line the fixed home electrical system must include an isolating device with at least a 3 mm contact separation to enable a simultaneous and all pole cut off from the mains according to NIN SEV 1000 The customer must have a socket for the electrical connection that is accessible and outside the coordination room The length of the connection cable ...

Страница 32: ...ke Seetalstrasse 11 7000 Chur Comer cialstrasse 19 Ersatzteilverkauf Points de vente de rechange Vendita pezzi di ricambio spare parts service 5506 Mägenwil Industriestrasse 10 Tel 0848 848 111 Fachberatung Verkauf Demonstration Vente Consulente cucina Vendita 8048 Zürich Badenerstrasse 587 Tel 044 405 81 11 Garantie Für jedes Produkt gewähren wir ab Verkauf bzw Lieferdatum an den Endverbraucher e...

Страница 33: ...o Nella garanzia sono comprese le spese di manodopera di viaggio e del materiale Dalla copertura sono esclusi il logoramento ed i danni causati da agenti esterni intervento di terzi utilizzo di ricambi non originali o dalla inosservanza delle prescrizioni d istallazione ed istruzioni per l uso Warranty For each product we provide a two year guarantee from the date of purchase or delivery to the co...

Страница 34: ...www electrolux com 34 ...

Страница 35: ...ENGLISH 35 ...

Страница 36: ...www electrolux com shop 867302679 A 062014 ...

Отзывы: