background image

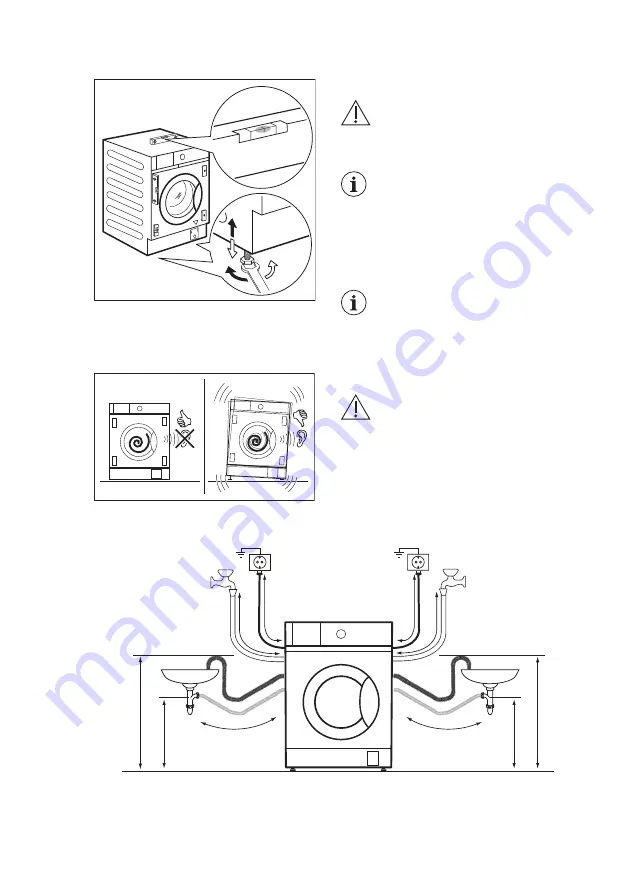
5.5 Positioning and levelling

x4

1. Install the appliance on a flat hard floor.

WARNING!

Make sure that carpets do not

stop the air circulation below

the appliance.

Bring the appliance near the

furniture recess before

levelling it. For more details,

refer to paragraph "Building

in".

2. Loosen or tighten the feet to adjust the

level.

A correct adjustment of the

appliance level prevents the

vibration, noise and the

movement of the appliance

when in operation.

The appliance must be level and stable.

CAUTION!

Do not put cardboard, wood or

equivalent materials below the

appliance feet to adjust the

level.

5.6 Hose and cable connection

1100 mm          1450 mm

760 mm

1020 mm

900 mm

1360 mm

ma

1

0

0

0

 mm

mi

n

6

0

0

 mm

ma

1

0

0

0

 mm

mi

n

6

0

0

 mm

www.electrolux.com

12

Содержание E776W402BI

Страница 1: ...E776W402BI EN Washer Dryer User Manual ...

Страница 2: ...tion Ingenious and stylish it has been designed with you in mind So whenever you use it you can be safe in the knowledge that you ll get great results every time Welcome to Electrolux Visit our website to Get usage advice brochures trouble shooter service and repair information www electrolux com support Register your product for better service www registerelectrolux com Buy Accessories Consumable...

Страница 3: ...es or lack of experience and knowledge if they have been given supervision or instruction concerning the use of the appliance in a safe way and understand the hazards involved Children between 3 and 8 years of age and persons with very extensive and complex disabilities shall be kept away from the appliance unless continuously supervised Children of less than 3 years of age should be kept away fro...

Страница 4: ...ould prevent the appliance door from being fully open Connect the mains plug to the mains socket only at the end of the installation process Make sure that the mains plug is accessible after installation The ventilation opening in the base must not be covered by a carpet mat or any floor covering WARNING The appliance must not be supplied through an external switching device such as a timer or con...

Страница 5: ...removers should be washed separately with an extra amount of detergent before being dried in the washer dryer Do not use the appliance if items have been soiled with industrial chemicals Do not dry unwashed items in the wash dryer Items such as foam rubber latex foam shower caps waterproof textiles and rubber backed articles and clothes or pillows fitted with foam rubber pads should not be dried i...

Страница 6: ...nsit bolts in a safe place If the appliance is to be moved in the future they must be reattached to lock the drum to prevent an internal damage Always take care when moving the appliance as it is heavy Always use safety gloves and enclosed footwear Do not install or use a damaged appliance Do not install the appliance where the appliance door cannot be fully opened Adjust the feet to have the nece...

Страница 7: ...ot dry dripping wet clothes in the appliance Do not let hot items to touch the plastic parts of the appliance Remove a detergent ball if used before starting a drying programme Do not use a detergent ball if setting a non stop programme 2 5 Service To repair the appliance contact the Authorised Service Centre Use original spare parts only Please note that self repair or non professional repair can...

Страница 8: ... 9 5 6 1 Hinge supports 2 Detergent dispenser 3 Control panel 4 Magnetic plate 5 Door handle 6 Rating plate 7 Plate with rubber beater 8 Drain pump filter 9 Front feet for levelling the appliance 10 Drain hose 11 Mains cable 12 Inlet hose connection 13 Back feet for levelling the appliance 00000000 00A Mod xxxxxxxxx 000V 00Hz 0000 W 910000000 00 A B C Prod No D The rating plate reports the model n...

Страница 9: ...pm 1 Connect the water inlet hose to a water tap with a 3 4 thread 2 The appliance works correctly if the water pressure is not lower than 0 05 MPa 0 5 bar If you cannot connect the water inlet hose to the cold water tap of the primary hydraulic sys tem connect it to your domestic cold water storage system Make sure not to exceed a dis tance of 5 02 m 16 5 ft between the appliance inlet hose and t...

Страница 10: ... the floor under the appliance WARNING It is strongly recommended that this action is carries out by two persons 2 Carefully put the appliance down on its rear side Make sure not to damage the hoses 1 2 3 Remove the polystyrene protection from the bottom 1 2 4 Return the appliance in vertical position and remove the socket polystyrene protection www electrolux com 10 ...

Страница 11: ... user manual bag Put the smallest cap F in upper hole and the two bigger caps G in lower holes We recommend that you keep the packaging and the transit bolts for any movement of the appliance 5 4 Installation on suspended flooring Suspended wooden floors are particularly susceptible to vibration To limit vibration we recommend placing a waterproof wooden panel at least 15 mm thick under the applia...

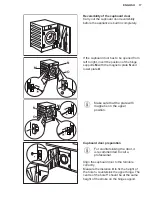
Страница 12: ...lding in 2 Loosen or tighten the feet to adjust the level A correct adjustment of the appliance level prevents the vibration noise and the movement of the appliance when in operation The appliance must be level and stable CAUTION Do not put cardboard wood or equivalent materials below the appliance feet to adjust the level 5 6 Hose and cable connection 1100 mm 1450 mm 760 mm 1020 mm 900 mm 1360 mm...

Страница 13: ...ance Do not turn the inlet hose downwards but turn it left or right depending on the position of your water tap 4 Loosen the ring nut to fix it in the correct position 5 Connect the water inlet hose to the cold water tap with 3 4 thread WARNING The inlet water shall not exceed 25 C WARNING Make sure that there are no leaks from the couplings Use the hose supplied with appliance Do not use an exten...

Страница 14: ...ighten it with the supplied cable tie L Make sure that the drain hose makes a loop to prevent particles going into the appliance from the sink L To a wall pipe Directly to a built in drain pipe in the room wall and tighten it with the supplied cable tie L You can extend the drain hose to maximum 400 cm Contact the service centre for the other drain hose and the extension 5 7 Building in 600 mm min...

Страница 15: ...re indicated in the drawing When levelling the appliance under the furniture DO NOT squeeze the sponge pad Before proceeding with appliance building in bring it near the recess and preposition the inlet hose the drain hose and the mains cable WARNING Make sure they are not kinked or squashed 5 8 Installing anti tilting device Accessory Install this accessory in case of risk of appliance tilting on...

Страница 16: ...e height and turn the nut clockwise to fix it 5 9 Preparation and assembly of the cupboard door The dimensions of the cupboard door should be width min 595 max 598 mm thickness 16 22 mm Factory pre setting The appliance is originally pre set for the assembly of a cupboard door opening from right to left The best solution would be to screw the upper hinge to the upper hole of the top plate and the ...

Страница 17: ...magnetic plate N and lower plate O M N O Make sure that the plate with magnet is on the upper position x y y Cupboard door preparation For countersinking the door it is recommended to call a professional Align the cupboard door to the furniture correctly Measure the distance X to fix the height of the hole to countersink the upper hinge The centre of the hole Y should be at the same height of the ...

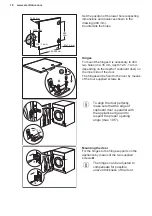
Страница 18: ...cupboard door on the inner side of the door The hinges will be fixed to the door by means of the four supplied screws A max 105 To align the door perfectly make sure that the edge of cupboard door is parallel with the appliance edge and to respect the proper opening angle max 105 Mounting the door Fix the hinges to the hinge supports on the appliance by means of the two supplied screws B The hinge...

Страница 19: ...connect the mains plug to the mains socket The rating plate and the Technical Data chapter indicate the necessary electrical ratings Make sure that they are compatible with the mains power supply Check that your domestic electrical installation can take the maximum load required also taking into account any other appliances in use Connect the appliance to an earthed socket The power supply cable m...

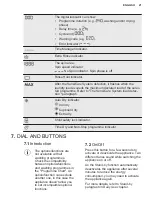
Страница 20: ...2 3 The permanent options are set by holding pressed the relative button for at least 3 seconds 1 Programme dial 2 Display 3 Time Dry touch button 4 Auto Dry touch button 5 Start Pause touch button 6 Delay Start touch button 7 Time Manager touch button and permanent Child Lock option 8 Prewash touch button and permanent Extra Rinse option 9 Spin touch button 10 Temp touch button 11 Mode touch butt...

Страница 21: ...and Non Stop programme indicator 7 DIAL AND BUTTONS 7 1 Introduction The options functions are not available with all washing programmes Check the compatibility between options functions and washing programmes in the Programme Chart An option function can exclude another one in this case the appliance doesn t allow you to set incompatible options functions 7 2 On Off Press this button for a few se...

Страница 22: ...programme ends with water in the drum The indicator is on display The door stays locked and the drum turns regularly to reduce creasing You must drain the water to unlock the door If you touch the Start Pause button the appliance performs the spinning phase and drains the water The appliance empties the water out automatically after 18 hours approximately 7 6 Prewash With this option you can add a...

Страница 23: ...play When it is activated the appliance will default to this option after you switch it off or change reset the programme If you press any button the indicator blinks to indicate that the buttons are disabled 7 10 Time Dry Touch this button to set the time that suits the fabrics you have to dry refer to Timed drying table The display shows the set value Each time you touch this button the time val...

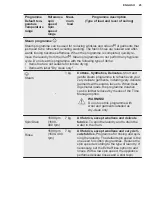
Страница 24: ...l Wash Dry mode 40 C2 1600 rpm 1600 rpm 1000 rpm 4 kg Eco 40 60 Cupboard dry level Dry only mode 4 kg White cotton and fast coloured cotton Cottons 40 C 90 C Cold 1600 rpm 1600 400 rpm 7 kg White cotton and coloured cotton Normal ly heavily and lightly soiled items Synthetics 40 C 60 C Cold 1200 rpm 1200 400 rpm 3 kg Synthetic items or mixed fabric items Nor mally soiled items Delicates 30 C 40 C ...

Страница 25: ...ates Short and gentle steam programme to refresh even your very delicate garments including very delicate garments with sequins lace etc When treat ing smaller loads the programme duration can be further reduced by means of the Time Manager option WARNING Do not use this programme with wool and garments labelled as dry clean only Spin Drain 1600 rpm 1600 400 rpm 7 kg All fabrics except woollens an...

Страница 26: ...leaning run a fur ther rinse cycle with empty drum and no detergent to remove any residue of bleach If you set this programme with the Mode Dry the appliance performs the anti fluff action Refer to chapter Fluff in the fabrics Anti allergy 60 C 1600 rpm 1600 400 rpm 7 kg White cotton items This programme re moves micro organisms thanks to a washing phase with the temperature maintained above 60 C ...

Страница 27: ... with a removable fleece or inner in sulation By performing a combined wash and dry programme the drying phase also acts as water repel lent restorer Make sure that the garment care label permits tumble drying Denim 30 C 40 C Cold 1200 rpm 1200 400 rpm 3 kg Special programme for Denim clothing with delicate washing phase to minimize colour fading and marks For better care a reduced load size is re...

Страница 28: ...tures and longer duration 2 According to UK Ecodesign for Energy Related Products and Energy Information Regula tions this programme at default temperature and spin speed in washing and drying mode with rated capacity 4 kg and with Cupboard dry level performs the wash and dry cycle able to clean normally soiled cotton laundry declared to be washable at 40 C or 60 C together in the same cycle and a...

Страница 29: ...swear Outdoor Denim One GO 1h 1kg 1 If you set the No Spin option the appliance performs draining only Suitable detergents for each programme Programme Universal powder1 Liquid Uni versal Liquid for coloureds Delicates woollens Special Eco 40 60 Cottons Synthetics Delicates Wool Anti allergy Sportswear ENGLISH 29 ...

Страница 30: ...of this machine has been tested and approved by The Woolmark Company The cycle is suitable to dry wool garments which are labelled hand wash provided that the garments are washed in a Woolmark endorsed hand washing cycle and dried according to the instructions issued by the manufacturer M1381 The Woolmark symbol is a Certification mark in many countries 8 3 Automatic drying Initial cycle times for...

Страница 31: ... to 3 kg Iron Dry Suitable for ironing Cottons and Linen sheets tablecloths shirts etc up to 4 kg 8 4 Timed drying Dryness Level Type of fabric Load kg Spin speed rpm Suggested duration mins Extra Dry For towelling materials Cottons and Linen bathrobes bath towels etc 4 1600 170 190 2 1600 110 120 1 1600 65 75 Denim garments 3 1200 165 175 1 1200 75 85 Cupboard Dry For items to be stored Cottons a...

Страница 32: ... has different acoustic signals that operate when You activate the appliance special short tune You deactivate the appliance special short tune You touch the buttons click sound You make an invalid selection 3 short sounds The programme is completed sequence of sounds for about 2 minutes The appliance has a malfunction sequence of short sounds for about 5 minutes To activate deactivate the acousti...

Страница 33: ...Loading the laundry 1 Open the appliance door 2 Empty the pockets and unfold the items before you put them in the appliance 3 Put the laundry in the drum one item at a time Do not put too much laundry in the drum 4 Close the door firmly CAUTION Make sure that no laundry gets caught between the seal and the door to avoid risk of water leakage and damage to the laundry Washing heavily oiled greasy s...

Страница 34: ...tergent and the fabric conditioner 6 Carefully close the detergent dispenser Make sure that the flap does not cause a blockage when you close the drawer 11 5 Setting a programme 1 Turn the programme dial to select the desired washing programme The first programme on the top right of the programme dial is Eco 40 60 the programme to which the information of the energy label relates The indicator of ...

Страница 35: ... Pause button again to start the new countdown 11 8 The SensiCare System load detection The programme duration in the display is referred to a medium high load After touching the Start Pause button the SensiCare System starts the laundry load detection 1 The appliance detects the load in the first 30 seconds During this phase the Time Manager bars placed below the time digits play a simple animati...

Страница 36: ...ow you can set a new washing programme 11 11 Opening the door Adding garments If the temperature and level of the water in the drum are too high and or the drum is still rotating you should not open the door While a programme or the delay start operates the appliance door is locked The display shows the indicator 1 Touch the Start Pause button In the display the related door lock indicator goes of...

Страница 37: ...when You do not use the appliance for 5 minutes when no programme is running Press the button On Off to activate the appliance again 5 minutes after the end of the washing programme Press the On Off button to activate the appliance again The display shows the end of the last programme Turn the programme dial to set a new cycle If the dial is rotated to the Reset position the appliance automaticall...

Страница 38: ...ad size To have a good drying by using less energy and in a shorter time the appliance does not let you set a too low spin speed for the items to be washed and dried 2 Touch button Start Pause to start the programme The SensiCare estimation starts In the display the door locked indicator comes on The display also shows the remaining programme time 12 3 Washing and Timed Drying 1 Tap on the Time Dr...

Страница 39: ...d synthetic items c Extra dry for cotton items The display shows the drying programme duration 2 Touch the Start Pause button to start the programme In the display the door locked indicator comes on The display also shows the remaining programme time 13 3 Timed Drying 1 Tap on the Time Dry button repeatedly to set the desired time value see the Timed drying table the Programmes chapter The drying ...

Страница 40: ...regularly 15 HINTS AND TIPS WARNING Refer to Safety chapters 15 1 The laundry load Divide the laundry into white coloured synthetics delicates and wool Follow the washing instructions on the laundry care labels Do not wash white and coloured items together Some coloured items can discolour with the first wash We recommend that you wash them separately for the first couple of times Turn multilayere...

Страница 41: ...pes of fabric or special ones for woollens only The choice and quantity of detergent will depend on type of fabric delicates woollens cottons etc the colour of clothes size of the load degree of soiling wash temperature and hardness of the water used Follow the instructions that you find on packaging of the detergents or other treatments without exceeding the indicated maximum level Do not mix dif...

Страница 42: ...rying programmes table 15 7 Items not suitable for drying Do not set a drying programme for this laundry Synthetic curtains Pieces of clothing with metal inserts Nylon stockings Quilts Bed covers Duvets Anoraks Sleeping bags Fabrics with residue of hair sprays nail solvents or similar Garments with foam rubber or materials similar to foam rubber 15 8 Garment labels When you dry the laundry obey th...

Страница 43: ...may find in the door seal the filters and the drum Refer to Door seal with double lip trap Cleaning the drum Cleaning the drain pump and Cleaning the inlet hose and the valve filter paragraphs If necessary please contact the Authorised Service Centre 16 3 External cleaning Clean the appliance with mild soap and warm water only Fully dry all the surfaces Do not use a scouring pads or any scratching...

Страница 44: ...n body in the washing or tap water containing iron Clean the drum with special products for stainless steel Always follow the instructions that you find on the packaging of the product Do not clean the drum with acidic descaling products scouring products containing chlorine or iron or steel wool For a thorough clean 1 Remove all laundry from the drum 2 Run the Machine Clean programme For more det...

Страница 45: ...the mains plug from the mains socket Regularly check the drain pump filter and make sure that it is clean Clean the drain pump if The appliance does not drain the water The drum does not turn The appliance makes an unusual noise because of the blockage of the drain pump The display shows the alarm code WARNING Do not remove the filter while the appliance operates Do not clean the pump if the water...

Страница 46: ... spillages when removing the filter 180 3 Turn the filter 180 degrees in anti clockwise direction to open it without removing Let the water flow out 4 When the bowl is full of water turn the filter back and empty the container 5 Repeat the steps 3 and 4 until the water stops to flow out 1 2 6 Turn the filter anti clockwise to remove it www electrolux com 46 ...

Страница 47: ...ater tap 2 1 9 Put the filter back into the special guides by turning it clockwise Make sure that you tighten the filter correctly to prevent leakages 1 2 10 Close the pump cover When you drain the water with the emergency drain procedure you must activate the drain system again 1 Put 2 litres of water in the main wash compartment of the detergent dispenser 2 Start the programme to drain the water...

Страница 48: ...liance is installed in an area where the temperature can reach values around 0 C or drop below remove the remaining water from the inlet hose and the drain pump 1 Disconnect the mains plug from the mains socket 2 Close the water tap 3 Put the two ends of the inlet hose in a container and let the water flow out of the hose 4 Empty the drain pump Refer to the emergency drain procedure 5 When the dra...

Страница 49: ...e pressure of the water supply is not too low For this information contact your local water authority Make sure that the water tap is not clogged Make sure that the inlet hose has no kinks damages or bends Make sure that the connection of the water inlet hose is correct Make sure that the filter of the inlet hose and the filter of the valve are not clogged Refer to Care and cleaning The appliance ...

Страница 50: ... Problem Possible solution The programme does not start Make sure that the mains plug is connected to the mains socket Make sure that the appliance door is closed Make sure that there is no damaged fuse in the fuse box Make sure that the Start Pause has been touched If the delay start is set cancel the setting or wait for the end of countdown Deactivate the Child Lock function if it is on Check th...

Страница 51: ... in the drum The load may be too small The programme du ration increases or decreases during programme execu tion The SensiCare System is able to adjust the programme duration according to the type and the laundry load size Refer to The SensiCare System load detection in Daily Use chapter The washing results are not satisfactory Increase the detergent quantity or use a different deter gent Use spe...

Страница 52: ... the door remains locked in case of failure it is possible to open it using the emergency unlock function Before opening the door CAUTION Risk of burns Make sure that the water temperature is not too high and the laundry is not hot If necessary wait until they cool down CAUTION Risk of injury Make sure that the drum is not rotating If necessary wait until the drum stops rotating Make sure that the...

Страница 53: ...ed Remaining moisture at the end of the cycle The higher is the spin speed the higher is the noise and the lower is the remaining moisture at the end of washing cycle Values and programme duration may differ depending on different conditions e g room temperature water temperature and pressure load size and type of laundry supply voltage and also if you change the default setting of a programme 18 ...

Страница 54: ...values are indicative only Programme kg kWh Litres h mm C rpm1 Cottons2 90 C 7 1 60 85 3 45 44 85 1600 Cottons 60 C 7 1 05 80 3 30 44 55 1600 Cottons3 20 C 7 0 25 80 2 50 44 20 1600 Synthetics 40 C 3 0 65 75 2 20 35 40 1200 Delicates4 30 C 2 0 30 50 00 50 35 30 1200 Wool 30 C 1 5 0 25 60 1 05 30 30 1200 1 Reference indicator of the spin speed 2 Suitable for washing heavily soiled textiles 3 Suitab...

Страница 55: ... ENVIRONMENTAL CONCERNS Recycle materials with the symbol Put the packaging in relevant containers to recycle it Help protect the environment and human health by recycling waste of electrical and electronic appliances Do not dispose of appliances marked with the symbol with the household waste Return the product to your local recycling facility or contact your municipal office ENGLISH 55 ...

Страница 56: ...www electrolux com shop 157019993 A 042022 ...

Отзывы: