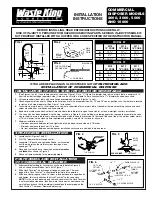
manualshive.com logo in svg
background image


SHOWER 

LID/CHUTE 

CONTROL 
SWITCHES 


C5.1 

CLEANING THE UNIT


It is recommended that at the end of each shift or if the unit is to be shut down that it is cleaned manually.  
 
Flushing through can be activated whilst running by holding the GREEN start button down.  
 
Do not put any cleaning tools (brushes or rags) into the machine at any time. Wipe all external surfaces. 
 
Use machine cleaning shower hose to wash the machine through this only operates whilst the machine is 
running and for a further 2 minutes after its operating cycle. If residue deposits are still visible, repeat the 
cleaning process.   
 
Only use washing up liquid soap, suitable for dish washing, to clean the machine. 
 
NEVER use abrasives strong detergents, pipe unblocking substances or bleach, as such products can cause 
damage to internal components within the unit. Use of such will invalidate the warranty. 


C5.2 

DAILY MAINTENANCE (HYGIENE CHECK) 


Wipe machine’s external surfaces 


Wash through with liquid soap suitable for dish washing 


Flush Machine through using machine’s shower hose 


Empty Bin regularly, particularly at the end of a shift, and wash bin to remove residues. 


Clean waste outlet to waste receptacle. 


Open lid and check the Red service light is on and flashes, and machine isolates.  If machine 
isolates but light does not come on then replace light bulb. If machine does not isolate call 
maintenance engineer. 


Page 16 of 20 

Содержание 616020

Страница 1: ...INSTALLATION OPERATING AND MAINTENANCE INSTRUCTION MODELS COMPACT SYSTEMS ORGANIC WASTE DISPOSAL SYSTEMS DOC NO WMS616020 EN EDITION 1 10 2009 Page 1 of 20 ...

Страница 2: ...POSITIONING AND ADJUSTMENT OF FEET Pag 9 B3 6 WATER FLOW ADJUSTMENT Pag 10 B4 MAINTENANCE Pag 10 B4 1 YEARLY CHECKS Pag 11 C INSTRUCTION FOR THE USER MAINTENANCE Pag 12 C1 GENERAL INFORMATION ON ORGANIC FOOD WASTE PROC Pag 12 C1 1 MATERIALS SUITABLE FOR PROCESSING Pag 12 C1 2 MATERIALS CRITICAL FOR PROCESSING Pag 12 C1 3 MATERIALS NOT ALLOWED AT ALL Pag 13 C2 INTRODUCTION Pag 13 C3 OPERATING PROCE...

Страница 3: ...TROUBLESHOOTING Pag 17 D1 WARNING MESSAGE START STOP SERVICE LIGHT SEQ Pag 17 D2 WARNING MESSAGE CONTROL BOX LED Pag 17 D3 WARNING MESSAGE CONTROL BOX WARNING LIGHTS Pag 18 D4 BASIC FAULT FINDINGS TROUBLE SHOOTING Pag 19 Page 3 of 20 ...

Страница 4: ... not use outdoors To disconnect push the Emergency Stop button then remove plug from outlet Do not unplug by pulling on cord To unplug grasp the plug not the cord Unplug from outlet when not in use and before servicing or cleaning Do not operate the COMPACT with a damaged cord or plug or after the appliance malfunctions or is dropped or damaged in any manner Connect to a properly grounded outlet o...

Страница 5: ...ated and reliable appliance for grinding and dewatering organic wastes You can use the COMPACT for processing of all kinds of organic materials See GENERAL INFORMATION ON ORGANIC FOOD WASTE PROCESSING A3 TECHNICAL DATA Organic Waste Disposal System comprising Disposer Pump and Press Electrically operated on 380 400v 3phase 4 wire no neutral 50 60Hz 20 A Current Rating Water supply Cold feed to sin...

Страница 6: ...on site be selected so as to allow easy and thorough cleaning of the outside of unit following operation A floor waste outlet close to the machine and a water repellent wall coating are convenient For electrical connection of the unit you will need a 380 400v 3ph 5 wire 50 60Hz currant rating 16 Amps supply Ensure that a qualified electrician installs the connection point Both HOT and COLD water s...

Страница 7: ...arch will result in the formation of deposits in the wastewater pipe The recommended water connections are soft plastic fittings use of metal connectors will damage the machine ports It is recommended that the water connection is carried out by a qualified person Cold and hot water connections must not be reversed The water connections are marked H Hot C Cold COLD CONNECTION HOT CONNECTION B3 2 WA...

Страница 8: ...ctric shock This COMPACT is equipped with a cord having an equipment grounding conductor and a grounding plug The plug must be plugged into an appropriate outlet that is properly installed and grounded in accordance with all local codes and ordinances A qualified electrician must be consulted if there is any doubt as to whether an outlet box is properly grounded DANGER Improper connection of the e...

Страница 9: ...acts as a locking nut to set the foot once adjusted OUTER TUBE FOOT By hand adjust the feet to level the machine take care not to unscrew them too far and detach them from the machine frame OUTER TUBE FOOT Once the machine is level retighten the outer tubes counter clockwise when viewed from above using a pipe wrench or similar to fix the position of the feet OUTER TUBE FOOT Ensure machine stands ...

Страница 10: ... located at the front and rear of the sink The flow should be a sufficient to wash organic waste to be processed into Disposer If there is evidence of splashing from sink the water flow can be reduced by adjusting the valves located at the front of the sink SINK WATER CONTROL VALVES B4 MAINTENANCE IMPORTANT SAFETY INSTRUCTIONS MAINTENANCE OPERATIONS MUST ONLY BE CARRIED OUT BY APPROVED PERSONNEL O...

Страница 11: ... Disassemble outlet chute above bin and thoroughly clean internal surfaces Also clean exit port of Press Isolate water supplies HOT COLD Disconnect the water supply pipes to allow access to water inlet solenoid valves Clean water inlet filters remove water inlet pipes to access plastic inlet filters check direction of filter before removal see photo Pull each filter out using pliers and clean any ...

Страница 12: ...essed the unit is likely to malfunction and block highly fibrous product should if possible be disposed of in the normal manner i e Directly into the waste disposal skip dumpster All store vegetable trimmings MAX PERCENTAGE ALLOWED 80 of the mix With vegetable trimmings care should be taken not to mix the trimmings with wire ties plastic ties elastic bands plastic wrapping paper etc CAUTION Trimmi...

Страница 13: ... containers C2 INTRODUCTION IMPORTANT SAFETY INSTRUCTIONS NEVER ATTEMPT TO OPERATE THE MACHINE IF CONNECTED DO NOT AT WATER IS DISCONNECTED WITH GUARDS REMOVED LID IS OPEN CHUTE IS DIS ANYWAY DISASSEMBLED TEMPT TO CLEAN INTERNAL PARTS USING WIRES ROPES BUSHES OR HOSES ANY JAMS TAKE CARE MUST BE CLEARED BY DISASSEMBLY when closing the Lid Chute to avoid injury or damage to the safety switches When ...

Страница 14: ...e processing cycle will automatically stop after two minutes if there is further material to process press the START BUTTON again to commence another cycle i If the Lid Chute is opened to the sink the unit will stop automatically To restart the unit close the Lid Chute and press the START BUTTON C3 2 END OF SHIFT SHUT DOWN OF MACHINE a Run machine through full cycle to clear any waste in process b...

Страница 15: ...NS WARNING PROCESSED WASTE IS HEAVY DO NOT TO OVERFILL THE WASTE COLLECTION BIN As an aid to the disposal of the waste and in the interest of hygiene a plastic bag can be inserted into the bin Part Ref 1600 300g This will help with the final disposal of the waste into a skip dumpster it is recommended that the neck of the plastic bag is sealed before disposal C5 CLEANING DAILY MAINTENANCE INTRODUC...

Страница 16: ...Only use washing up liquid soap suitable for dish washing to clean the machine NEVER use abrasives strong detergents pipe unblocking substances or bleach as such products can cause damage to internal components within the unit Use of such will invalidate the warranty C5 2 DAILY MAINTENANCE HYGIENE CHECK Wipe machine s external surfaces Wash through with liquid soap suitable for dish washing Flush ...

Страница 17: ... START STOP SWITCH SERVICE LIGHT SEQUENCE NOTE The Service Light will flash in a predetermined sequence followed by a pause to identify specific faults within the unit SERVICE LAMP SIGNAL MEANING Constant Light Motor Failed Open Inspection Cover check Electrical Control Box Motor Protector Switch OR Main Power Supply Fault check all 3 phase connections inside control box and at socket 1 Flash Mach...

Страница 18: ...OWER IS ON 2 OPTIONAL LED NOT USED ON SOME MODELS 3 DISPOSER CONTROL LED LIT WHEN DISPOSER IS RUNNING 4 PRESS CONTROL LED LIT WHEN PRESS IS RUNNING 5 PUMP CONTROL LED LIT WHEN PUMP IS RUNNING 6 LID SENSOR 1 LEFT SENSOR LED LIT WHEN LID IS CLOSED 7 LID SENSOR 2 RIGHT LED LIT WHEN LID IS CLOSED 8 STOP SWITCH LED LIT WHEN SWITCH IS PRESSED 9 START SWITCH LED LIT WHEN SWITCH IS PRESSED 10 PUMP MOTOR S...

Страница 19: ...ice Sink overfilling with Water Check Direction of rotation Check function of pump by pressing and holding start button water level should decrease quickly Check all waste delivery pipes for blockages Check dehydrator for blockage Worn pump impellor Disposer is working no waste coming from Press Check direction of rotation Check blockage of waste pipes press and hold start button Check drive belts...

Страница 20: ...on at sink check water supply Pump not delivering water Check direction of rotation Counter Clockwise when viewing motor fan Problems cleaning the chute Remove chute from press by loosening thumb screws and clean internal surfaces Leakage Remove front panel Check for fluid leakage from Disposer Press and Pump drain holes Disposer Pump Press Drain Hole Locations Arrowed The Manufacturer reserves th...

Отзывы: