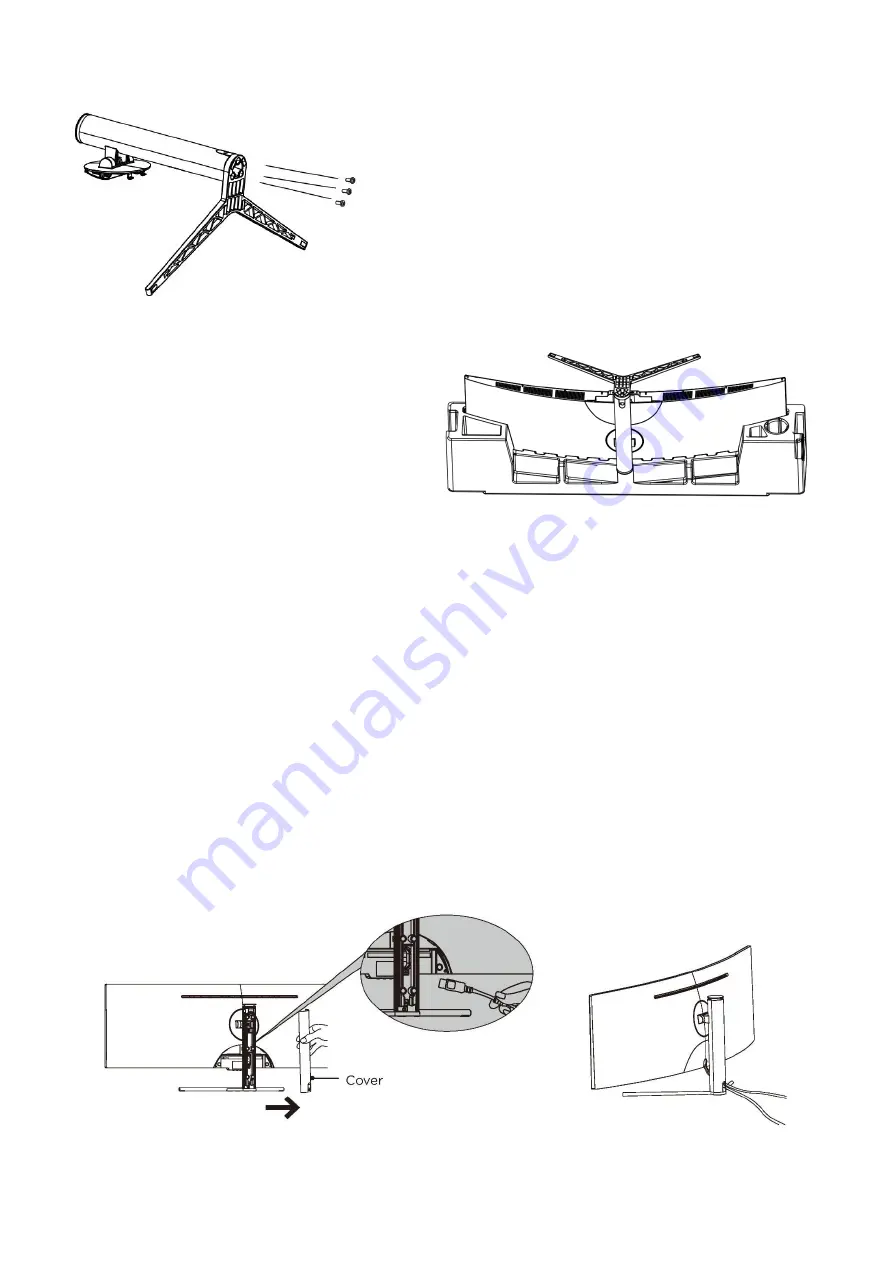
background image

ATTACHING THE STAND


Attach the base of the stand to the upright section of 
the stand using the three bolts provided. 


Carefully take the monitor out of the box and 
place upside down within the polystyrene 
insert, before locking the assembled stand 
onto the rear of the monitor. 

Before removing the monitor, ensure that the 
stand is securely locked onto the rear of the 
monitor 


NOTES:  


Due to the heavy weight and dimensions of the LCD screens and their fragile nature, we 
recommend that they are unpacked and assembled by 2 people.


electriQ and its distributors and dealers are not liable or responsible for damage or injury 
caused by improper installation, improper use or failure to observe these safety instructions. 
In such cases any guarantee will expire. 


The stand can be removed from the rear of the monitor by pressing the quick release button 
on the rear of the monitor. 


CABLE MANAGEMENT 

The cover can be removed from the rear of the stand. Cables can then be threaded through the 
stand, up to the terminals.  Once the cables are in position, replace the cover on the rear of the 
stand. 

DO NOT put pressure on the screen when moving or positioning the monitor.


Содержание eiQ-49SUWD144FSH

Страница 1: ...USER MANUAL eiQ 49SUWD144FSH 49 INCH CURVED LED MONITOR eiQ 49SUWD144FSHQ 49 INCH CURVED QLED MONITOR Please read this manual thoroughly before use and keep it handy for future reference...

Страница 2: ...WALL MOUNTING 7 CONTROL PANEL 7 INPUT OUTPUT TERMINALS 8 INITIAL SETUP 8 QUICK MENU 9 MENU OPTIONS 9 INPUT SOURCE 10 BRIGHTNESS CONTRAST 10 COLOUR SETTINGS 11 PICTURE QUALITY SETTINGS 12 DISPLAY 13 A...

Страница 3: ...rvicing is required when the apparatus has been damaged in any way such as power supply cord or plug is damaged liquid has been spilled or objects have fallen into the apparatus or it has been exposed...

Страница 4: ...between the monitor and the supporting furniture Educate children about the dangers of climbing on furniture to reach the monitor or its controls If your existing monitor is being retained and reloca...

Страница 5: ...the wall to avoid it falling when pushed When twisting the monitor do not hold by the top you should twist from the base When lifting the monitor do not use one hand to handle it you should lift the m...

Страница 6: ...that they are unpacked and assembled by 2 people electriQ and its distributors and dealers are not liable or responsible for damage or injury caused by improper installation improper use or failure to...

Страница 7: ...and assistance Careful consideration should be made regarding the location the monitor is to be wall mounted as some walls are not suitable for installation If the monitor is to be mounted on drywall...

Страница 8: ...pports HDMI 1 4 75Hz Freesync 5 HDMI 3 Supports HDMI 1 4 75Hz Freesync 6 AC Power Socket INITIAL SETUP Connect the monitor to a power outlet 1 Press the POWER button on the monitor or to turn it on Th...

Страница 9: ...d Miscellaneous options details of each menu can be found in the following sections Within the Menu use UP 3 and DOWN 2 Press to go up and down the current menu or to adjust the selected value MENU 1...

Страница 10: ...en DisplayPort DP HDMI 1 HDMI 2 or HDMI 3 BRIGHTNESS CONTRAST Brightness Adjust the brightness of the display between 0 and 100 Contrast Adjust the contrast of the display between 0 and 100 DCR Turn t...

Страница 11: ...olour Temperature Change the Colour Temperature of the display to Warm Cool or User When the User Mode is selected the Red Green and Blue values can be adjusted independently between 0 and 100 Low Blu...

Страница 12: ...n the Response OverDrive feature between Off High Middle of low Noise Reduction Adjust the level of Noise Reduction between Low Medium High or Off Super Resolution Change the Super Resolution between...

Страница 13: ...nge the image aspect ratio to Wide screen Auto 4 3 or 1 1 AUDIO Mute Turn On and off to mute and unmute the audio output Volume Adjust the output volume between 0 and 100 Audio Source Chose which sour...

Страница 14: ...put Choose the source of the second window between HDMI 1 HDMI 2 and HDMI 3 PIP Size Adjust the size of the secondary source in PIP and PBP modes between Small Medium and Large PIP Position Set the po...

Страница 15: ...Change the horizontal position of the OSD Menu OSD V Position Change the vertical position of the OSD Menu OSD Transparency Change the transparency value of the OSD Menu between 0 and 100 OSD Time Ou...

Страница 16: ...16 OTHER DP Version Set the DP version between 1 1 and 1 2 FreeSync AdaptiveSync Turn FreeSync On or Off HDR HDR can be set to On Off or Autodetect Reset Restore factory default setting...

Страница 17: ...contact the local council for details of your local household waste recycling centres Product Model eiQ 49SUWD144FSH eiQ 49SUWD144FSHQ Screen Size 49 Diagonal 49 Diagonal Panel Type VA Panel QLED VA P...

Страница 18: ...her possible interference sources Image colour or quality deteriorates Check that all the video settings are adjusted appropriately such as brightness contrast colour etc For more information about vi...

Отзывы: