background image

ATTENTION 


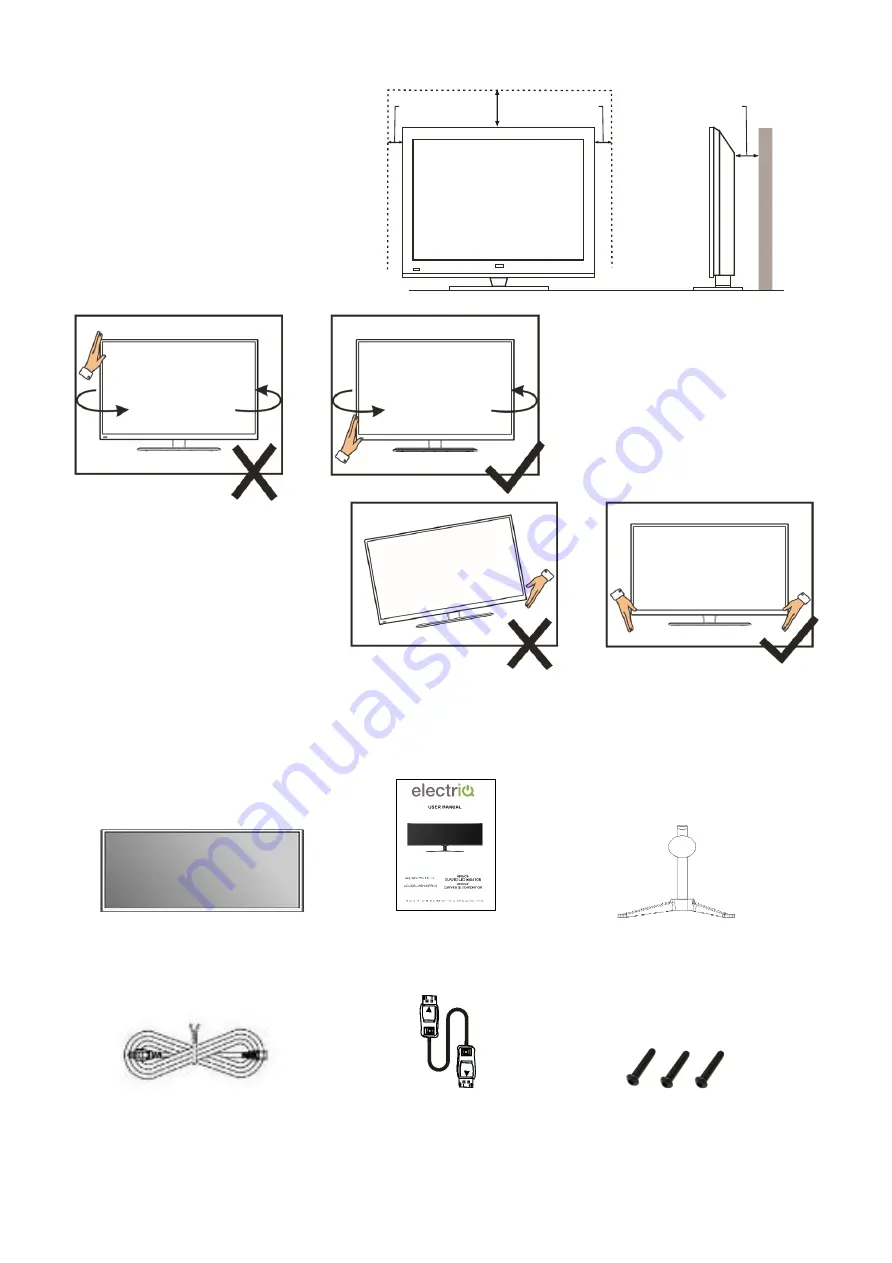
Place  the  monitor  on  a  firm  and 

flat 

surface,  leaving  a  space  of  at 
least  10cm  around  the  unit  and 
30cm from  the  top  of the  unit  to 
the ceiling or cabinet. Ensure the 
monitor is positioned close to the 
wall  to  avoid  it  falling  when 
pushed. 


When  twisting  the  monitor, 
do  not  hold  by  the  top,  you 
should twist from the base.


When  lifting  the  monitor,  do 
not use one hand to handle 
it, you should lift the monitor 
using  two  hands,  ensuring 
pressure  is  not  put  on  the 
screen itself.


CONNECTION AND PREPARATION OF THE MONITOR


WHAT IS INCLUDED 


Monitor                               User Manual


Stand                              


 .


               Power Cable                                   DP Cable                                 Bolts 

10


cm


30


cm


10


cm


cm


10


Содержание eiQ-49SUWD144FSH

Страница 1: ...USER MANUAL eiQ 49SUWD144FSH 49 INCH CURVED LED MONITOR eiQ 49SUWD144FSHQ 49 INCH CURVED QLED MONITOR Please read this manual thoroughly before use and keep it handy for future reference...

Страница 2: ...WALL MOUNTING 7 CONTROL PANEL 7 INPUT OUTPUT TERMINALS 8 INITIAL SETUP 8 QUICK MENU 9 MENU OPTIONS 9 INPUT SOURCE 10 BRIGHTNESS CONTRAST 10 COLOUR SETTINGS 11 PICTURE QUALITY SETTINGS 12 DISPLAY 13 A...

Страница 3: ...rvicing is required when the apparatus has been damaged in any way such as power supply cord or plug is damaged liquid has been spilled or objects have fallen into the apparatus or it has been exposed...

Страница 4: ...between the monitor and the supporting furniture Educate children about the dangers of climbing on furniture to reach the monitor or its controls If your existing monitor is being retained and reloca...

Страница 5: ...the wall to avoid it falling when pushed When twisting the monitor do not hold by the top you should twist from the base When lifting the monitor do not use one hand to handle it you should lift the m...

Страница 6: ...that they are unpacked and assembled by 2 people electriQ and its distributors and dealers are not liable or responsible for damage or injury caused by improper installation improper use or failure to...

Страница 7: ...and assistance Careful consideration should be made regarding the location the monitor is to be wall mounted as some walls are not suitable for installation If the monitor is to be mounted on drywall...

Страница 8: ...pports HDMI 1 4 75Hz Freesync 5 HDMI 3 Supports HDMI 1 4 75Hz Freesync 6 AC Power Socket INITIAL SETUP Connect the monitor to a power outlet 1 Press the POWER button on the monitor or to turn it on Th...

Страница 9: ...d Miscellaneous options details of each menu can be found in the following sections Within the Menu use UP 3 and DOWN 2 Press to go up and down the current menu or to adjust the selected value MENU 1...

Страница 10: ...en DisplayPort DP HDMI 1 HDMI 2 or HDMI 3 BRIGHTNESS CONTRAST Brightness Adjust the brightness of the display between 0 and 100 Contrast Adjust the contrast of the display between 0 and 100 DCR Turn t...

Страница 11: ...olour Temperature Change the Colour Temperature of the display to Warm Cool or User When the User Mode is selected the Red Green and Blue values can be adjusted independently between 0 and 100 Low Blu...

Страница 12: ...n the Response OverDrive feature between Off High Middle of low Noise Reduction Adjust the level of Noise Reduction between Low Medium High or Off Super Resolution Change the Super Resolution between...

Страница 13: ...nge the image aspect ratio to Wide screen Auto 4 3 or 1 1 AUDIO Mute Turn On and off to mute and unmute the audio output Volume Adjust the output volume between 0 and 100 Audio Source Chose which sour...

Страница 14: ...put Choose the source of the second window between HDMI 1 HDMI 2 and HDMI 3 PIP Size Adjust the size of the secondary source in PIP and PBP modes between Small Medium and Large PIP Position Set the po...

Страница 15: ...Change the horizontal position of the OSD Menu OSD V Position Change the vertical position of the OSD Menu OSD Transparency Change the transparency value of the OSD Menu between 0 and 100 OSD Time Ou...

Страница 16: ...16 OTHER DP Version Set the DP version between 1 1 and 1 2 FreeSync AdaptiveSync Turn FreeSync On or Off HDR HDR can be set to On Off or Autodetect Reset Restore factory default setting...

Страница 17: ...contact the local council for details of your local household waste recycling centres Product Model eiQ 49SUWD144FSH eiQ 49SUWD144FSHQ Screen Size 49 Diagonal 49 Diagonal Panel Type VA Panel QLED VA P...

Страница 18: ...her possible interference sources Image colour or quality deteriorates Check that all the video settings are adjusted appropriately such as brightness contrast colour etc For more information about vi...

Отзывы: