ElectrIQ ECFIRPH7W Скачать руководство пользователя страница 12

12 


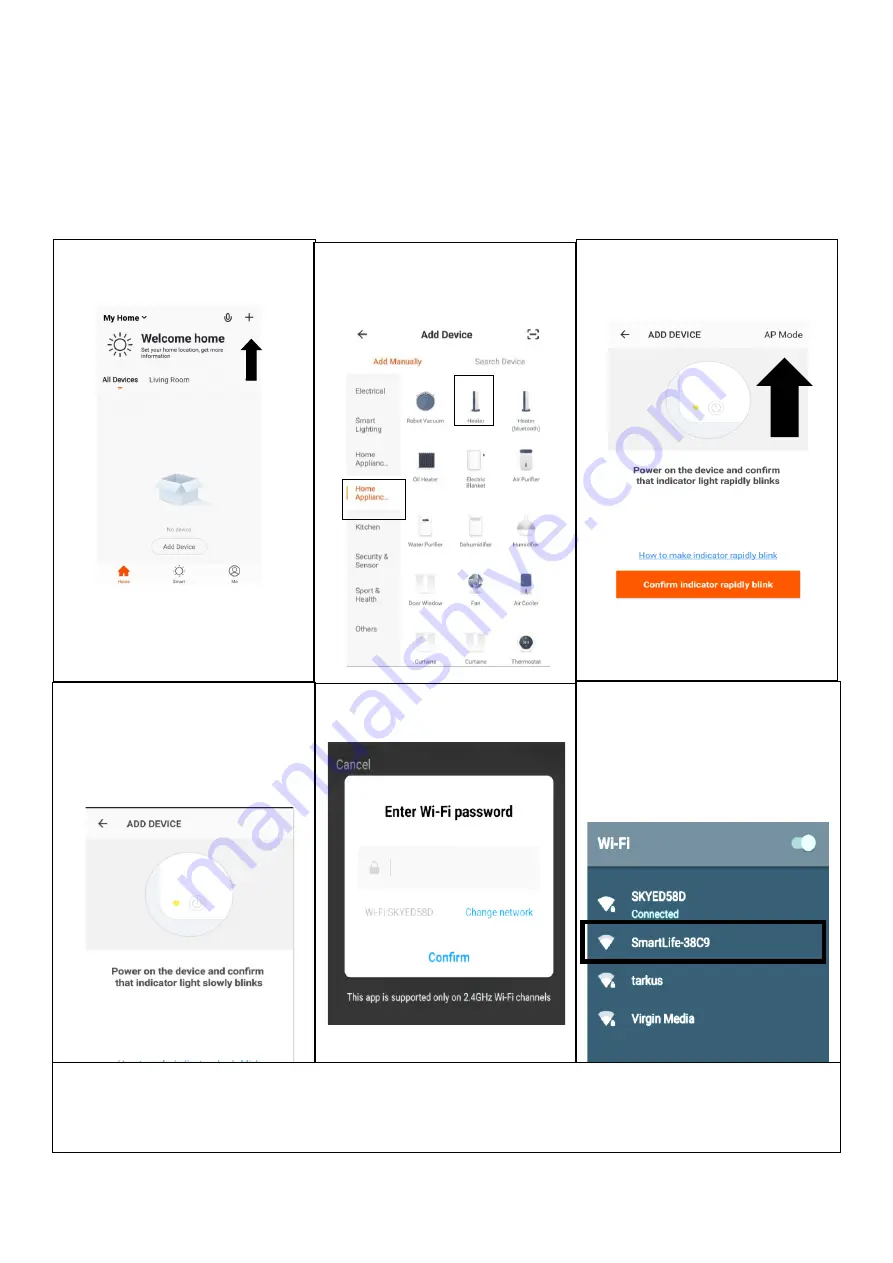
CONNECTING USING AP MODE (ALTERNATIVE METHOD) 

Before initiating the connection, make sure the unit is in standby mode, with the WiFi 
Indicator flashing once per second.  If not follow the instructions for changing the 
WiFi connection mode. Also ensure your phone is connected to the WiFi network. 
(We advise turning mobile data off during setup)  


1.  Open app and press 

“+” to 

add device, or use the add 
device button


2.  Select the type of device                                                               

as “Heater” within the Home 
Appliance tab. 


3.  

Press on the AP mode 

button in the top right of the 
screen.


4. Ensure the WiFi indicator on 

the heater is slowly flashing 
(once per second), then 
press on the orange button 
at the bottom of the screen 
to confirm 


5. Enter your WiFi password 

and press confirm.


6. Go to network settings in your 

phone and connect to the 
“SmartLife xxx” connection. 
There is no password to 
enter. Then return back to the 
app to complete setup.


This will then transfer the settings to the heater.   

Once the connection process has completed, go back to the network settings on your phone to ensure 
your phone has reconnected to your WiFi router.


Содержание ECFIRPH7W

Страница 1: ...Infrared Carbon Heater with Smart App ECFIRPH7W Thank you for choosing electriQ Please read the manual before using this heater and keep it safe for future reference Visit our page www electriQ co uk...

Страница 2: ...SAFETY INSTRUCTIONS 3 PRODUCT OVERVIEW 6 INSTALLATION 5 OPERATION 7 SETTING UP THE APP 8 USING THE APP 13 CLEANING AND MAINTENANCE 19 TROUBLESHOOTING 19 TECHNICAL SPECIFICATIONS 20 SUPPORT 20 PRODUCT...

Страница 3: ...d less than 8 years shall only switch on off the appliance provided that it has been placed or installed in its intended normal operating position and they have been given supervision or instruction c...

Страница 4: ...Do not use the appliance for anything other than its intended use It is designed for domestic indoor use only There may be a trace of odour during the first few minutes of initial use or after a peri...

Страница 5: ...ecommend to have the panel installed by a quali ed electrician or installer The distance from the heater to the oor must be at least 20 cm Step 1 Use the supplied template to mark the position of the...

Страница 6: ...crease the desired temperature Timer Button Used to set a countdown timer and to disable WIFI Heating Status Indicates whether the heater is currently operating 1 Weekday 2 Open Window Indicator 3 Tim...

Страница 7: ...one use timer and starts operation when programmed 1 While the unit is operating press the TIMER button to activate the timer 2 Use the Temperature and buttons to adjust its duration 3 Once the set ti...

Страница 8: ...etails By default WIFI is enabled when you switch the heater on The WIFI symbol will flash until a connection is established To turn the WiFi off press and hold the WiFi button for 10 seconds until th...

Страница 9: ...4 A verification code will be sent by the method selected in step 3 Enter the code into the app 2 The app is now registered It will automatically log you in following registration 5 Type in the passw...

Страница 10: ...ype in a name for your home 4 Press on the location button to select the location of your home See SETTING YOUR LOCATION below 5 New rooms can be added by pressing the ADD ANOTHER ROOM option at the b...

Страница 11: ...phone is connected to the WiFi network We advise turning mobile data off during setup 2 Select the type of device as Heater within the Home Appliance tab 3 Press on the orange button at the bottom of...

Страница 12: ...within the Home Appliance tab 3 Press on the AP mode button in the top right of the screen 4 Ensure the WiFi indicator on the heater is slowly flashing once per second then press on the orange button...

Страница 13: ...it on or off or to enter the device screen to make other changes Smart Scene Allows you to program intelligent behaviour based on the internal and external environment Add Device Add a device to the a...

Страница 14: ...the unit on or off Device Name Desired Temperature Displays what has been set as the target room temperature Decrease Desired Temperature Temperature range 15 35C Increase Desired Temperature Temperat...

Страница 15: ...n the main schedule screen Schedules can also be amended and deleted as required The app provides a timer that can be easily programmed using your phone This can be accessed through the schedule optio...

Страница 16: ...configurations Below is an example of how to set up a scene 3 Press the Pen next to Please Enter Scene Name to input the name for your Scene Show on Dashboard Leave this on if you require the scene t...

Страница 17: ...Press the Pen next to Please Enter Scene Name to input the name for your Scene Press the Red Plus next to When any condition is satisfied to add the trigger Press the Red Plus next to Execute followin...

Страница 18: ...in the correct WiFi connection mode if not please refer to the CHANGING BETWEEN CONNECTION MODES section 2 Ensure the WiFi password has been entered into the app correctly Case sensitive 3 Check that...

Страница 19: ...le Reason Solution No power 1 Power cord is unconnected 2 There is no power from socket 3 The power switch on the rear of the unit is turned off 1 Connect the power cord 2 Check socket is turned on 3...

Страница 20: ...14 53 EU The full text of the EU declaration of conformity is available at the following internet address https www electriQ co uk content declaration of conformity Disposal Do not dispose this produc...

Страница 21: ...ure control select one At minimum heat output elmin N A kW single stage heat output and no room temperature control No In standby mode elSB 1 W two or more manual stages no room temperature control No...

Отзывы: