background image

Chapter 02


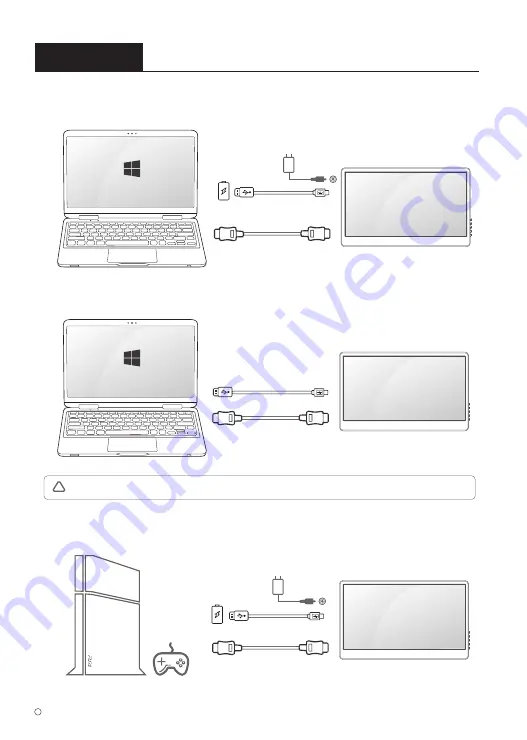
Connecting and Using a Source Device

2-1. Connected to PC/Laptop (with HDMI Port)

2-2. Connected to Other Device (with HDMI Port)

OR

2019 ELECROW All Rights Reserved.

C

5

DISPLAY

HDMI to Mini HDMI Cable

Type A to Micro USB

DC

External Power 

Supply

DISPLAY

HDMI to Mini HDMI Cable

Type A to Micro USB

External Power 

Supply

COMPUTER

COMPUTER

DISPLAY

HDMI to Mini HDMI Cable

Type A to Micro USB

Note

: Some computers have low power USB ports, Do not forget  connect an external power supply of 5V/2A or above.

!

DC

Содержание MQ133

Страница 1: ...ECROW 13 3 IPS Portable Monitor Model MQ133 USER MANUAL Customer Support Should there be any questions please feel free to let us know and contact us with your purchase order number at info elecrow co...

Страница 2: ...2 Connecting and Using a Source Device 2 1 Connected to PC Laptop with HDMI Port 2 2 Connected to Other Devices with HDMI Port 2 3 How to Set Your PC Laptop Monitor to Duplicate or Extend Mode How to...

Страница 3: ...1 1 Electricity and Safety 1 1 2 Installation 1 1 3 Cleaning Do not use a damaged power cord or plug or a loose power socket An electric shock or fire may result Do not touch the power plug with wet h...

Страница 4: ...nd dry cloth in water and wring thoroughly to clean the exterior of the product 5 Connect the power cord to the product when cleaning is finished 6 Power on the product and computer 318 3mm 198 4mm 11...

Страница 5: ...y the setting OSD menu When in the OSD menu press to confirm the selection Auto By default the key is the hot key for signal option When in the OSD menu press to exit the OSD menu By default the key i...

Страница 6: ...Rights Reserved C 5 DISPLAY HDMI to Mini HDMI Cable Type A to Micro USB DC External Power Supply DISPLAY HDMI to Mini HDMI Cable Type A to Micro USB External Power Supply COMPUTER COMPUTER DISPLAY HD...

Страница 7: ...o make your changes according to the indicators on the menu 6 Select the AUTO to return to the previous menu or MENU to save the setting If you want to adjust any other functions repeat steps 2 5 1 Co...

Страница 8: ...T FPS RTS STANDARD DCR Turn dynamic contrast on or off by selecting ON or OFF mode Sharpness The adjusting range is from 0 to 4 Aspect Adjusts the aspect ratio to WIDE or 4 3 Note Only under the Stand...

Страница 9: ...justing range is from 0 to 100 OSD Timer Adjust OSD timeout from 10 to 60 Transparency Adjust the transparency of OSD menu and adjusting range is from 0 to 100 The color temperature function contains...

Страница 10: ...r HDMI 2 Low Blue Light Decrease the blue light emitted from the display Volume Adjust the volume in the range of 0 100 Selects Yes to revert all settings to the factory default mode RESET IMAGE AUTO...

Страница 11: ...anel Size Aspect Ratio Brightness Contrast Resolution Viewing angle Display Color Vertical Frequency Display Mode Response Time Supported Resolutions Power Source Power Consumption Display Area H V Ph...

Страница 12: ...ties Fire flood earthquake or other accidents Problem No power No picture No signal No sound Dark Light Picture Image is blurred Possible Solutions 1 Make sure the power cord is plugged properly 2 Pre...

Отзывы: