background image

6

7


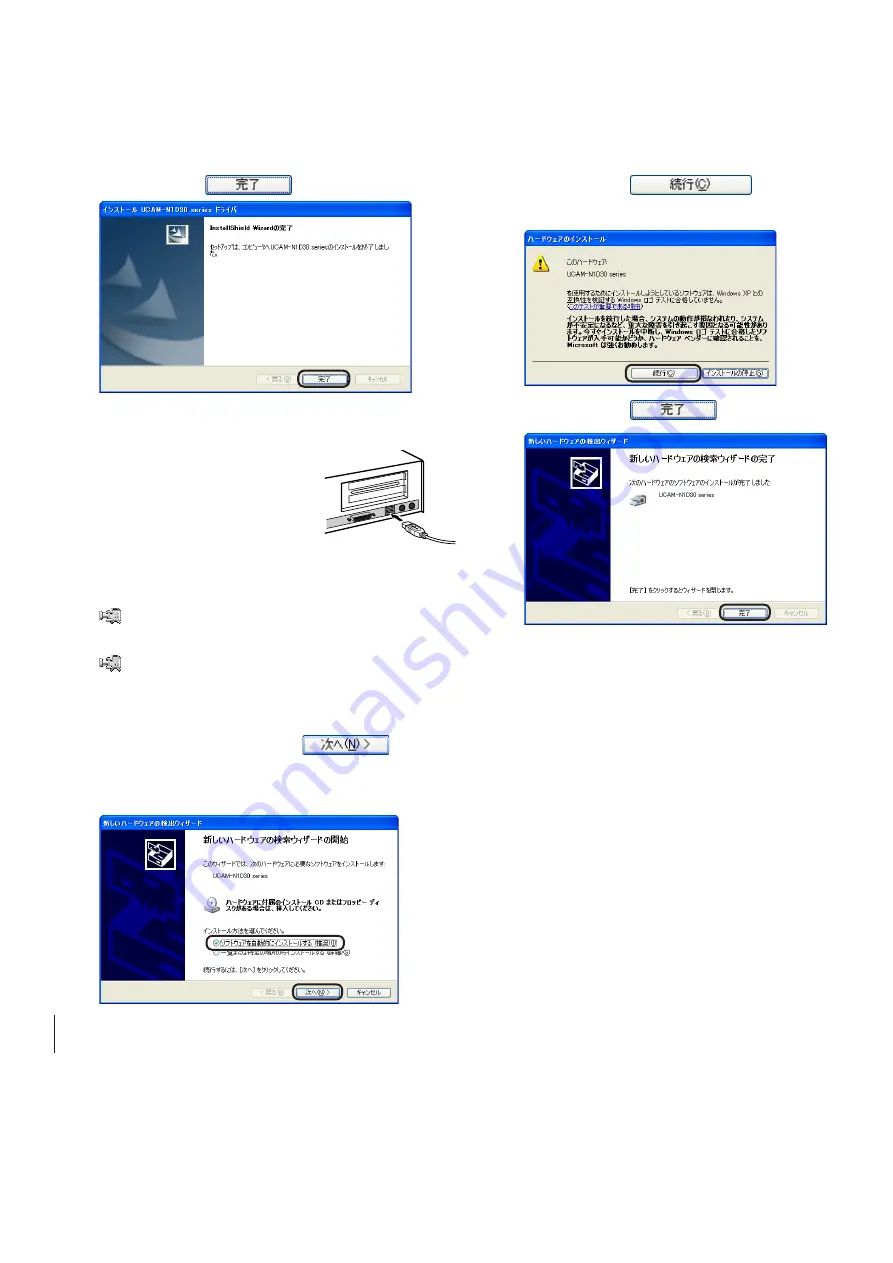
6.


Click on the 


button.


7.


Peel the sticker off the USB connector of 
the webcam.


8.


Plug the USB connector 
of  the  webcam  into  a 
USB port of the PC that 
supports USB 2.0.

The  New  Hardware  Detection Wizard  ap-
pears.

  The  webcam  can  be  disconnected  from 

the PC even when power to the PC is ON.

  Connect  the  webcam  by  properly 

orienting the USB connector to the port.


9.


Select 

「ソフトウェアを自動的にインストー

ルする」

and click on the 

button.

Hardware  Installation  window  appears  on 
the monitor.


10.


Click on the 


button.

Installation begins.


11.


Click on the 

 button.

This  completes  Driver  Utility  installation.  Now, 
check  the  Driver  Utility  has  been  correctly  in-
stalled. Proceed to "Checking Driver Utility Instal-
lation" on pg. 8.

Содержание UCAM-N1D30 Series

Страница 1: ...ing the Driver Utility 5 Checking Driver Utility Installation 8 Uninstalling the Driver Utility 9 Image Setup Image Setup 10 Appendix If the Webcam Does Not Work 11 For Inquiries About this Product 11...

Страница 2: ...ed or uneven surfaces Hold the clip firmly with one hand when turning the webcam Connect the webcam to a USB port that sup plies 5V 500 mA of power or more Precautions in Use Do not touch the webcam s...

Страница 3: ...g performance This webcam is specifically for use with USB 2 0 It requires high speed support It does not support USB 1 1 interfaces Names of Parts Use to capture still pictures via supporting softwar...

Страница 4: ...C or contact the PC manufacturer For Windows XP Service Pack 1 or a later version of Windows XP is required to use this webcam If a support ing Service Pack is not installed in your PC up date Windows...

Страница 5: ...DirectX 9 0b installation program will be executed first In such case updatingthesoftwarewithWindows Update installs the latest version as of January 2005 DirectX 9 0c Install the Driver Utility befo...

Страница 6: ...nnected from the PC even when power to the PC is ON Connect the webcam by properly orienting the USB connector to the port 9 Select and click on the button Hardware Installation window appears on the...

Страница 7: ...Select and click on the button The PC restarts 7 Peel the sticker off the USB connector of the webcam 8 Plug the USB connector of the webcam into a USB port of the PC that supports USB 2 0 The New Ha...

Страница 8: ...ed to the PC If there is nothing wrong with the connection the Driver Utility was not correctly in stalled Disconnect the webcam from the PC uninstall the Driver Utility see Uninstalling the Driver Ut...

Страница 9: ...en no longer necessary or for oth er reasons 1 If using Windows XP select UCAM N1D30 Series Uninstall from the Start menu If using Windows 2000 select UCAM N1D30 Series Uninstall from the Start menu 2...

Страница 10: ...ertical direction Exposure Sets the exposure of the image When a check mark appears in the Auto checkbox exposure is automatically set The webcam setup windows can be called from video capture softwar...

Страница 11: ...with Windows 98 Windows 98SE Windows Me or Mac OS The webcam was connected to the PC before installing the Driver Utility If the webcam was mistakenly connected to the PC before the Driver Utility wa...

Страница 12: ...USB 1 1 External dimensions W67 x D35 x H102 mm Weight 130 g Clip opening 6 17 mm Cable length 180 cm To connector tip Earphone Microphone Earphone Diaphragm diameter 15 mm Diaphragm type Dynamic Max...

Страница 13: ...13 MEMO...

Страница 14: ...14 MEMO...

Страница 15: ...15 USB Connection PC Camera Setup Guide UCAM N1D30 Series Published by ELECOM Corporation 1st Edition February 18 2005 C06001 C6 WU 1 2005 ELECOM Corporation All rights reserved...

Страница 16: ...USB Connection PC Camera Setup Guide...

Отзывы: