11
en
7 SETTING UP THE GAUGE
7.1 SELECTING THE TRANSDUCER TYPE MANUALLY
Follow these steps to select your transducer type.
1.
Select MENU/PROBE/TYPE and press ENTER
2.
Scroll through the transducer list until the appropriate transducer is
highlighted.
3.
Press ENTER to select the transducer.
4.
Perform a probe zero
7.2 TRANSDUCER - ZEROING
Setting the zero point for the transducer is important in the same way it
is important for a mechanical micrometer. Zeroing takes into account
slight variations in the manufacturing process for maximum accuracy.
If zeroing is not carried out correctly, the measurements taken by the
gauge will be in error by some fixed value.
To perform a probe zero:
1.
Press MEAS to display the measurement screen.
2.
Remove all couplant from the face of the transducer and check that the wearface is clean and
free of any debris.
3.
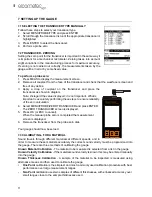
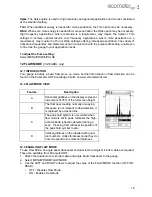
Apply a drop of couplant on the transducer and place the
transducer as shown in diagram.
Note: Disregard the value displayed; it is not important. What is
important is accurately performing these steps to ensure reliability
of the zero calculation.
4.
Select MENU/PROBE/ZERO TRANSDUCER and press ENTER.
The ZERO TRANSDUCER screen is displayed.
5.
Press OK (or ESC to cancel).
When the manual probe zero is completed the measurement
screen is displayed.
6.
Remove the transducer from the probe zero disk.
Your gauge should now be zeroed.
7.3 CALIBRATING - FOR A MATERIAL
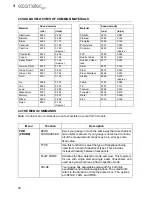
Sound travels through different materials at different speeds, and in
order to measure these materials accurately the correct sound velocity must be programmed into
the gauge. There are three methods of calibrating the gauge.
Known Material Calibration
- The material to be measured is selected from a list in the gauge
Known Velocity Calibration
- If the material sound velocity is known this may be entered manually
into the gauge.
Known Thickness Calibration
- A sample of the material to be inspected is measured using
alternative means and then used to calibrate the gauge.
•
One Point
calibration is the simplest and most commonly used calibration procedure with best
performance over large measurement ranges
•
Two Point
calibration uses two samples of different thicknesses, with enhanced accuracy over
small ranges close to the sample thicknesses used
5
0(18
&/5
0($6


