Pixie Attaché
– an EDP WASP clone
ELBY Designs
– Laurie Biddulph
Kariong, NSW 2250, Australia
13 of 18
ACTION:
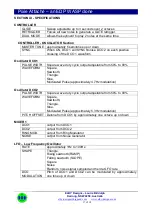
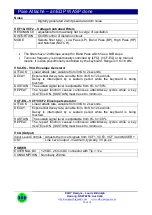
(1) Set controls as in Figure 1.
(2) Turn [DCO 1] control (38) and DCO 2 control (37) down.
(3) Turn the [MIXER] control (24) down.
(4) Turn the [NOISE] control (40) up full.
(5) Turn the [VCF 1] control (27) up full.
(6) Hold low C whilst fully rotating the [FREQUENCY] control (14).
(7) Repeat (6) with the filter in the [BP], [HP] and [NOTCH] positions.
As the noise signal can be considered to be made up of frequencies covering the whole audio spectrum, this
should give a clear idea of the effect of the filter in various modes.
The [RESONANCE] control (34) causes the filter to emphasise any signal that is close to the cut-off
frequency.
ACTION:
Repeat (6) above with the [RESONANCE] control (34) fully clockwise and then fully anti-
clockwise.
The [VCF-EG] control (13), which is explained fully in Section VIII, also introduces modulation of the filters,
but from the VCF-EG Envelope Generator. This is the reason why controls (13) and (15) are placed together
on the front panel.
In addition the Filter cut-off frequency, like the frequencies of DCO 1 and DCO 2, is also determined by the
note played on the keyboard.
ACTION:
(1) set the Pixie Attaché up as shown in Figure 1, but with the oscillators off and the noise
source on full.
(2) Play the keyboard from low C up to top C. The Filter will be heard to track the keyboard.
This is useful when using DCO 1 and DCO 2 since it means that the way the filter
modifies the wave shape of the signal will not change over the range of the keyboard.
The [SEPARATION] control (16) applies
an offset control voltage to VCF 2 allowing its frequency position to
be moved from that of VCF 1.
VCF 3 is a low-pass filter. The [EMPHASIS] control (32) adjusts the 'depth' of the filtering while the [VCF
CONTROL] adjusts the 'amount' of modulation from the VCF CONTROL section.


