Elba EBO-C3580ST Скачать руководство пользователя страница 10

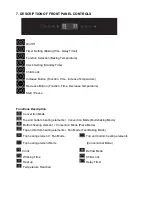
8. PROGRAMME AND FUNCTIONS 

8.1


Current Time Setting


During  the  first  use,  display  screen  shows  a  flashing 

“0:00”. The symbol of Timer Setting 

”  will display.  Press  the button  “

”  or  “

”  to increase or decrease the hours.  After 

setting hours press Clock Setting 

” to set the minutes. Press “

” or “

” to increase or 

decrease the minutes and press 

clock setting again “

” to confirm the current time. 


8.2  Reset the Current Time


Keeping “

” pressed for 3 seconds if you want to set the current time again. Clock setting 

range is from: 00:00 to 23:59.   
Notice:  After  you  have  set  the  time,  leave  the  appliance  away.  The  appliance  will  go  to 
standby mode after 5 minutes. 


8.3  Selecting the Oven Function


In standby mode, press  “

”  to  enter function selection mode.  Press “

”  and  “

”  to 

select  the  desired  function. 

”  ,  “

”  will  light  up  simultaneously.  30:00  and  250

  will 

appear on the screen. 

Press “

” to set baking time. Press “

” and “

” to increase or decrease the baking 

time. 

Press  “

”  again  to  set  delay  timer,  the  delay  timer  symbol  “

”  will  light  (For  further 

information about delay timer setting, refer point 

“Delay Timer Setting”) 

- Press 

” to set temperature. Press “

” and “

” to increase or decrease the desired 

temperature. 
- Press 

” to start the baking function. 


8.4


Delay Timer Setting


The delay timer is the continuation of clock time. For example, if the current time is 10:00 
and  you  want  appliance  start  working  after  2  hours,  you  should  set  delay  time  at  12:00. 
Press the 

” key and wait for confirmation. 

 
When “

” is pressed to define a delayed start timer, the corresponding light “

” starts to 

blink.  The  screen  will  show  the  current  time 

“AUTO”.  Press  “

”  and  “

”  to  set  hours. 

Press 

”  again  to  set minutes.  Press  “

”  to  confirm  the delay  start timer.  Press  “

” 

again the appliance will start working after the delay start timer. 
 
Display  screen  will  show  the  delayed  start  timer 

“AUTO”  and  the current  time  alternately 

when the appliance is in standby mode. 
 
To cancel the delay start timer, press and hold the On/Off button 

” for 1 second. 


8.5  Pause During the Process of Baking 

Stop baking and change the settings 

  Press the Start / Pause 

” button. The baking process will stop. At this moment you 

can adjust the baking time and temperature of the function. 

  Press the On/Off 

” 

button. Enter the function  selection mode, and choose the new 

function. 

  Press the Timer Setting 

” 

button. Then press the Increase Button 

” 

and Decrease 

Содержание EBO-C3580ST

Страница 1: ...al Please read this manual carefully before operating your set Retain it for future reference Record model number and serial number of the set See the label attached on the set and quote this informat...

Страница 2: ...9 8 PROGRAMME AND FUNCTIONS 10 8 1 CURRENT TIME SETTING 10 8 2 RESET THE CURRENT TIME 10 8 3 SELECTING THE OVEN FUNCTION 10 8 4 DELAY TIMER SETTING 10 8 5 PAUSE DURING THE PROCESS OF BAKING 10 8 6 CH...

Страница 3: ...s in the oven When the oven is not being used everything should be removed except provided accessory Do not cover slag pan or other parts with tinsel since it will result overheat Accessible parts may...

Страница 4: ...s 3 INSTALLATION 3 1 Before the Installation Please check the products and make sure that there is no damage caused by striking or heavy load The oven door is level and you can open and close the oven...

Страница 5: ...cabinet should be insulated and the clearance between the edge of the cabinet and the oven should be over 100mm for ventilation 50 546 455 21 594 444 550 448 452 558 565 min 600 100cm 2 50 min 600 458...

Страница 6: ...during installation or handling The panels of the adjacent cabinets must be made of heat resistant material which can withstand temperatures of up to 100 In compliance with current safety standards c...

Страница 7: ...ase contact a qualified technician to check the connection The manufacturer declines all liability of damage resulting from a connection which has not been earthed properly Before plugging the applian...

Страница 8: ...y sauce and or grease from dripping onto the bottom of the oven only when grilling food or when using the rotisserie For all other types of baking never use the bottom shelf and never place anything o...

Страница 9: ...ime Decrease Temperature Start Pause Functions Description Convection Mode Top and bottom heating elements Convection Mode Multi baking Mode Bottom heating element Convection Mode Pizza Mode Top and b...

Страница 10: ...etting Press to set temperature Press and to increase or decrease the desired temperature Press to start the baking function 8 4 Delay Timer Setting The delay timer is the continuation of clock time F...

Страница 11: ...ration of the fans generates a normal air flow which comes out above the door and may continue for a short time even after the appliance is switched to standby mode Notice When the oven temperature le...

Страница 12: ...l come on This is the classic and traditional type of cooking which perfected with heat distribution and reduced energy consumption For example cabbage with ribs Spanish style cod Ancones style stock...

Страница 13: ...tom of the oven as the accumulation of heat could compromise the baking and damage the enamel There is a risk of fire if the aluminum foil or baking material touches the heating element Clean the glas...

Страница 14: ...s to be disposed at an authorized place for recycling of electrical and electronic appliances By collecting and recycling waste you help to save natural resources and make sure the product is disposed...

Страница 15: ......

Отзывы: