©
Elation Professional
®
- www.elationlighting.com - SD Disk Drive™ User Manual Page 5
SD Disk Drive™
Set Up
©
Elation Professional
®
- www.elationlighting.com - SD Disk Drive™ User Manual Page 6
For permanent installation be sure to mount the drive in a rack and
secure the unit to the rack via the built-in rack ears. If the unit is not
used in permanent installation be sure to locate the unit on a flat level
surface to prevent the unit from accidental tipping.
Connect the included DC9V 1200 mA power supply to the power inlet
connection located on the rear of the unit and plug the power supply
in to a standard wall outlet.
Using the included serial link cable, connect one end of the cable to
the RS-232 output connection on the rear of your particular Show De-
signer version (SD, SD1, or SD2). If you have a another device already
connected to the RS-232 jack on the rear of the Show Designer, re-
move it for now and put it aside.
If you already had a trackball or mouse connected to your Show De-
signer or you would like to use one now, connect it to the rear of the
SD Disk Drive via the RS-232 appropriately labeled “To Trackball”. For
more info on using a trackball or mouse see optional accessories.
If you will be using an optional PS-2 Keyboard, connect it now via the
keyboard connector appropriately labeled “To Keyboard” on the rear
of the disk drive unit. For more info on using a keyboard see optional
accessories.
Original Show Designer Firmware Upgrade:
If you are using an
original Show Designer with a software version prior to version 2.10
you must update the system firmware to accept the SD Disk Drive
prior to attempting operation between the two units. If your system
software is greater than 2.10 or you are using a Show Designer 1 or
Show Designer 2 you may skip this step, if not please follow either of
the two steps below (depending on your system software) to allow
seamless operation between your Show Designer and the SD Disk
Drive. The software version can be found in the LCD immediately upon
startup of the Show Designer.
Upgrading Firmware Versions 2.00 - 2.09
-
If you are running a soft-
ware version from 2.00 to 2.09 and you have internet access you can
update the firmware through the use of the SD Disk Drive. The follow-
ing procedures will guide you through the software upgrade.
1
) Follow the installation guide lines and connect your SD Disk Drive
to your Show Designer.
2
) Download the latest Show Designer software from either the Ameri-
can DJ (www.AmericanDJ.com), Elation (www.ElationLighting.com), or
the Elation Professional (www.elationlighting.com). The software ver-
sion must equal version 2.10 or greater to be affective and will down
load as “shdsXXX.txt” where XXX represents the software version.
For
Example;
software version 2.10 will download as “shds210.txt.
”
3
) Rename the file to “autoload.txt” and copy this file to a blank 3.5”
floppy disk. Please note; Windows XP automatically assigns the file
suffix “.txt,” therefore you do not have to add the file suffix. If you do
run into an error while attempting to load the file try removing the “.txt”
extension and repeating the process.
4
) Be sure power to the Show Designer and the SD Disk Drive is off
and insert the floppy disk that contains the renamed show designer file
in to the SD Disk Drive.
5
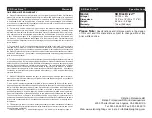
) Press and hold down the “Menu” and “Erase” buttons simultane-
ously while turning on the power to the Show Designer. After the Show
Designer has been powered on, the LCD will read “Download new
program,” you may then release the “Menu” and “Erase” buttons.
6
) With the Show Designer LCD reading “Download new program”
and with the floppy containing the “autoload.txt” file inserted into the
SD Disk Drive, turn on power to the SD Disk Drive. The new software
will automatically begin to load into the Show Designer and the Show
Designer LCD will change to “Receiving new program.”
If the above procedure does not work, please try the process over
and be sure to rename the downloaded Show Designer update file to
“autoload.txt.” You may also want to try removing the “.txt” file exten-
sion and repeating the upload process.
SD Disk Drive™
Set Up
Hold down the Show Designer “Menu”
and “Erase” to update software


