


/ 25 /
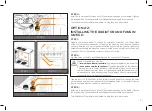
STEP 4
When you turn on the power supply the coolant should be pushed from the
reservoir to other water cooling components, therefore you have to fill the
coolant continuously while the pump is running.
Alternatively you can cycle (turn on and of) the power supply in few
second intervals to speed up the air bleeding process.
When the coolant level becomes steady fill the reservoir so that the coolant
level is about 2 centimeters below the edge. Screw the reservoir top back
in clockwise direction.
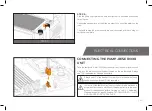
STEP 5
Shake and tilt the PC chassis to remove any air possibly trapped in the radia-
tor. You may need to add more coolant.
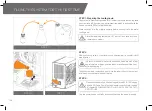
STEP 6: 24 HOUR LEAK TEST
It is best practice to run your pump for at least 24 hours in order
to ensure the system is leak free. Once the 24 hour leak test has
been completed and there is no sign of leaking fluid you are free to
finish your computer build.
You will not be needing the EK-ATx Bridging Plug and EK-Cable Pump
Testing Adapter anymore. Reconnect the pump – refer to page 21, chapter
ELECTRICAL CONNECTIONS.
Reconnect all PSU power connections to your motherboard and periphery
(4/8-pin ESP, 24-pin ATx, PCI-express power, SATA power, ...) to finish
off the build.
STEP 4
STEP 5


