background image

18

MENUS (Cont.)

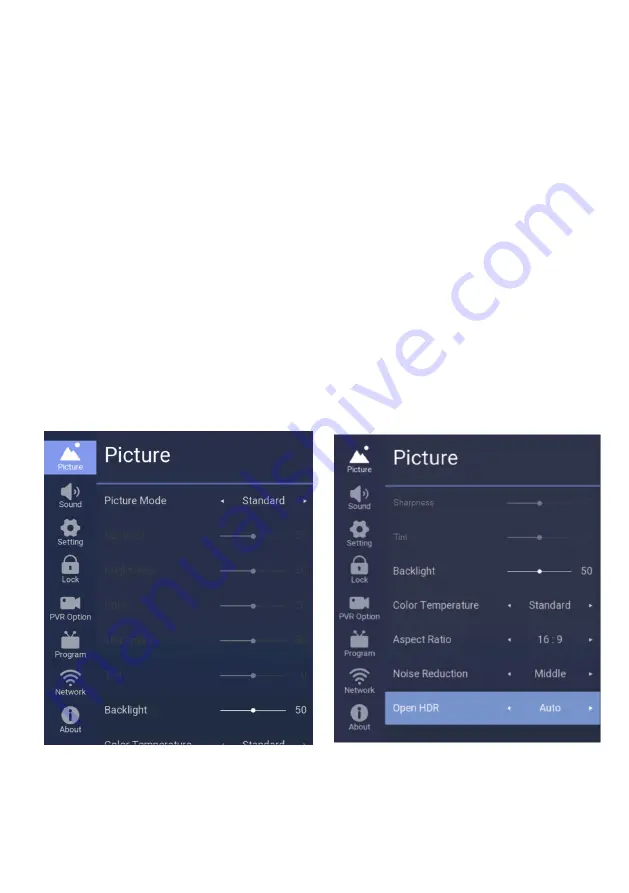
To access PICTURE settings, press the 

MENU

 on your remote control,  go to PICTURE.

PICTURE

Contrast:

 Adjusts the lightness and darkness between objects and the background.

Brightness:

 Adjusts the brightness of the picture.

Colour: 

Adjusts the colors, making them lighter or darker.

Sharpness: 

Adjusts the outline of objects to either sharpen them or make them more dull.

Tint

: Adjusts the Tint of the picture.

OPEN HDR

Select high dynamic range setting (TV must be receiving a HDR signal for this setting to 
be active), Only in HDMI Mode. (example: HDR Media Player, Console that produces HDR 
streaming content such as Netflix, YouTube or other streaming services with HDR content.

Содержание K550USN

Страница 1: ...55 4K ULTRA HD SMART TV K550USN INSTRUCTION MANUAL Please read this manual carefully before using and keep it for future reference...

Страница 2: ......

Страница 3: ...8 Controls and Connections 10 Remote Control 12 Basic Operations 15 Tuning your TV 16 Menus 17 Picture 18 Sound 19 Setting 20 Lock 21 PVR Option 22 Network 23 About 24 Streaming Apps 25 FAQs 26 Specif...

Страница 4: ...t The lightning flash symbol within the triangle is intended to warn you of non insulated dangerous voltage the product s enclosure that could be of sufficient magnitude to generate a risk of electric...

Страница 5: ...or electric shock Unplug this TV during lightning storms or when unused for long periods of time Not doing so may result in fire or electric shock Do not cover the ventilation openings of the product...

Страница 6: ...E MATERIALS REQUIRE DIFFERENT ATTACHMENTS PLEASE SEEK PROFESSIONAL ADVICE IF YOU ARE IN DOUBT WHAT FIXING DEVICE TO USE WARNING GENERAL SAFETY CONT Please beware that Dust could accumulate over time o...

Страница 7: ...e small metallic objects on top of the unit Metal object falls inside the product it may result in short circuit fire or electric shock Do not use or store flammable or combustible materials near the...

Страница 8: ...d Step 1 Place a soft cushioned material on top of a flat surface to prevent damaging the screen panel Then place the TV screen flat on top with the screen side facing down as illustrated on the right...

Страница 9: ...n to assist in the following task We recommend you use a professional installer as we assume no liability for any eventual damage to the product or injury to yourself if you mount the TV on your own N...

Страница 10: ...10 CONTROLS AND CONNECTIONS Channel Up Channel Down Volume Down Volume Down OK Select Volume Up Input Menu...

Страница 11: ...the USB port to record playback of video music photo CONTROLS AND CONNECTIONS 1 OPTICAL 2 RJ45 ETHERNET 3 HDMI 3 4 HDMI 2 5 CVBS Y PB PR 6 AUDIO RIGHT AND LEFT 7 HDMI 1 ARC 8 RF ANTENNA 9 USB 2 INPUT...

Страница 12: ...ormation 12 REWIND Rewind back during media playback 13 Play Pause TIMESHIFT Pause rewind and play live TV USB is needed for this function to work 14 TEXT Press REVEAL to display or hide hidden telete...

Страница 13: ...lay Menu 24 EXIT Exit from the main menu 25 CH Press to play the next or previous channel 26 Fast Forward Fastforward during media playback 27 SUBTITLE Enable disable subtitles 28 ASPECT Adjust the as...

Страница 14: ...use the unit for a long time please remove batteries from the remote to avoid accident Keep batteries away from children and pets Never throw batteries into a fire Do not drop or impact the remote co...

Страница 15: ...Basic Operations Press the INPUT button to display the input source list Press the buttons to select the input source and then perss ENTER to confirm You can access connected USB drives by selecting U...

Страница 16: ...tenna RF cable is plugged into your TV before proceeding Press the MENU button for the below menu to appear Use the directional arrows on your remote control and go to Program Then select Program to a...

Страница 17: ...17 MENUS To access MENU settings Press the menu button on the remote control and the menu will display on your screen MAIN MENU...

Страница 18: ...Adjusts the colors making them lighter or darker Sharpness Adjusts the outline of objects to either sharpen them or make them more dull Tint Adjusts the Tint of the picture OPEN HDR Select high dynami...

Страница 19: ...sounds mode Music Provides clear and live sound for music Movie Provides live and full sound for movies Sports Emphasizes bass over other sounds User Customise to the settings of your choice Equalise...

Страница 20: ...Link Setup is HDMI CEC Settings Select this option to go in and turn on or off HDMI CEC HDMI ARC Auto Power and Auto Standby via HDMI CEC function HDMI CEC allows devices connected to your TV through...

Страница 21: ...remote control go to LOCK Lock Systen Can select On or Off Default Passowrd 0000 is the default password setting Set Password Enter your 4 digit password once entered confirm password by entering the...

Страница 22: ...stem Press up down direction keys to select PVR file system Select submenu in DTV mode Start Record Start recording on the channel you are on Start Timeshift Start timeshift function while watching TV...

Страница 23: ...ter Network Configuration press right direction arrow to WIFI and select it 2 To scan for your WIFI network go down and select Scan AP once scanning is complete choose your WIFI network then select PA...

Страница 24: ...bout settings press the MENU on your remote control go to ABOUT Netflix Do not select option to Deactivate or Terminate Netflix this will permenantly remove netflix from your TV and you will not be ab...

Страница 25: ...o select which app you want to open go up into the selection of apps and using the left or right directional arrows you can go through the apps that are built into your TV Connect to the internet via...

Страница 26: ...onnected correctly Check if input settings for TV is correct Audio settings are properly set Make sure volume is not muted If earphones are connected unplug them Adjust the volume No operation can be...

Страница 27: ...HERNET WiFi Yes 802 11 b g n Multimedia Playback Format under USB Mode Movie MPEG2 MPEG4 H264 MJPEG FLV VP8 VP9 Music MP3 M4A AAC Photo JPEG BMP PNG Power Source 100 240V 50 60Hz Power Consumption 135...

Страница 28: ...CUSTOMER SUPPORT info ayonz com DISTRIBUTED BY Ayonz Pty Ltd...

Отзывы: