background image

3

PRECAUTIONS


WARNING

Handle the power cord with care.

•  Do not place the cord underneath the unit or other heavy objects.

•  Do not pull on or tie the cord.

If the power cord becomes damaged, stop using it. Use of a damaged cord may result in fi re 

or electric shock.

Never touch the plug and power cord if it begins to thunder.

Touching them may result in electric shock.

When attaching an arm stand, please refer to the user’s manual of the arm 

stand and install the unit securely.

Not doing so may cause the unit to become unattached, which may result in injury or 

equipment damage. When the unit is dropped, please ask your dealer for advice. Do not 

continue using a damaged unit. Using a damaged unit may result in fi re or electric shock. 

When reattaching the tilt stand, please use the same screws and tighten them securely.

Do not touch a damaged LCD panel directly with bare hands.

The liquid crystal that may leak from the panel is poisonous if it enters the eyes or mouth.

If any part of the skin or body comes in direct contact with the panel, please wash thoroughly. 

If some physical symptoms result, please consult your doctor.

Follow local regulation or laws for safe disposal.

The backlight of the LCD panel contains mercury.

Содержание FlexScan S2100-M

Страница 1: ... 4 Off Timer Settings 2 5 Screen Size Selection 2 6 Power Indicator EIZO Logo Display Setting 2 7 Locking Buttons 2 8 Setting Adjustment menu Display 2 9 Viewing Information Setting Language 2 10 Setting BrightRegulator 2 11 Resumption of Default Setting Chapter 3 Connecting Cables 3 1 Connecting Two PCs to the Monitor 3 2 Connecting Peripheral USB Devices Chapter 4 Troubleshooting Chapter 5 Refer...

Страница 2: ...ion Indicates to ground for safety Copyright 2005 2006 EIZO NANAO CORPORATION All rights reserved No part of this manual may be reproduced stored in a retrieval system or transmitted in any form or by any means electronic mechanical or otherwise without the prior written permission of EIZO NANAO CORPORATION EIZO NANAO CORPORATION is under no obligation to hold any submitted material or information...

Страница 3: ...e region to which it was originally shipped If the product is used outside the region it may not operate as specified in the specifications To ensure personal safety and proper maintenance please read carefully this section and the caution statements on the monitor Location of Caution Statement ...

Страница 4: ...e A unit placed on an inadequate surface may fall and result in injury or equipment damage If the unit falls disconnect the power immediately and ask your dealer for advice Do not continue using a damaged unit Using a damaged unit may result in fire or electric shock ...

Страница 5: ...become unattached which may result in injury or equipment damage When the unit is dropped please ask your dealer for advice Do not continue using a damaged unit Using a damaged unit may result in fire or electric shock When reattaching the tilt stand please use the same screws and tighten them securely Do not touch a damaged LCD panel directly with bare hands The liquid crystal that may leak from ...

Страница 6: ... and cables when moving the unit Moving the unit with the cord attached is dangerous It may result in injury When handling the unit grip the bottom of the unit firmly with both hands ensuring the panel faces outward before lifting Dropping the unit may result in injury or equipment damage ...

Страница 7: ...age is dark or black If pressure is repeatedly applied to the screen it may deteriorate or damage your LCD panel Leave the screen white to decrease the prints Do not scratch or press on the panel with any sharp objects such as a pencil or pen as this may result in damage to the panel Do not attempt to brush with tissues as this may scratch the LCD panel When the monitor is cold and brought into a ...

Страница 8: ...ndicator EIZO Logo Display Setting 18 To turn off the Power indicator while a screen is displayed Power Indicator Setting 18 To display EIZO logo EIZO Logo Appearing Function 18 2 7 Locking Buttons 18 To lock operation Adjustment Lock 18 2 8 Setting Adjustment menu Display 19 To update menu settings Menu Size Menu Position Menu Off Timer Translucent Orientation 19 2 9 Viewing Information Setting L...

Страница 9: ...zel Portrait Landscape display available 1 2 Buttons and Indicators Buttons 1 Adjustment menu ScreenManager 2 Senser BrightRegulator 3 Input signal selection button 4 Mode button 5 Auto adjustment button 6 Enter button 7 Control buttons Left Down Up Right 8 Power button 9 Power indicator Indicator status Operation status Blue The screen is displayed Yellow Power saving Off Power off ScreenManager ...

Страница 10: ...s or to adjust brightness Page 11 2 Screen Adjustment Advaced Adjustment Adjustment menu Clock to remove vertical bars see page 12 Phase to remove horizontal flickering and blur distortion see page 12 Position to correct screen position see page 12 Range Adjustment to adjust color gradation automatically see page 13 Smoothing to adjust blurred texts lines see page 13 Function marked with are also ...

Страница 11: ...tment menu Refer to below for operation Set the off timer Off Timer to set the monitor power off time see page 16 Change the screen size Screen Size to change screen size see page 17 Border Intensity to change the brightness of non displayed area of image see page 17 Power Indicator Setting Power Indicator Setting to turn off the indicator while the screen is displayed see page 18 Adjustment menu ...

Страница 12: ...le for easy adjustments of the monitor screen following adjustment patterns and procedures on the screen ScreenManager Pro for Medical for Windows application software A utility software program to control monitor adjustments from a PC using its mouse and keyboard A PC must be connected to the monitor with the supplied USB cable Refer to the description later User s Manual of this monitor PDF file...

Страница 13: ...the Screen Adjustment Program Load the EIZO LCD Utility Disk on the PC and start the Screen Adjustment Program compatible with the PC in use After the program starts up perform the adjustment in step 4 following the instructions of the program Attention Wait 20 minutes or more from monitor power on before starting adjustments Attention This function works correctly when an image is fully displayed...

Страница 14: ... and press The adjustment is completed To remove flickering or blurring Phase 1 Choose Phase from the Screen menu and press The Phase menu appears 2 Adjust the phase with or and press The adjustment is completed To correct screen position Position Since the number of pixels and the pixel positions are fixed on the LCD monitor only one position is provided to display images correctly The position a...

Страница 15: ...tion All the adjustments using the Screen Adjustment Program are completed 6 Change the smoothing setting To modify blurred characters lines Smoothing When a low resolution image is displayed the characters or lines of the displayed image may be blurred 1 Choose Screen from the Adjustment menu and press 2 Choose Smoothing from the Screen menu and press The smoothing menu appears 3 Select a suitabl...

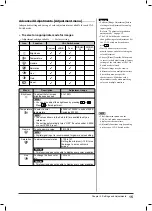
Страница 16: ... texts for word processing or spreadsheets DICOM CL Available for setting tailored to X ray film color clear base DICOM BL Available for setting tailored to X ray film color blue base CAL Switch mode name Example Custom Displays current mode To select CAL Switch mode name 1 Press The CAL Switch mode name appears at the lower left of the screen 2 One of five modes is displayed in turn each time is ...

Страница 17: ... To adjust color saturation 128 to 127 Setting the minimum 128 turns the image to a monochrome screen Attention This function does not enable to display every color gradation Hue To change the flesh color etc 32 to 32 Attention This function does not enable to display every color gradation NOTE The Adjustment menu and the CAL Switch mode name cannot be displayed at the same time Adjustable functio...

Страница 18: ...f Timer This function allows the monitor to automatically turn off after a specified time has passed This function serves to reduce afterimages caused when the monitor screen is left on for a long time period without use Use this function when an image is displayed throughout the day Off Timer System Timer Monitor Power Indicator ON time 1H 23H Operating Blue Last 15 min in ON time Advance Notice ...

Страница 19: ... specified resolution Example Image size 1280 1024 1600 1200 Full Default setting Enlarged Normal 1280 1024 1500 1200 Procedure 1 Choose Others from the Adjustment menu and press 2 Choose Screen Size from the Others menu and press The screen size setting window appears 3 Select Full Enlarged or Normal with or and press The screen size setting is completed To adjust brightness of non display area B...

Страница 20: ...is completed To display EIZO logo EIZO Logo Appearing Function When this unit is turned on the EIZO logo appears at the center of the screen Selection to display or not to display the logo is available with this function Procedure 1 Press to power off the unit 2 Press again while pressing The EIZO logo does not appear on the screen Resetting 1 Press to power off the unit 2 Press again while pressi...

Страница 21: ...sing the following procedure 1 Choose Others from the Adjustment menu and press 2 Choose Menu Settings from the Others menu and press 3 Choose Menu Off Timer from the Menu Settings menu and press The Menu Off Time menu appears 4 Choose Enable with or 5 Choose an Off Time 15 30 45 60 seconds with or and press The menu off timer setting is completed Translucent Set the transparency for menu display ...

Страница 22: ...set Enable or Disable for BrightRegulator 1 Choose Others from the Adjustment menu and press 2 Choose BrightRegulator from the Others menu and press The BrightRegulator setting window appears 3 Select Enable or Disable with or and press The BrightRegulator setting is completed 2 11 Resumption of Default Setting To reset color adjustment Reset Resume the default settings factory settings for color ...

Страница 23: ...ample 2 Analog D sub mini 15 pin Signal cable FD C16 option Signal cable supplied MD C87 D sub mini 15 pin Analog Selecting input signal Input Signal Selection button Switch the input signal with Input signal switches each time is pressed When the signal is switched the active signal type Analog or Digital appears at the top right corner of the screen for two seconds Chapter 3 Connecting Cables At...

Страница 24: ...ices Required System Environment 1 A PC equipped with a USB port or another USB hub connected to a USB compatible PC 2 Windows 98 Me 2000 XP or Mac OS 8 5 1 or later 3 Supplied EIZO USB cable MD C93 Connection Procedure Setup of USB Function 1 Connect the monitor first to a PC using the signal cable and run the PC 2 Connect the supplied USB cable between the downstream USB port of a USB compatible...

Страница 25: ...gnal soon after power on Check whether the PC is turned on Check whether the signal cable is connected properly Switch the input signal with The message below shows that the input signal is out of the specified frequency range Such signal frequency is displayed in red Example Select an appropriate display mode using the graphics board s utility software Refer to the manual of the graphics board fo...

Страница 26: ...t start Check for Adjustment Lock function 15 The button does not function The button does not function when digital signal is input Check whether the buttons are lockd This function works correctly when an image is fully displayed over the Windows or Macintosh display area It does not work properly when an image is displayed only on a part of the screen DOS prompt window for example or when a bla...

Страница 27: ...following tilt angles of the monitor Up 45 degrees down 45 degrees Up 45 degrees down 45 degrees vertical display 90 degrees clockwise Connect the cables after attaching an arm 5 1 Attaching an Arm Option The stand can be removed and replaced with an arm or another stand to be attached to the monitor Use an arm or stand of EIZO option Attaching 1 Lay the LCD monitor on a soft cloth spread over on ...

Страница 28: ...with a soft cloth such as cotton cloth or lens cleaning paper Remove persistent stains gently with a cloth dampened with little water and then clean the LCD panel again with a dry cloth for better finishing Attention Never use any solvents or chemicals such as thinner benzene wax alcohol and abrasive cleaner which may damage the cabinet or LCD panel NOTE Optional ScreenCleaner is recommended for c...

Страница 29: ...itch Off 1 W or less Input Signal Connectors DVI I connector D sub mini 15 pin connector Analog Input Signal Sync a Separate TTL positive negative b Composite TTL positive negative Analog Input Signal Video Analog positive 0 7 Vp p 75 Ω Digital Signal Transmission System TMDS Single Link Video Signal Memory Analog signal 45 preset 22 Digital Signal 10 preset 0 Plug Play VESA DDC 2B Dimensions Main...

Страница 30: ...ult settings factory settings BrightRegulator Disabled Smoothing 3 CAL Switch Mode Custom Screen Size Full Input Signal Auto Off Timer Disabled Setting Size Normal Off Timer 45 seconds Language English Outside Dimensions unit mm inch ...

Страница 31: ...appear on the screen DICOM Digital Imaging and Communication in Medicine DICOM is a standard for digital imaging and communication for medical use developed by American College of Radiology and National Electric Manufacturers Association DVI Digital Visual Interface DVI is a digital interface standard DVI allows direct transmission of the PC s digital data without loss This adopts the TMDS transmi...

Страница 32: ...s pixels of specified size which are illuminated to form images The EIZO S2100 M monitor consists of 1600 horizontal pixels and 1200 vertical pixels At a resolution of 1600 1200 all pixels are illuminated as a full screen 1 1 sRGB Standard RGB International standard for color reproduction and color space among peripheral devices such as monitors printers digital cameras scanners sRGB allows Intern...

Страница 33: ...31 Chapter 5 Reference 5 5 Preset Timing The following table shows factory preset video timing ...

Страница 34: ...ty Energy Energy saving mode after a certain time beneficial both for the user and environment Electrical safety Emissions Electromagnetic fields Noise emissions Ecology The products must be prepared for recycling and the manufacturer must have a certified environmental management system such as EMAS or ISO 14000 Restrictions on chlorinated and brominated flame retardants and polymers heavy metals...

Страница 35: ...er there is no guarantee that interference will not occur in a particular installation If this equipment does cause harmful interference to radio or television reception which can be determined by turning the equipment off and on the user is encouraged to try to correct the interference by one or more of the following measures Reorient or relocate the receiving antenna Increase the separation betw...

Страница 36: ...ß die Höhe der Bildschirmmitte über dem Boden zwischen 135 150 cm beträgt d Der Standfuß muß die Möglichkeit zur Neigung des Bildschirmgerätes besitzen max vorwärts 5 min nach hinten 5 e Der Standfuß muß die Möglichkeit zur Drehung des Bildschirmgerätes besitzen max 180 Der maximale Kraftaufwand dafür muß weniger als 100 N betragen f Der Standfuß muß in der Stellung verharren in die er manuell bew...

Страница 37: ...tzerland All recycling information is placed in the SWICO s website http www swico ch Recycling Information für Kunden in der Schweiz Alle Informationen zum Thema Recycling finden Sie auf der Homepage des Brancheverbandes SWICO http www swico ch Renseignements de recyclage pour les clients en Suisse Vous trouvez tous les renseignements pour le sujet de recyclage sur la page WEB de I UNION DE BRAN ...

Страница 38: ......

Отзывы: