background image

14

Chapter 2 Basic Adjustment/Setting
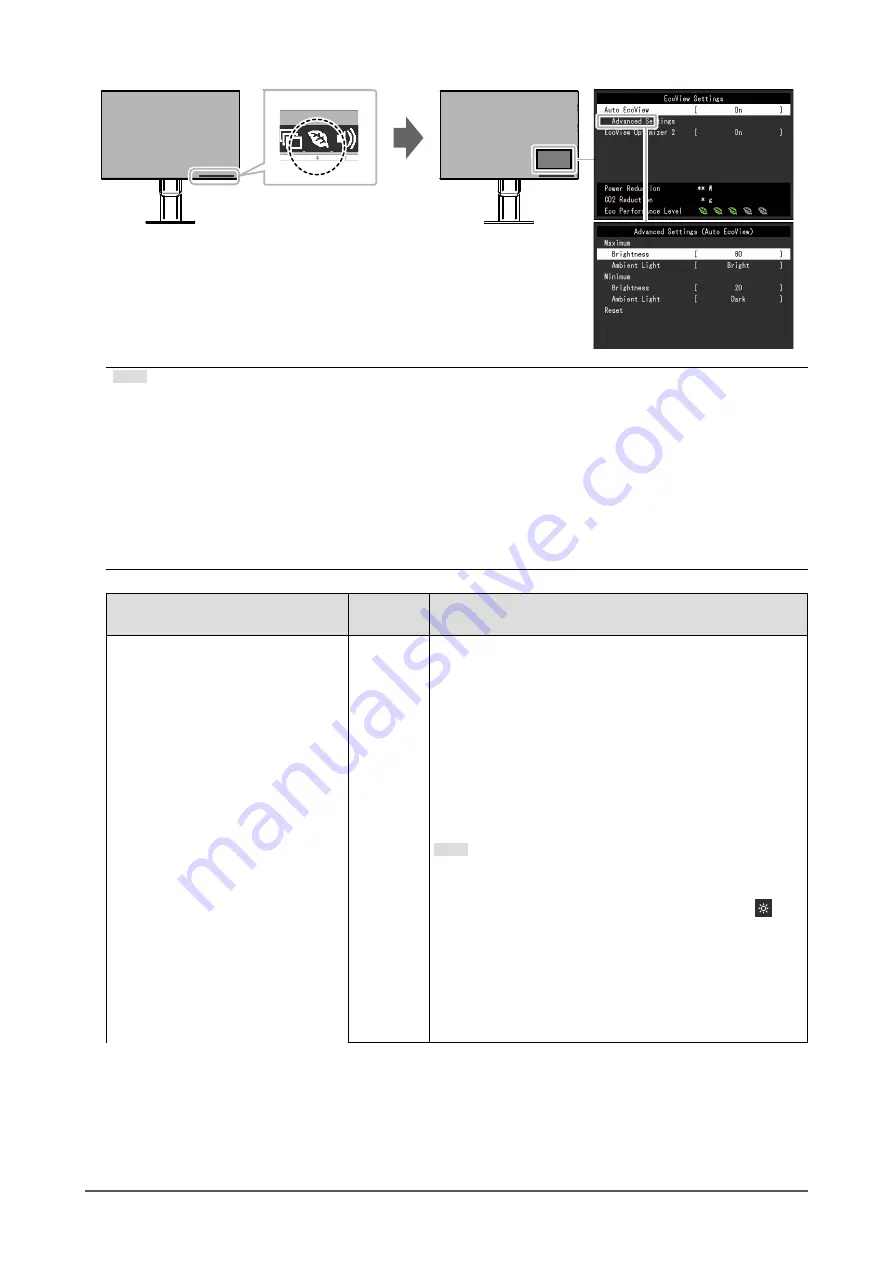
Note

 • The power saving level (Power Reduction, CO

2

 Reduction, and Eco Performance Level) can be checked on the 

“EcoView Settings” menu. The more indicators that light up representing the Eco Performance Level, the higher 
the power saving level attained.

 - Power Reduction: the reduction in the backlight’s power consumption as a result of the adjusted brightness 

value.

 - CO

2

 Reduction: converted from the “Power Reduction” value, this is an estimate of the quantity of CO

2


emissions reduced when using the monitor for 1 hour.

 • The numeric value is a result of calculation based on a default setting (0.000555t-CO2/kWh) determined by a 

Japanese ministerial ordinance (2006, Ministry of Economy, Trade and Industry, Ministry of Environment, civil 
code article 3) and may differ depending on country and year.

Function

Setting 

Range

Description

Auto EcoView
 

On
Off

The ambient light sensor on the front of the monitor detects 
the ambient brightness to automatically adjust the screen 
brightness to a comfortable level using Auto EcoView. The 
power consumption of the backlight can be curtailed by 
adjusting the brightness to an appropriate level.
This function can also mitigate eye strain and tiredness 
caused by a screen that is too bright or too dark.

Use the “Advanced Settings” to set the automatic adjustment 
range to suit the monitor’s usage environment or personal 
preference.

Note

 • Be careful not to block the ambient light sensor on the 

lower side of the monitor when using Auto EcoView.

 • Even when the Auto EcoView setting is “On”, the   

operation switch on the front of the monitor or color 
adjustment can be used to change the “Brightness” to 
suit your personal preference. Moreover, the manner in 
which the Auto EcoView function changes brightness 
also differs according to the changed value.

 • When “DICOM” is selected for the color mode, the Auto 

EcoView setting is turned “Off”.

Содержание FlexScan EV2451

Страница 1: ...iarize yourself with safe and effective usage Please refer to the Setup Guide for basic information ranging from connection of the monitor to a PC to using the monitor For the latest product information including the User s Manual refer to our web site http www eizoglobal com Color LCD Monitor User s Manual ...

Страница 2: ...val system or transmitted in any form or by any means electronic mechanical or otherwise without the prior written permission of EIZO Corporation EIZO Corporation is under no obligation to hold any submitted material or information confidential unless prior arrangements are made pursuant to EIZO Corporation s receipt of said information Although every effort has been made to ensure that this manua...

Страница 3: ... may adhere to the bottom of the stand due to the composition of the rubber Check the desk surface before use It takes about 30 minutes for the performance of electrical parts to stabilize Please wait 30 minutes or more after the monitor power has been turned on and then adjust the monitor Monitors should be set to a lower brightness to reduce changes in luminosity caused by long term use and main...

Страница 4: ...faces of the monitor In that case do not turn the monitor on Instead wait until the dew condensation disappears otherwise it may cause some damage to the monitor Cleaning Attention Chemicals such as alcohol and antiseptic solution may cause gloss variation tarnishing and fading of the cabinet or LCD panel and also quality deterioration of the image Never use thinner benzine wax or abrasive cleaner...

Страница 5: ...ference Settings 24 Language 25 Information 25 Chapter 4 Administrator Settings 26 4 1 Basic Operation of the Administrator Settings Menu 26 4 2 Functions of the Administrator Settings Menu 27 Chapter 5 Troubleshooting 28 5 1 No Picture 28 5 2 Imaging Problems For Both Digital and Analog 29 5 3 Imaging Problems For Analog Only 30 5 4 Other Problems 31 Chapter 6 Reference 32 6 1 Attaching the Optio...

Страница 6: ... as an external monitor of a notebook computer This product can be used in a multi monitor configuration in which multiple monitors are connected to a single PC Mounting the monitor on an arm enables this product to be used in a multiple monitor configuration in which the screen is rotated by 180 flipped vertically Note PC settings must be configured to rotate the monitor display by 180 ...

Страница 7: ... consumption while maintaining the brightness specified by the input signal 1 Reference values Maximum power consumption 42 W when a USB device is connected speaker working standard power consumption 13 W brightness 120 cd m2 when no USB device is connected speaker not working at default settings Realizing More Convenient Operations Using Screen InStyle The Screen InStyle monitor control utility e...

Страница 8: ...ndicator Indicates the monitor s operation status White Screen display Orange Power saving mode OFF Main power power off 1 For details on usage see 3 1 Basic Operation of the Setting menu page 17 Attention The operation switches and Power switch are capacitance switches that can be operated not only by touching the front part of the switch but also by touching the bezel bottom of the switch When t...

Страница 9: ...am port Connects to a peripheral USB device 10 USB upstream port Connects to the USB cable when using software that needs a USB connection or when using the USB Hub function 11 Headphone jack Connects to headphones 12 Stereo mini jack Connects to a stereo mini jack cable 13 Speakers Outputs audio 14 Security lock slot Complies with Kensington s MicroSaver security system 15 Cable holder Holds the ...

Страница 10: ...0Hz Interlace 800 600 VESA 56 25Hz 72 19Hz 75Hz Progressive 800 600 VESA 60 32Hz Progressive 1024 768 VESA 60Hz Progressive 1024 768 VESA 70 07Hz 75 03Hz Progressive 1280 720 CEA 861 50Hz Progressive 1280 720 CEA 861 59 94Hz Progressive 1280 720 CEA 861 60Hz Progressive 1280 800 VESA CVT 59 81Hz Progressive 1280 1024 VESA 60 02Hz Progressive 1280 1024 VESA 75 03Hz Progressive 1600 900 VESA RB 60Hz...

Страница 11: ... menu 5 Click the OK button 6 When a confirmation dialog box is displayed click Keep changes OS X Mountain Lion 10 8 or later 1 Select System Preferences from the Apple menu 2 When the System Preferences dialog box is displayed click Displays For OS X Mountain Lion 10 8 click Displays for Hardware 3 On the displayed dialog box select the Display tab then choose Change for Resolutions 4 The list of...

Страница 12: ...1 Switch Operation Method 1 Displaying the operation guide 1 Touch any switch except The operation guide appears on the screen 2 Adjusting setting 1 Touch a switch for adjustment setting The Adjustment Setting menu appears A submenu may also be displayed In this case select the item for adjustment setting using and select 2 Perform adjustment setting with the switches and select to accept the chan...

Страница 13: ... effect It is suitable for displaying images from media such as books and documents Movie This mode displays moving images brightly and with a clear cut three dimensional appearance It is suitable for playing back video content DICOM Select this mode to simply display medical purpose digital images based on DICOM Part 14 Attention This is not intended to be used for diagnostic purposes Note Screen...

Страница 14: ...e Description Auto EcoView On Off The ambient light sensor on the front of the monitor detects the ambient brightness to automatically adjust the screen brightness to a comfortable level using Auto EcoView The power consumption of the backlight can be curtailed by adjusting the brightness to an appropriate level This function can also mitigate eye strain and tiredness caused by a screen that is to...

Страница 15: ... white level of the input signal This function can reduce power consumption while maintaining the brightness specified by the input signal Note The setting is turned Off in the following cases When Movie or DICOM is selected for the color mode When set to On the appearance of pale colors may change If this bothers you set this function to Off 2 5 Adjusting Brightness The brightness of the screen c...

Страница 16: ...16 Chapter 2 Basic Adjustment Setting 2 6 Adjusting Volume The volume of the speakers and headphones can be set individually Setting Range 0 to 30 ...

Страница 17: ...tch except The operation guide appears 2 Select The Setting menu appears 2 Adjusting setting 1 Select a menu to adjust set with and select The Sub menu appears 2 Select an item to adjust set with and select The Adjustment Setting menu appears 3 Perform adjustment setting with or and select to accept the changes The Sub menu appears Selecting during adjustment setting will cancel the adjustment set...

Страница 18: ...may be observed in different colors on multiple monitors due to monitor specific characteristics Make fine color adjustments visually when matching colors across multiple monitors Function Setting Range Description Color Mode User1 User2 sRGB Paper Movie DICOM Select the desired mode according to the monitor application The color setting status can also be adjusted according to personal preference...

Страница 19: ...omes reddish at low color temperatures and bluish at high color temperatures similar to the temperatures of a flame A gain preset value is set for each color temperature setting value Note The value shown in K is available only as a reference Gain allows you to perform more advanced adjustment If set to Off the image is displayed in the preset color of the monitor Gain 100 for each RGB channel Whe...

Страница 20: ...tions from being able to be displayed Saturation 50 to 50 Adjust the color saturation Note Using this function may prevent some color gradations from being able to be displayed The minimum value 50 changes the screen to monochrome Gain 0 to 100 The brightness of each red green and blue color component is referred to as Gain The hue of white can be changed by adjusting the gain Note Using this func...

Страница 21: ... full screen without changing the aspect ratio Since aspect ratios are maintained blank horizontal or vertical borders may appear Dot by Dot Displays the image at the set resolution or size specified by the input signal Note Example settings Full Screen Aspect Ratio Dot by Dot 1 Only enabled when input signal information according to which the setting can be automatically determined is detected du...

Страница 22: ... be extended to match the actual contrast ratio of the monitor Auto Automatically identifies the brightness range of the input signal and displays the image accordingly Full Extension of the signal output range is not performed Limited Extends the signal output range through 0 to 255 and displays the image Note This can only be set during DisplayPort or HDMI input This setting is fixed to Full for...

Страница 23: ...phics board After setting adjust the Clock again if vertical bars appear Hor Position Ver Position The display position horizontal and vertical of the screen can be adjusted Note Since the number of pixels and pixel positions are fixed on the LCD monitor only one position is provided to display images correctly Position adjustment is made to shift an image to the correct position 5 Only enabled du...

Страница 24: ...the monitor has shifted to power saving mode images are not displayed on the screen Exiting power saving mode If the monitor receives input it automatically exits power saving mode and returns to the normal display mode Note At the time of shifting to power saving mode a message that indicates the transition is displayed 5 seconds in advance When not using the monitor you can turn off the main pow...

Страница 25: ...tting Range English Deutsch Français Español Italiano Svenska Japanese Simplified Chinese Traditional Chinese Attention The display language of the Administrator Settings menu cannot be changed Information Monitor information product name serial number usage time resolution and input signal can be checked Example ...

Страница 26: ... Menu display 1 Touch to turn off the monitor 2 While touching the leftmost switch touch for more than 2 seconds to turn on the monitor The Administrator Settings menu appears 2 Setting 1 Select an item to set with and select The Adjustment Setting menu appears 2 Set with and select The Administrator Settings menu appears 3 Applying and exiting 1 Select Apply and then The settings are applied and ...

Страница 27: ...gnizes the connector through which PC signals are input and displays images on the screen accordingly regardless of whether this function is set to On or Off just after the main power switch on the rear side of the monitor has been turned on When this function is set to On the monitor only enters power saving mode after all connected PCs have entered power saving mode or have been switched off Com...

Страница 28: ...the PC is connected to the DisplayPort connector Use a signal cable recommended by us for the connection Turn the monitor off and on 2 The message below appears This message appears when the signal is not input correctly even though the monitor is functioning properly This message appears when no signal is input Example The message shown left may appear because some PCs do not output the signal im...

Страница 29: ...ncrease decrease setting value and are displayed in gray Brightness adjustment menu via operation switch Brightness adjustment menu in color adjustment Brightness adjustment may not be possible when the installation environment of the monitor is excessively bright or dark In this case try changing the following settings Change the maximum and minimum values for Ambient Light in the Auto EcoView ad...

Страница 30: ...Try changing Input Color Format in the Setting menu see Input Color Format page 22 10 The image does not display on the entire screen Try changing Picture Expansion in the Setting menu see Picture Expansion page 21 5 3 Imaging Problems For Analog Only Problem Possible cause and remedy 1 Display position is incorrect Use Position in the Setting menu to correct the image position see Hor Position Ve...

Страница 31: ...t the PC If the peripheral devices work correctly when they are directly connected to the PC contact your local EIZO representative Check whether the PC and OS are USB compliant For USB compliance of the respective devices consult their manufacturers Depending on the USB 3 0 host controller that you are using connected USB devices may not be recognized correctly Update to the latest USB 3 0 driver...

Страница 32: ...nce between screw holes 100 mm 100 mm VESA mount of the arm or stand external dimensions 122 mm x 122 mm or less Plate thickness 2 6 mm Strong enough to support weight of the monitor unit excluding the stand and attachments such as cables When attaching an arm or stand the installable orientations and movement range tilt angle are as follows Orientation 1 Movement range tilt angle Up 45 Down 45 1 ...

Страница 33: ... monitor Use the VESA mounting screws supplied with this product when attaching the arm or stand Attaching the original stand 1 Remove the fixing screws on the optional arm or optional stand and detach the optional arm or optional stand 2 To prevent damaging the panel surface lay the monitor with its panel surface facing down on a soft cloth spread on a stable surface 3 Attach the original stand A...

Страница 34: ...er Detaching the cable holder 1 Slide the cable holder to the left and detach it from the stand Attaching the cable holder 1 Align the tabs of the cable holder with the attachment parts of the stand 2 Slide the cable holder to the right and attach it to the stand ...

Страница 35: ... B 1 Align the tabs of A with the attachment parts of the stand A 2 Slide A downward to secure the tabs to the attachment parts of the stand 3 Check the tabs of B four locations indicated by and the attachment locations of A B A 4 Pass the cables between A and B and align B with A to fit in ...

Страница 36: ...36 Chapter 6 Reference 5 Slide B downward and secure it to A Detaching the cable cover 1 Slide B upward and detach it from A 2 While holding down of A lightly slide A upward to detach it from the stand ...

Страница 37: ... 1 To PC 2 To PC 3 To PC 4 DVI connector HDMI connector D Sub mini 15 pin connector DisplayPort connector Digital DisplayPor Signal cable PP200 supplied Note You can select the input signal to display using the operation switch on the front of the monitor For details see 2 2 Switching Input Signals page 12 This product provides a function that automatically recognizes the connector through which P...

Страница 38: ...be used For USB compatibility of peripheral devices contact their manufacturers Even when the monitor is in power saving mode devices connected to the USB downstream port will still work Therefore power consumption of the monitor varies with connected devices even in power saving mode When the main power of the monitor is off a device connected to the USB downstream port will not operate Connectio...

Страница 39: ...tream Max 900 mA per port Audio Audio Input Format DisplayPort 2ch linear PCM 32 kHz 44 1 kHz 48 kHz 88 2 kHz 96 kHz HDMI 2ch linear PCM 32 kHz 44 1 kHz 48 kHz Speakers 1 W 1 W Headphones 2 mW 2 mW 32 Ω Input Terminals Line Stereo mini jack 1 DisplayPort 1 HDMI TypeA 1 shared with video signal Output Terminals Headphones Stereo mini jack 1 Power Input 100 240 VAC 10 50 60 Hz 0 75 A 0 40 A Maximum ...

Страница 40: ...ect Ratio HDMI PC signal input Aspect Ratio HDMI video signal input Auto DVI D input Aspect Ratio D Sub input Aspect Ratio Input Color Format DisplayPort input Auto HDMI PC signal input RGB HDMI video signal input Auto Power Save On Language English Power Indicator On Auto Input Detection Off Compatibility Mode Off On Screen Logo On Key Lock Off Accessories Signal cable HH200HS HDMI HDMI FD C39 DV...

Страница 41: ...mark of Adobe Systems Incorporated in the United States and other countries Apple macOS Mac OS OS X Macintosh and ColorSync are registered trademarks of Apple Inc EIZO the EIZO Logo ColorEdge DuraVision FlexScan FORIS RadiCS RadiForce RadiNET Raptor and ScreenManager are registered trademarks of EIZO Corporation in Japan and other countries ColorEdge Tablet Controller ColorNavigator CuratOR EcoVie...

Страница 42: ...ifferent plastics used Product Lifetime Product Take Back Minimum one year product warranty Minimum three year availability of spare parts Product takeback Packaging Limits on hazardous substances in product packaging Packaging prepared for recycling Ergonomic User centered design Visual ergonomics in products with a display Adjustability for user comfort displays headsets Acoustic performance pro...

Страница 43: ... radio communications However there is no guarantee that interference will not occur in a particular installation If this equipment does cause harmful interference to radio or television reception which can be determined by turning the equipment off and on the user is encouraged to try to correct the interference by one or more of the following measures Reorient or relocate the receiving antenna I...

Страница 44: ...utors b Any incompatibility of the Product due to possible technical innovations and or regulations c Any deterioration of the sensor d Any deterioration of display performance caused by the deterioration of expendable parts such as the LCD panel and or backlight etc e g changes in brightness changes in brightness uniformity changes in color changes in color uniformity defects in pixels including ...

Страница 45: ...s sur le recyclage Ce produit doit être jeté aux points de collecte prévus à cet effet et recyclé conformément à la législation de votre pays afin de réduire l impact sur l environnement Lorsque vous jetez ce produit veuillez contacter un distributeur ou une société affiliée de votre pays Les adresses des distributeurs sont répertoriées sur le site Web EIZO ci dessous http www eizoglobal com Pour ...

Страница 46: ...recycling Wanneer u dit product wilt weggooien moet het uit milieu overwegingen worden verzameld en gerecycled volgens de betreffende wetgeving van uw land Wanneer u dit product wilt weggooien moet u contact opnemen met een distributeur of een partner in uw land De contactadressen worden vermeld op de volgende EIZO website http www eizoglobal com Informação sobre reciclagem Este produto quando o d...

Страница 47: ...sszegyűjteni és újrahasznosítani hogy csökkentsük a környezet terhelését Amikor ezt a terméket eldobja kérjük lépjen kapcsolatba egy országon belüli forgalmazóval vagy társvállalkozással A kapcsolat címei az EIZO alábbi weboldalán találhatók felsorolva http www eizoglobal com Podatki o recikliranju Ob koncu uporabe odslužen izdelek izročite na zbirno mesto za recikliranje v skladu z okoljevarstven...

Страница 48: ... представител или със съответните органи отговарящи за това във вашата страна Данните за връзка с нас са описани на следния Интернет сайт на EIZO http www eizoglobal com Informaţie referitoare la reciclare Acest produs când debarasat trebuie colectat şi reciclat conform legislaţiei ţării rspective ca să reducem sarcina mediului Când se debarasează de acest produs vă rugăm să contactaţi un distribu...

Страница 49: ... UM EV2451 03V25976B1 2nd Edition April 2017 Copyright 2016 2017 EIZO Corporation All rights reserved ...

Отзывы: