background image

1

3. Screen Adjustment and Settings

3


Perform the auto size adjustment again with the analog screen adjustment pattern 
displayed.

1. Display Pattern 1 in full screen on the monitor using the “Screen adjustment pattern files”.

2. Press  . 

A message “Your setting will be lost, if you press again now” appears for five seconds.

3. Press   again while the message is displayed. 

The Auto Adjustment function begins (showing a running status icon) to adjust flickering, 
screen position, and screen size automatically.

4


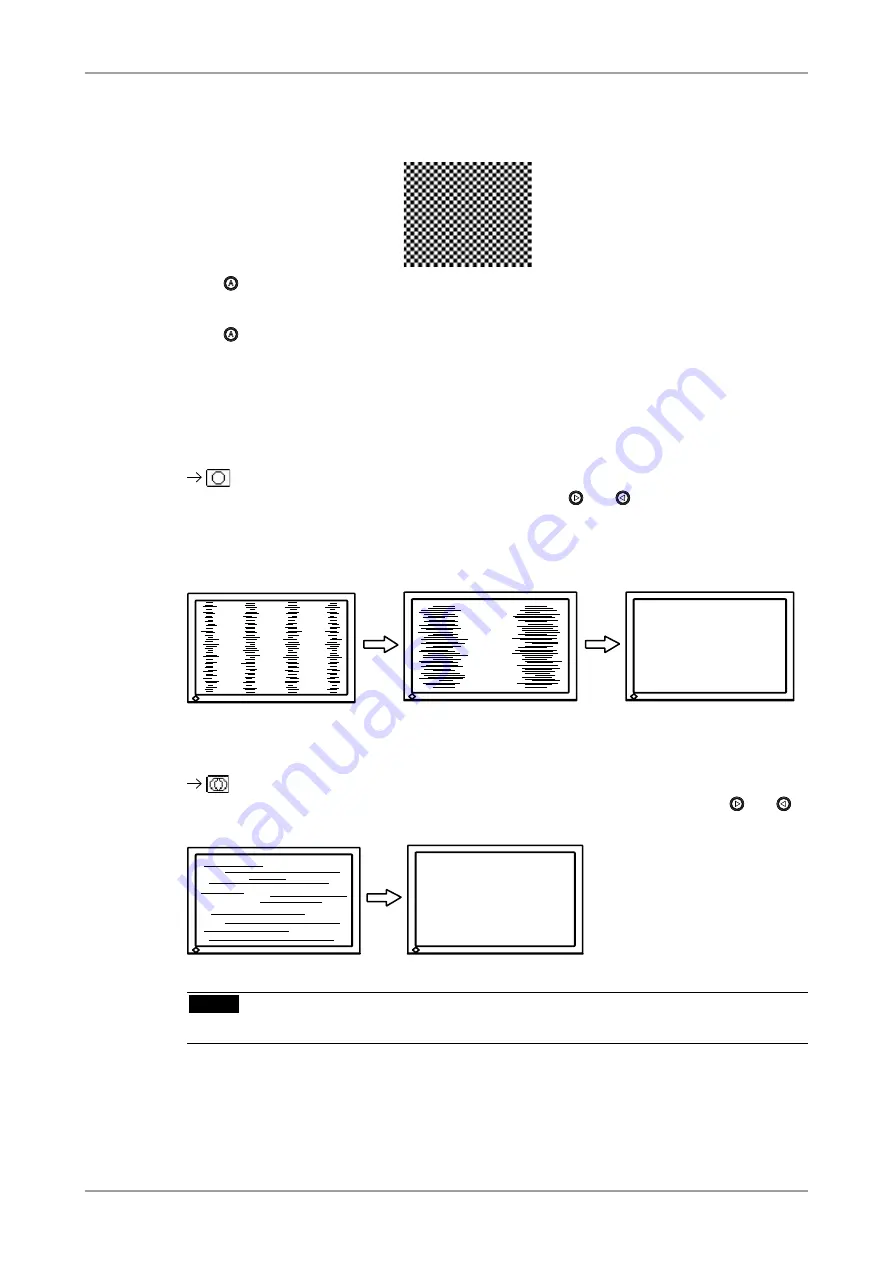
Adjust by using <Screen> menu in the Adjustment menu

(1) Vertical bars appear on the screen 


Use the <Clock> adjustment. 

Select the <Clock> and eliminate the vertical bars by using   and   of the Control buttons.  
Do not continuously press the Control buttons, as the adjustment value will change quickly and 
make it difficult to locate the most suitable adjustment point. If the horizontal flickering, blur 
or bars appear, proceed to <Phase> adjustment as follows.


(2) Horizontal flickering, blurring or bars appear on the screen. 


Use the <Phase> adjustment.  

Select the <Phase> and eliminate the horizontal flickering, blurring or bars by using   and   
buttons. 


NOTE

• Horizontal bars may not completely disappear from the screen depending on the PC.

Содержание COLOR EDGE CG241W

Страница 1: ...r 22 3 6 Locking the settings 22 3 7 Power Indicator Setting 23 3 8 Automatic brightness adjustment 23 3 9 Displaying Lower Resolutions 24 3 10 Setting the orientation of the Adjustment menu 25 3 11 EIZO Logo Appearing Function 25 4 Troubleshooting 26 5 Reference 29 5 1 Attaching an arm 29 5 2 Environmental Settings Digital signals only 30 5 3 Cleaning 31 5 4 Specifications 32 5 5 Glossary 35 6 AP...

Страница 2: ...ery effort has been made to ensure that this manual provides up to date information please note that EIZO monitor specifications are subject to change without notice ENERGY STAR is a registered trademark of the United States Environmental Protection Agency in the United States and other countries Apple Macintosh Power Macintosh and Power Mac are registered trademarks of Apple Inc VESA is a registe...

Страница 3: ...r dealer for advice Attempting to use a malfunctioning unit may result in fire electric shock or equipment damage Do not open the cabinet or modify the unit Opening the cabinet or modifying the unit may result in fire electric shock or burn Refer all servicing to qualified service personnel Do not attempt to service this product yourself as opening or removing covers may result in fire electric sh...

Страница 4: ...utlet of your country Be sure to remain within the rated voltage of the power cord Not doing so may result in fire or electric shock Power supply 100 120 200 240 Vac 50 60 Hz To disconnect the power cord grasp the plug firmly and pull Tugging on the cord may damage and result in fire or electric shock OK The equipment must be connected to a grounded main outlet Not doing so may cause in fire or el...

Страница 5: ...ving the unit with the cord attached is dangerous It may result in injury When handling the unit grip the bottom of the unit firmly with both hands ensuring the panel faces outward before lifting Dropping the unit may result in injury or equipment damage Do not block the ventilation slots on the cabinet Do not place any objects on the ventilation slots Do not install the unit in a closed space Do ...

Страница 6: ...LCD panel Leave the screen white or black to decrease the prints When the screen image is changed after displaying the same image for extended periods of time an afterimage may appear Use the screen saver or timer to avoid displaying the same image for extended periods of time When the monitor is cold and brought into a room or the room temperature goes up quickly dew condensation may occur inside...

Страница 7: ...refer to the EIZO LCD Utility Disk Color Vision Deficiency Simulation Software UniColor Pro supported This software can be downloaded from http www eizo com Smoothing function incorporated for the adjustment of an enlarged image FineContrast modes to select the most suitable mode for screen display Height adjustable stand BrightRegulator function incorporate Attaching the Adjustment Certificate to...

Страница 8: ...t Down Up Right 8 Power button 9 Power indicator Indicator status Operation status Blue The screen is displayed Flashing blue 2 times for each When the timer is set for ColorNavigator notifies that a recalibration is required for CAL mode or EMU mode Orange Power saving Off Power off ScreenManager is an EIZO s nickname of the Adjustment menu Control Panel FineContrast menu Adjustment menu ScreenMa...

Страница 9: ...ator An application software for calibrating monitor characteristics and generating ICC profiles for Windows and Apple ColorSync profiles for Macintosh A PC must be connected to the monitor with the supplied USB cable Refer to the descriotion later Screen adjustment pattern files Used when adjusting the image of the analog signal input manually User s Manual PDF file To use ColorNavigator Refer to...

Страница 10: ... pressed When the signal is switched the active signal type Signal 1 or 2 Analog or Digital appears at the top right corner of the screen for two seconds This function is used to select which PC will have priority to control the monitor when utilizing two PCs The monitor constantly checks the input signals and switches automatically in accordance with the Input Priority setting see table below Onc...

Страница 11: ...s Signal 2 2 If signals from both inputs are present the monitor gives preference to Signal 2 in the following cases When the power of the monitor is turned ON When the signal input to Signal 2 is changed even if active input was Signal 1 Manual The monitor will not detect signals automatically in this mode Select the active input by pressing NOTE When the 1 or 2 is selected the power saving mode ...

Страница 12: ...r peripherals is recommended If the monitor is in the power saving mode or if the monitor is connected to the power outlet with the monitor turned off all the devices connected to the USB ports upstream and downstream work Therefore power consumption of the monitor varies with connected devices even in the power saving mode The followings are procedures for the Windows 8 Windows 7 Windows Vista Wi...

Страница 13: ...Adjustments and Settings 1 Select the desired sub menu icon using and press The sub menu appears 2 Use to select the desired setting icon and press The setting menu appears 3 Use to make all required adjustments and press save the settings 3 Exiting the Adjustment menu 1 To return to the main menu select the Return icon or press twice followed by 2 To exit the Adjustment menu select Exit icon or p...

Страница 14: ...enu Size Change the size of the menu Menu Position Adjust the menu position Menu Off Timer Set the menu displaying time Translucent Set the transparency of the background Orientation Set the orientation of the Adjustment menu BrightRegulator Set automatic brightness adjustment Power Indicator Make non light for blue lighting when the screen is displayed Power Indicator Setting Reset Return to the ...

Страница 15: ...t button again to automatically adjust the clock phase screen position and resolution If you do not wish to do adjust the screen do not press again NOTE The Auto adjustment function is intended for use on the Macintosh and on AT compatible PC running Windows It may not work properly in either of the following cases It does not work properly when an image is displayed only on a part of the screen c...

Страница 16: ...y using Screen menu in the Adjustment menu 1 Vertical bars appear on the screen Use the Clock adjustment Select the Clock and eliminate the vertical bars by using and of the Control buttons Do not continuously press the Control buttons as the adjustment value will change quickly and make it difficult to locate the most suitable adjustment point If the horizontal flickering blur or bars appear proc...

Страница 17: ...ion and the resolution now being displayed are different Select Resolution and confirm if the resolution now being displayed is the same as the input resolution If it is not adjust the vertical resolution using and and adjust the horizontal resolution using and 5 Adjust the output signal range Dynamic Range of the signal Use the Range Adjustment of Screen menu This controls the level of output sig...

Страница 18: ...trast modes are as follows Mode Purpose Custom To adjust the color settings according to your preference sRGB To display the screen images based on those original colors ex over the Internet EMU The mode only for calibration software CAL Color Adjustment of the Mode Settings Brightness Temperature and Gamma settings can be adjusted on the FineContrast menu Select the desired function icon with and...

Страница 19: ...ected FineContrast mode Settable Adjustable Fixed at the factory Icons Functions FineContrast Mode Custom sRGB EMU CAL Brightness Temperature Gamma Saturation Hue Gain 6 Colors Reset These settings can be also adjusted on the FineContrast menu See FineContrast NOTE Allow the LCD monitor to stabilize for at least 30 minutes before making image adjustments Allow the monitor to warm up for at least 3...

Страница 20: ... in the digital signal input is recommended If using the monitor in the analog input signal set the gamma value from 1 8 to 2 2 Saturation To change the saturation 100 100 Setting the minimum level 100 turns the image to the monochrome NOTE The Saturation adjustment may cause undisplayable color tone Hue To change the flesh color etc 100 100 NOTE Using Hue adjustment may not obtain proper tone rep...

Страница 21: ...g Input This monitor complies with the VESA DPMS standard and adopts a power saving method Procedure 1 Set the PC s power saving settings 2 Select VESA DPMS from the PowerManager menu Power Saving System PC Monitor Power Indicator Operation Operation Blue Power saving STAND BY SUSPEND OFF Power saving Orange Power Resumption Procedure Operate the mouse or keyboard to return to a normal screen Digi...

Страница 22: ...ating time expired Power Off Off 1 When is pressed during the advance notice period the monitor continues to operate for additional 90 minutes Extension of operation time can be set without limitation Power Resumption Procedure Press to return a normal screen NOTE The off timer function works while the PowerManager is active but there is no advance notice before the monitor s power is turned off 3...

Страница 23: ...icator in the Adjustment menu Others menu 2 Select Disable 3 8 Automatic brightness adjustment The sensor on the front side of the monitor detects the environmental brightness to adjust the screen brightness automatically and comfortably Procedure 1 Select BrightRegulator in the Adjustment menu Others menu 2 Select Enable NOTE This function is not available in the EMU and CAL modes ...

Страница 24: ...e s resolution Since the vertical resolution and horizontal resolution are enlarged at same rates some horizontal or vertical image maydisappear Normal Displays the picture at the actual Screen resolution Example Displaying 1280 x 1024 2 Smooth the blurred texts of the enlarged screen Switch the Smoothing setting When a low resolution image is displayed in the Full or Enlarged mode the characters ...

Страница 25: ...changed Procedure 1 Select Orientation in the Adjustment menu Others menu 2 Use to select between Portrait and Landscape 3 11 EIZO Logo Appearing Function When switching on the power button on the front control panel the EIZO logo is displayed for a while If you desire to display or undisplay this logo use this function Default is logo appearing To undisplay 1 Press to turn off the unit 2 Press ag...

Страница 26: ... correctly even when the monitor functions properly This message appears when no signal is input This is displayed for about 40 seconds The message shown left may appear because some PCs do not output the signal soon after power on Check whether the PC is turned on Check whether the signal cable is connected properly Switch the input signal with The message below shows that the input signal is out...

Страница 27: ...nc signal are input simultaneously Select either composite signal or separate signal 10 The screen is too bright or too dark Adjust Brightness The LCD monitor backlight has a fixed life span When the screen becomes dark or begins to flicker contact your local dealer 11 Afterimages appear Use a screen saver or off timer function for a long time image display Afterimages are particular to LCD monito...

Страница 28: ...gital signal is input Check for Adjustment Lock function page 22 19 PC is hung up The peripherals connected to the downstream ports do not operate Check that the USB cable is correctly connected Check the downstream ports by connecting the peripherals to other downstream ports If the problem is solved by doing this contact an EIZO dealer For details refer to the manual of the PC Try executing the ...

Страница 29: ...compliant Supportable Weight Total weight of the monitor without stand and attaching equipment such as a cable TÜV GS approved arm or stand Please connect cables after attaching an arm stand Setup Procedure 1 Lay the LCD monitor down Do not scratch the panel 2 Remove the tilt stand by loosening the screws Unscrew the four screws securing the unit and the stand with the screwdriver 3 Attach an arm ...

Страница 30: ...an be set regardless of whether or not the computer is running How to set 1 Press to turn off the unit 2 Press again while pressing 3 Select the input signal using the in the Signal Selection menu at the center of the monitor Use to select or just confirm the frequency that corresponds to your graphics board and then press Normal Horizontal scanning frequency 31 76kHz Vertical scanning frequency 5...

Страница 31: ... damage to the cabinet or LCD panel Cabinet To remove stains wipe the cabinet with a soft lightly moistened cloth using a mild detergent Do not spray wax or cleaner directly into the cabinet For details refer to the manual of the PC LCD Panel The LCD surface can be cleaned with a soft cloth such as cotton or lens paper If necessary stubborn stains can be removed by using the provided ScreenCleaner...

Страница 32: ...Signal Connector DVI I connector Applicable to HDCP 2 Analog Input Signal Sync Separate TTL Positive Negative Composite TTL Positive Negative Analog Input Signal Video 0 7 Vp p 75 ohms Positive Input Signal Digital TMDS Single Link Signal registration Analog 45 Factory preset 30 Digital 10 Factory preset 0 Plug Play VESA DDC 2B EDID structure 1 3 Dimensions with stand 566 mm W x 456 538 mm H x 230...

Страница 33: ...When locked or unlocked with Long beep pressed Adjustment menu data save executed 4 short beeps Monitor not connected correctly PC turned off Monitor received unsupported signal frequency 2 short beeps every 15 sec Monitor is in the advance notice mode of the Off Timer The power will be off within fifteen minutes Dimensions 398 5 15 7 571 22 5 462 544 18 2 21 4 183 5 7 2 373 14 7 45 6 1 8 347 6 13...

Страница 34: ...wer 24 TMDS Clock 5 NC 15 Ground return for 5V Hsync and Vsync C1 Analog Red 6 DDC Clock SCL 16 Hot Plug Detect C2 Analog Green 7 DDC Data SDA 17 TMDS Data0 C3 Analog Blue 8 Analog Vertical Sync 18 TMDS Data0 C4 Analog Horizontal Sync 9 TMDSData1 19 TMDS Data0 5 Shield C5 Analog Ground analog R G B return 10 TMDS Data1 20 NC NC No Connection USB Port No Signal Remarks 1 VCC Cable power 2 Data Seri...

Страница 35: ...he color filter of the LCD panel Red green and blue are the three primary colors The colors on the monitor are displayed by combining these three colors The color tone can change by adjusting the illumination amount passed through each color s filter Gamma Generally the relationship that the light intensity values of a monitor change nonlinearly to the input signal level is called Gamma Characteri...

Страница 36: ... degrees Kelvin At high temperatures the white tone appears somewhat blue while at lower temperatures it appears somewhat red Computer monitors generally give best performance at high temperature settings 5000 K Slightly reddish white usually used in print industry 6500 K White called daylight color suited for web browsing 9300 K Slightly bluish white usually used for television TMDS Transition Mi...

Страница 37: ... 480 75Hz 31 5 MHz Horizontal 37 50 Negative Vertical 75 00 Negative VESA 640 480 85Hz 36 0 MHz Horizontal 43 27 Negative Vertical 85 01 Negative VESA 800 600 56Hz 36 0 MHz Horizontal 35 16 Positive Vertical 56 25 Positive VESA 800 600 60Hz 40 0 MHz Horizontal 37 88 Positive Vertical 60 32 Positive VESA 800 600 72Hz 50 0 MHz Horizontal 48 08 Positive Vertical 72 19 Positive VESA 800 600 75Hz 49 5 ...

Страница 38: ...Vertical 70 00 Positive VESA 1600 1200 75Hz 202 5 MHz Horizontal 93 75 Positive Vertical 75 00 Positive VESA CVT 1680 1050 60Hz 146 3 MHz Horizontal 65 29 Negative Vertical 59 95 Positive VESA CVT 1920 1200 60Hz 193 3 MHz Horizontal 74 56 Negative Vertical 59 89 Positive VESA CVT RB 1920 1200 60Hz 154 0 MHz Horizontal 74 04 Positive Vertical 59 95 Negative ...

Страница 39: ...Energy saving mode after a certain time beneficial both for the user and environment Electrical safety Emissions Electromagnetic fields Noise emissions Ecology The products must be prepared for recycling and the manufacturer must have a certified environmental management system such as EMAS or ISO 14000 Restrictions on chlorinated and brominated flame retardants and polymers heavy metals such as c...

Страница 40: ...o radio communications However there is no guarantee that interference will not occur in a particular installation If this equipment does cause harmful interference to radio or television reception which can be determined by turning the equipment off and on the user is encouraged to try to correct the interference by one or more of the following measures Reorient or relocate the receiving antenna ...

Страница 41: ...daß die Höhe der Bildschirmmitte über dem Boden zwischen 135 150 cm beträgt d Der Standfuß muß die Möglichkeit zur Neigung des Bildschirmgerätes besitzen max vorwärts 5 min nach hinten 5 e Der Standfuß muß die Möglichkeit zur Drehung des Bildschirmgerätes besitzen max 180 Der maximale Kraftaufwand dafür muß weniger als 100 N betragen f Der Standfuß muß in der Stellung verharren in die er manuell b...

Страница 42: ...6th Edition April 2013 03V22160F1 U M CG241W ...

Отзывы: