The specified vibration value can be used to compare
the equipment with another electric power tools.
The specified vibration value can be used for initial
assessment of a harmful effect.
Reduce noise generation and vibration to a
minimum!
Use only equipment that is in perfect condition.
Maintain and clean the equipment regularly.
Adopt your way of working to the equipment.
Do not overload the equipment.
Have the equipment checked if necessary.
Switch off the equipment when not in use.
Wear gloves.
Residual risks
Even if you use this electric power tool in
accordance to instructions, certain residual risks
cannot be eliminated. The following hazards may
arise in connection with the equipment’s
construction and layout:
1.
Lung damage if no suitable protective dust mask
is applied.
2.
Damage to hearing if no suitable ear protection is
applied.
3.
Health damage caused by hand-arm vibrations if
the equipment is used over a longer period or is
not properly guided and maintained.
6. Before starting the equipment
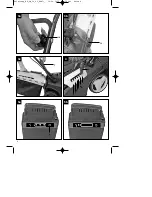
Fitting the push bar (Fig. 3a to 3b)
The push bar is fully pre-assembled and must only be
swung out and adjusted to the required height. To do
so, undo the star nuts (Figure 3a/Item 12) and unfold
the top push bar. Then secure the top push bar again
with the star nuts. Now release the quick-lock lever
(Figure 3b/Item 13) by flipping it open, move the push
bar to the required height and secure by flipping back
the quick-lock lever.
Fitting the grass box (Fig. 3c)
Before you fit the grass bag you must ensure that the
motor is switched off and the blade is not rotating. Lift
the ejector flap (Fig. 3c/Item 7) with one hand. With
the other hand, hold the grass bag by the handle and
hook it in from above (Fig. 3c).
Adjusting the cutting height (Fig. 4)
Important.
Adjust the cutting height only when the
motor is switched off and the safety plug has been
pulled. Before you begin to mow, check to ensure that
the blade is not blunt and that none of the fasteners
are damaged. To prevent any imbalance, replace
blunt and/or damaged blades. To carry out this
check, first switch off the motor and pull out the safety
plug. The cutting height is adjusted as shown in
Figure 4.
To do so, push the lever of the cutting height
adjustment (Figure 4/Item 8) inwards, select the
required cutting height by moving the lever to the left
or right and pull back the lever to one of the six
graduations (Figure 4/Item A-F). Make sure that the
lever engages properly.
Position A
Cutting height: 25 mm
Position B
Cutting height: 35 mm
Position C
Cutting height: 45 mm
Position D
Cutting height: 55 mm
Position E
Cutting height: 65 mm
Position F
Cutting height: 75 mm
Battery
The equipment is fitted with a lithium-ion battery. The
battery pack is completely closed and maintenance
free.
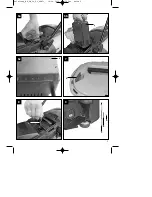
Battery charge level indicator (Fig. 5a to 5b)
The battery pack is equipped with a pushbutton for
checking the charge level. Simply press the
pushbutton (Figure 5a/Item A) to read off the battery
level from the LEDs:
All 3 level monitoring LEDs are lit (Figure 5a):
Battery charge level is high.
2 level monitoring LEDs are lit: Battery charge
level is decreasing. Stop work as soon as
possible.
1 level monitoring LED is lit: Battery is flat.
Stop work IMMEDIATELY and charge the
battery. Otherwise the battery’s service life will be
greatly shortened.
Malfunction LED is lit (Figure 5b): The battery is
defective. Do not continue to use the battery
18
GB
Anleitung_RG_CM_36_Li_SPK7:_ 16.04.2012 12:38 Uhr Seite 18
Содержание RG-CM 36 Li
Страница 3: ...3 1 11 8 3 7 12 2 1 10 6 13 2 6 4 5 9 9 Anleitung_RG_CM_36_Li_SPK7 _ 16 04 2012 12 38 Uhr Seite 3 ...
Страница 4: ...4 3a 3b 3c 4 5a 5b 12 13 7 8 A A B C D E F Anleitung_RG_CM_36_Li_SPK7 _ 16 04 2012 12 38 Uhr Seite 4 ...
Страница 5: ...5 6a 6b 6c 7 8 9 4 4 A 5 C B A Anleitung_RG_CM_36_Li_SPK7 _ 16 04 2012 12 38 Uhr Seite 5 ...
Страница 6: ...6 1 2 3 4 6 5 10 Anleitung_RG_CM_36_Li_SPK7 _ 16 04 2012 12 38 Uhr Seite 6 ...
Страница 60: ...60 Anleitung_RG_CM_36_Li_SPK7 _ 16 04 2012 12 39 Uhr Seite 60 ...
Страница 61: ...61 Anleitung_RG_CM_36_Li_SPK7 _ 16 04 2012 12 39 Uhr Seite 61 ...

