background image

6

GB

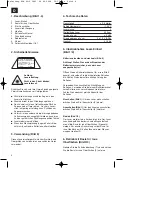
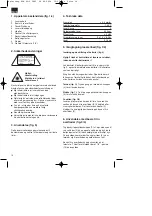
1. Layout (Fig. 1-4)

1 Laser 

unit

Base for rough surfaces

3 ON/OFF 

switch

Laser beam outlet

5 Spirit-levels

Battery compartment cover

7 Safety 

cover

8 Control 

buttons

9 Nails
10  Photographic tripod thread (1/4“)

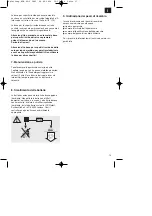
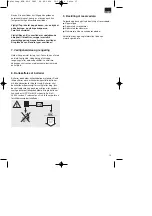
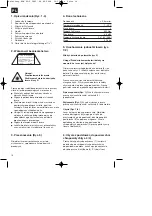
2. Safety information

Caution:
Laser radiation.
Do not look into the beam!
Laser class 2

Protect yourself and your environment from 
accidents by taking the appropriate precautionary 
measures.

Do not look directly into the laser beam with the
naked eye.

Never look directly into the laser path.

Never direct the laser beam at reflecting surfaces,
persons or animals. Even a low output laser beam
can inflict injury on the eye.

Caution: It is vital to follow the work procedures
described in these instructions. Using the tool in
any other way may result in hazardous exposure
to laser radiation.

Never open laser module.

When the tool is not going to be used for an
extended period of time, the batteries should be
removed.

3. Use (Fig. 5)

This laser level unit is used to establish and check
horizontal and vertical lines.

4. Technical data

Accuracy ± 0.6 

mm/m

Operating temperature 

-1-40°C

Laser class 

2

Laser wave length 

650 nm

Laser output 

≤ 5 mW

Laser power supply 

2 x 1.5 V (AAA)

Weight 0.16 

kg

5. Starting up the laser unit (Fig. 1/2)

Inserting and changing batteries (Fig. 2)

Important! Always make sure that the laser is
switched off before you insert the batteries!

Open the battery compartment cover (6) as shown in
Fig. 2 and insert the batteries supplied. Check that
the battery terminals are positioned correctly.

Use only alkaline-manganese batteries. Do not mix
batteries from different manufacturers. Use batteries
with the same capacity.

Switching on (Fig. 1): 

To switch the laser on, press

the On/Off switch (3) once.

Switching off (Fig. 1): 

To switch the laser off, press

the On/Off switch (3) twice.

Operation (Fig. 1/3)

The laser projects a horizontal line. The laser can be
held in your hands or be placed with its magnetic
mount on the base for rough surfaces (2). Exact
alignment on the base for rough surfaces (2) is
facilitated by the three spirit levels (5).

6. Working with the base for rough
surfaces (Fig. 3/4)

Remove the safety cover (7) and place the base for
rough surfaces (2) on a suitable surface and firmly
press the two control buttons (8) simultaneously.
Four nails (9) then emerge at the back and can be
used to fasten the base to the surface.

The base for rough surfaces can also be mounted on
a photographic tripod. For this purpose there is  a
1/4” thread (10) on the rear.

Achtung Laserstrahlung
Nicht in den Strahl blicken!

Laserspezifikation nach
EN 60825-1: 1994+A1: 2002+A2: 2001
Laser Klasse 2

JG-21

Ï

: 650 nm

P: 

 5 mW

Anleitung NLW 90-2 SPK1  08.09.2006  10:17 Uhr  Seite 6

Содержание NLW 90/2

Страница 1: ...struzioni per l uso Livella laser Betjeningsvejledning lasernivelleringsapparat Instrukcja obs ugi Niwelator laserowy Haszn lati utas t s a l zer nivell l k sz l khez Upute za uporabu uredjaja za lase...

Страница 2: ...eiligheidsvoorschriften lezen en in acht nemen Betjeningsvejledningen og sikkerhedsanvisningerne skal l ses inden maskinen tages i brug Alle anvisninger skal f lges Przed uruchomieniem nale y przeczyt...

Страница 3: ...3 3 5 4 1 2 4 5 1 3 6 8 7 2 10 9 Anleitung NLW 90 2 SPK1 08 09 2006 10 17 Uhr Seite 3...

Страница 4: ...rgung Laser 2 x 1 5 V AAA Gewicht 0 16 kg 5 Inbetriebnahme Laser Einheit Bild 1 2 Batterien einsetzen und wechseln Bild 2 Achtung Stellen Sie vor dem Einsetzen der Batterien immer sicher dass der Lase...

Страница 5: ...tung und Reinigung Halten Sie das Ger t stets trocken und sauber Wischen Sie Verschmutzungen mit einem weichen feuchten Tuch ab Verwenden Sie hierf r keine scharfen Reinigungs oder L sungsmittel Reini...

Страница 6: ...ig 1 2 Inserting and changing batteries Fig 2 Important Always make sure that the laser is switched off before you insert the batteries Open the battery compartment cover 6 as shown in Fig 2 and inser...

Страница 7: ...aser beam outlet at regular intervals with a cotton wad 8 Battery disposal Batteries contain materials that are potentially harmful to the environment Never place batteries in your household refuse in...

Страница 8: ...urant du laser 2 x 1 5 V AAA Poids 0 16 kg 5 Mise en service de l unit laser figure 1 2 Mettre les piles en place et les remplacer figure 2 Attention Assurez vous toujours avant de mettre les piles en...

Страница 9: ...salissures avec un chiffon doux et humide N utilisez pas de d tergents o le produits de nettoyage puissants Nettoyer la sortie du rayon laser intervalles r guliers avec un b tonnet ouat 8 limination...

Страница 10: ...eenheid fig 1 2 Batterijen installeren en vervangen fig 2 Let op Vergewis u er zich steeds van dat de laser uitgeschakeld is voordat u de batterijen installeert Open het deksel 6 van het batterijvak z...

Страница 11: ...on Wis vuil met een schone vochtige doek af Gebruik daarvoor geen agressieve schoonmaak of oplosmiddelen Reinig de laserstraaluitlaat regelmatig met een wattenstaafje 8 Verwijderen van batterijen Batt...

Страница 12: ...corrente del laser 2 x 1 5 V AAA Peso 0 16 kg 5 Messa in esercizio dell unit laser Fig 1 2 Come inserire e cambiare le batterie Fig 2 Attenzione Prima di inserire le batterie assicuratevi sempre che i...

Страница 13: ...Non utilizzate a tal fine detergenti aggressivi o solventi Pulite il foro d uscita del raggio laser ad intervalli di tempo regolari con un bastoncino cotonato 8 Smaltimento delle batterie La batterie...

Страница 14: ...ing og udskiftning af batterier fig 2 Vigtigt Husk at kontrollere at laseren er slukket inden du s tter batterierne i Luk d kslet til batterimagasinet 6 op som vist p fig 2 og s t de medf lgende batte...

Страница 15: ...vne mellemrum med en vatpind 8 Bortskaffelse af batterier Batterier indeholder milj skadelige materialer Smid ikke batterier ud som husholdningsaffald batterier m ikke uds ttes for ild eller vand Batt...

Страница 16: ...lasera 5 mW Napi cie zasilania lasera 2 x 1 5V AAA Waga 0 16 kg 5 Uruchomienie jednostki lasera rys 1 2 W o y baterie do pojemnika rys 2 Uwaga Przed w o eniem baterii nale y si upewni e laser jest wy...

Страница 17: ...zenie Prosz zawsze utrzymywa urz dzenie w czysto ci Zabrudzenia usuwa mi kk wilgotn ciereczk Nie u ywa w tym celu r cych rodk w czyszcz cych lub rozpuszczalnik w Wyj cie promienia laserowego prosz czy...

Страница 18: ...ev tele k pek 1 2 Berakni vagy kicser lni az elemeket 2 es k p Figyelem Az elemek bet tele el tt biztos tsa mindig hogy a l zer ki van kapcsolva Nyissa ki a 2 es k pen mutatottak szerint az elemrekesz...

Страница 19: ...haszn ljon ehhez er s tiszt t s old szereket Tiszt tsa rendszeres id szakaszokban a l zersug r kimenetet egy f ltiszt t p lcik val meg 8 Az elemek megsemmis t se Az elemek a k rnyezetet vesz lyeztet a...

Страница 20: ...rske jedinice u pogon slika 1 2 Umetanje i zamjena baterije slika 2 Pa nja Prije umetanja baterije uvijek provjerite je li laser isklju en Otvorite poklopac pretinca za bateriju 6 kao to je prikazano...

Страница 21: ...mojte koristiti abrazivna sredstva za i enje kao ni otapala Izlaz laserske zrake istite u redovitim intervalima higijenskim tapi ima od vate 8 Zbrinjavanje baterija Baterije sadr e materijale koji su...

Страница 22: ...2 650 5 2 1 5 Bec 0 16 5 1 2 2 6 2 1 3 1 3 1 3 2 2 5 RUS Achtung Laserstrahlung Nicht in den Strahl blicken Laserspezifikation nach EN 60825 1 1994 A1 2002 A2 2001 Laser Klasse 2 JG 21 650 nm P 5 mW A...

Страница 23: ...23 6 3 4 7 2 8 9 1 4 10 7 8 ISC GmhH Eschenstra e 6 D 94405 Landau 9 www isc gmbh info RUS iNTERNATiONALES SERViCE CENTER GmbH Anleitung NLW 90 2 SPK1 08 09 2006 10 17 Uhr Seite 23...

Страница 24: ...5 Pu tanje laserske jedinice u pogon slika 1 2 Umetanje i zamena baterije slika 2 Pa nja Pre umetanja baterije uvek proverite da je li laser isklju en Otvorite poklopac pregratka za bateriju 6 kao to...

Страница 25: ...ojte da koristite abrazivna sredstva za i enje ni rastvore Izlaz laserskog zraka istite u redovitim intervalima higijenskim tapi ima od vate 8 Zbrinjavanje baterija Baterije sadr e materijale koji su...

Страница 26: ...n mukaista yhdenmukaisuutta tuotteelle erkl rer herved f lgende samsvar med EU direktiv og standarder for artikkel EC izjavljuje sljede u uskladjenost s odredbama i normama EU za artikl declar urm toa...

Страница 27: ...tners als Er g nzung der lokal g ltigen gesetzlichen Vorschriften Bitte be achten Sie Ihren Ansprechpartner des regional zust ndigen Kun dendienstes oder die unten aufgef hrte Serviceadresse ISC GmbH...

Страница 28: ...cia ryzyka lub przej cia urz dzenia przez klienta Warunkiem skorzystania z uprawnie gwarancyjnych jest prawid owa konserwacja urz dzenia zgodnie z instrukcj obs ugi oraz u ytkowanie zgodne z przeznacz...

Страница 29: ...As an alternative to returning the electrical device the owner is obliged to cooperate in ensuring that the device is properly recycled if ownership is relinquished This can also be done by handing o...

Страница 30: ...interessati gli accessori e i mezzi ausiliari senza elementi elettrici forniti insieme ai vecchi apparecchi G lder kun EU lande Smid ikke el v rkt j ud som almindeligt husholdningsaffald I henhold ti...

Страница 31: ...prema zahtevima za povrat uredjaja Vlasnik elektro uredjaja alternativno je obavezan da umesto povrata robe u slu aju predaje vlasni tva u estvuje u stru nom eliminisanju elektro uredjaja Stari uredj...

Страница 32: ...nti d accompagnamento dei prodotti consentita solo con l esplicita autorizzazione da parte della ISC GmbH Eftertryk eller anden form for mangfoldigg relse af skriftligt materiale ledsagepapirer indbef...

Отзывы: