


GB
- 24 -
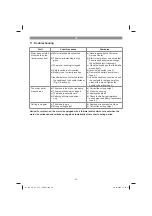
If the battery pack fails to charge, check:
•
whether there is voltage at the socket outlet
•
whether there is good contact at the charging
contacts
If the battery pack still fails to charge, send
•
the charging unit
•
and the battery pack
to our customer service center.
To ensure that items are properly packaged
and delivered when you send them to us,
please contact our customer service or the
point of sale at which the equipment was
purchased.
When shipping or disposing of batteries and
cordless tools, always ensure that they are
packed individually in plastic bags to prevent
short circuits and
fi
res.
To ensure that the battery pack provides long ser-
vice, you should take care to recharge it promptly.
You must recharge the battery pack when you
notice that the performance of the device drops.
Never allow the battery pack to become fully di-
scharged. This will cause it to develop a defect.
Battery capacity indicator (Fig. 13)
Press the switch for the battery capacity indicator
(Item A). The battery capacity indicator (Item B)
shows the charge status of the battery using 3
LEDs.
All 3 LEDs are lit:
The battery is fully charged.
2 or 1 LED(s) are lit:
The battery has an adequate remaining charge.
1 LED
fl
ashes:
The battery is empty, recharge the battery.
All LEDs
fl
ash:
The battery pack has undergone exhaustive di-
scharge and is defective. Do not use or charge a
defective battery pack.
Installing the battery (Fig. 14)
Open the battery cover. Then insert the batteries
in the mounts as shown in Fig. 14.
Important!
Use only batteries which are charged to the same
level. Never combine full and half-full batteries.
Always charge the two batteries simultaneously.
The equipment‘s operating time depends on
the battery with the lower charge level. The two
batteries must always be fully charged before
use. Close the battery cover by
fl
ipping the cover
down.
6. Operation
Caution!
The lawn mover is equipped with a safety circuit
to prevent unauthorized use. Directly before star-
ting up the lawn mover insert the safety plug (Fig.
15/Item 17) and remove the safety plug again
whenever you interrupt or terminate your work.
Important!
To prevent the equipment switching on acciden-
tally, the lawn mower is equipped with a safety
switch (Fig. 1/Item 2) which must be pressed
before the switching bar (Fig. 1/Item 3) can be ac-
tivated. The lawn mower switches itself o
ff
when
the switching bar is released. The start time can
amount to several seconds. Repeat this process
several times so that you are sure that the ma-
chine functions properly. Before you perform any
repair or maintenance work on the equipment,
ensure that the blade is not rotating and that the
safety plug is disconnected.
Caution! Never open the chute
fl
ap when the
grass bag has been detached (to be emptied)
and the motor is still running. A rotating bla-
de can cause serious injuries!
Always carefully fasten the chute
fl
ap and grass
basket. Switch o
ff
the engine before emptying the
grass basket.
Always ensure that a safe distance (provided
by the length of the long handles) is maintained
between the user and the mower housing. Be
especially careful when mowing and changing
direction on slopes and inclines. Maintain a solid
footing and wear sturdy, non-slip footwear and
long trousers.
Always mow along the incline (not up and down).
For safety reasons, the lawn mower may not be
used to mow inclines whose gradient exceeds 15
degrees.
Use special caution when backing up and pulling
the lawn mower. Tripping hazard!
Anl_GE_CM_36_41_Li_SPK9-1.indb 24
Anl_GE_CM_36_41_Li_SPK9-1.indb 24
06.10.2020 13:33:07
06.10.2020 13:33:07


