20
Chapter 2 Installation
✐
Password setting must be done when you connect the projector to the network. This setting
is carried out through the projector’s menu and also it can be set through the network using
the web browser. For further information please refer to item “Initial Setting/Password set-
ting” (
☞
p.30).
✐
Valid characters for password are only 4 digits numeric numbers 0 to 9. The number “0000”
means no password set.
✐
This password is not to restrict the use of the projector. This password is to set the security
against the use of the projector through the network.
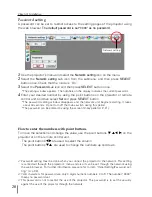
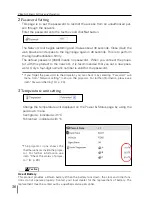
Password setting
A password can be set to restrict access to the setting pages of the projector using
the web browser.
The default password is set “0000” as no password.
1
Use the projector’s menu and select the
Network setting
icon on the menu.
2
Select the
Network setting
sub icon from the submenu, and then press
SELECT
button once. Check that the mode is “On”.
3
Select the
Password
sub icon and then press
SELECT
button once.
*The setting window appears. The numbers on the display indicates the current password.
4
Enter your desired number by using the point buttons on the projector or remote
control unit, and then select
Set
and press
SELECT
button.
*The password setting window disappears and the network unit begins restarting. It takes
about 40 seconds. Do not turn off the mains switch during this period.
*The password can be entered by using the screen 10-key pallet (
☞
P.21).
How to enter the numbers with point buttons
To move the selection and change the value, use the point buttons (
d e 7 8
) on the
projector or on the remote control unit.
The point buttons
7 8
are used to select the column.
The point buttons
d e
are used to change the numbers up and down.
Network setting
Содержание PjNET-20
Страница 5: ...Chapter 1 Preparation 5 Network Unit OWNER S MANUAL ENGLISH 1...
Страница 12: ...12 Chapter 1 Preparation...
Страница 13: ...Chapter 2 Installation 13 Network Unit OWNER S MANUAL ENGLISH 2...
Страница 25: ...3 25 Network Unit OWNER S MANUAL ENGLISH Chapter 3 Basic Setting and Operation...
Страница 37: ...Chapter 4 Controlling the Projector 4 37 Network Unit OWNER S MANUAL ENGLISH...
Страница 59: ...Chapter 5 Network Viewer Capture 5 59 Network Unit OWNER S MANUAL ENGLISH...
Страница 78: ...78 Chapter 5 Network Viewer Capture...
Страница 79: ...Chapter 6 Controlling the Multi Projectors 79 Network Unit OWNER S MANUAL ENGLISH 6...
Страница 85: ...Chapter 7 Use of Serial Port 85 Network Unit OWNER S MANUAL ENGLISH 7...
Страница 103: ...Appendix B FAQ 103 Network Unit OWNER S MANUAL ENGLISH...
Страница 113: ...113 Network Unit OWNER S MANUAL ENGLISH FAQ...


