background image

28

Computer Input

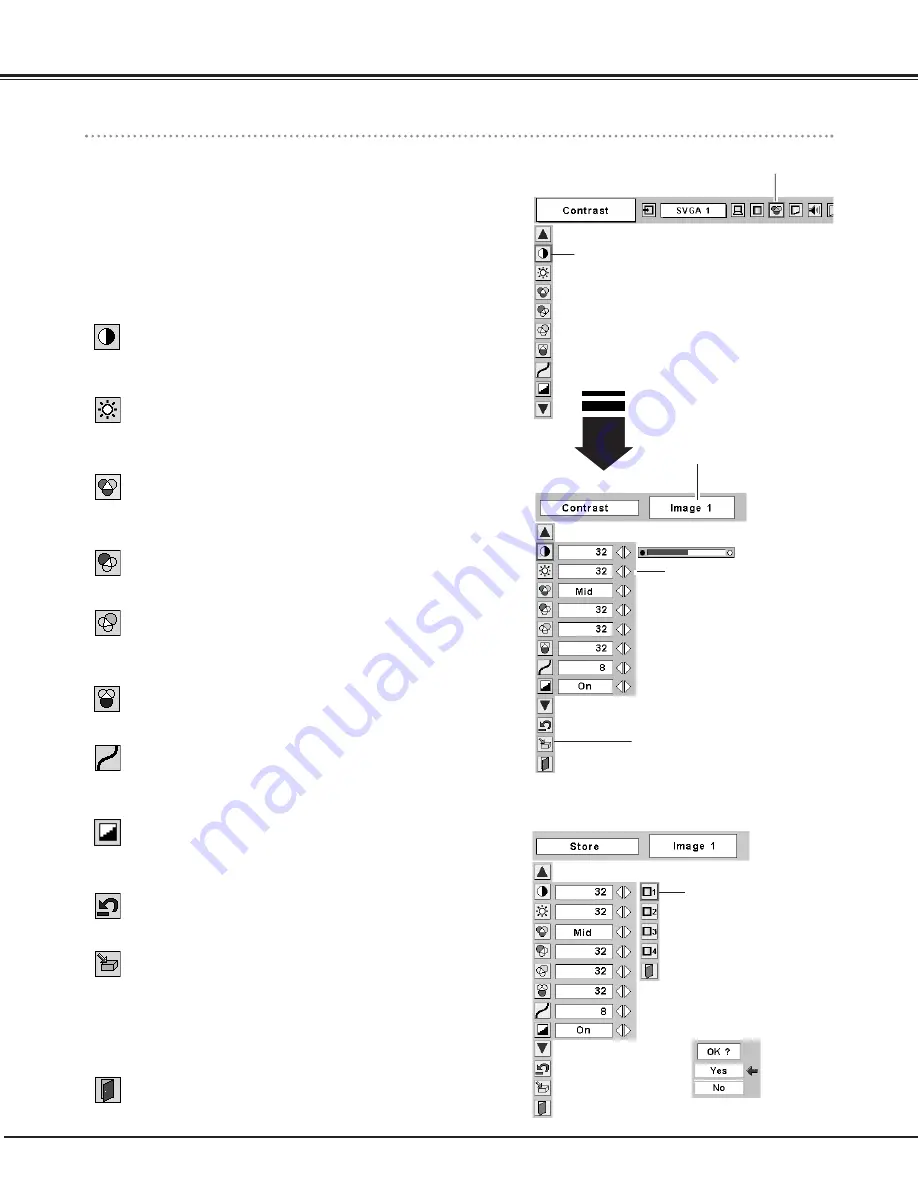
Image Level Menu
Move the red frame
pointer to any of
Image 1 to 4 where
you want to set  and
then press the
SELECT button.

Reset all adjustments to previous figures.

Reset

Store

Close the Image Adjust Menu.

Quit

To store manually preset image, move the red frame pointer to the
Store icon and press the SELECT button to display the Image Level
Menu.  Move the red frame pointer to the Image 1 to 4 where you
want to set and then press the SELECT button.
A confirmation box will appear and select "Yes". 

Press the Point 

7 8

buttons

to adjust the value.

Press the MENU button to display the On-Screen Menu.  Press
the Point 

7 8

buttons to move the red frame pointer to the

Image Adjust Menu icon.

1

2

Press the Point 

d

button to move the red frame pointer to the

item that you want to adjust, and then press the SELECT button.
The level of each item is displayed.  Adjust each level by
pressing the Point 

7 8

buttons.

Move the red frame pointer to
the item to be selected and
then press the SELECT button.

IMAGE ADJUST MENU

Image Level Adjustment

Store icon
Press the SELECT button at this
icon to store the adjustment.

Image Adjust
Menu icon

Selected Image level

Press the Point 

7 8 

buttons to adjust the image contrast. 

(From 0 to 63.)

Press the Point 

7 8

buttons to adjust the image brightness.  

(From 0 to 63.)

Contrast

Brightness

Press the Point 

7 8

buttons to obtain better balance of contrast.

(From 0 to 15.)

Gamma

Press the Point 

7 8

buttons to adjust the red tone.  (From 0 to 63.)

White balance (Red)

Press the Point 

7 8

buttons to adjust the green tone.  (From 0 to 63.)

White balance (Green)

Press the Point 

7 8

buttons to adjust the blue tone.  (From 0 to 63.)

White balance (Blue)

When this function is "On", it automatically enhances contrast of
bright and dark part of the image.

Auto grayscale

Press the Point 

7 8

buttons to select the Color temp. level you want

to select. (XLow, Low, Mid, or High) 

Color temp.

Содержание LC SD12 LC-SD12 LC-SD12

Страница 1: ...MODEL LC SD12 MULTIMEDIA PROJECTOR OWNER S MANUAL www touchboards com 205 Westwood Ave Long Branch NJ 07740 1 866 942 6273 Sales touchboards com...

Страница 2: ...may result in distorted image being displayed in a trapezoid shape Keystone adjustment solves this problem by digitally altering projection to produce undistorted images P20 P36 Multi language Menu Di...

Страница 3: ...nt 16 Basic Operation 17 Turning On the Projector 17 Turning Off the Projector 17 How to Operate the On Screen Menu 18 Menu Bar 19 Zoom Adjustment 20 Focus Adjustment 20 Keystone Adjustment 20 Picture...

Страница 4: ...OF FIRE OR ELECTRIC SHOCK DO NOT EXPOSE THIS APPLIANCE TO RAIN OR MOISTURE This projector produces intense light from the projection lens Do not stare directly into the lens as possible Eye damage co...

Страница 5: ...oltage points or short out parts that could result in a fire or electric shock Never spill liquid of any kind on the projector This projector should be operated only from the type of power source indi...

Страница 6: ...tilt the projector more than 20 degrees above and below Do not point the projector up to pro ject an image Do not point the projector down to project an image Do not put the projector on either side...

Страница 7: ...uency energy and if not installed and used in accordance with the instructions may cause harmful interference to radio communications However there is no guarantee that interference will not occur in...

Страница 8: ...ut any flammable objects near these vents Keep front grills at least 3 1m away from any objects especially heat sensitive objects Do not touch this area especially screws and metallic part This area w...

Страница 9: ...Name and Functions e w q u t r u COMPUTER IN COMPONENT IN Connect computer output component output or RGB Scart 21 pin video output to this connector P15 P16 q VIDEO Connect the composite video output...

Страница 10: ...ed item P18 Expand compress the image in Digital Zoom mode P29 r MENU button Open or close the On Screen Menu P18 t INPUT button Select the input source P22 30 31 e Point e ed d7 8 VOLUME buttons Sele...

Страница 11: ...ource P22 P31 r MENU button Open or close the On Screen Menu P18 t PAGE e ed d buttons Scroll back and forth pages on the screen when giving a presentation P9 P38 0 y D ZOOM e ed d buttons Select the...

Страница 12: ...the remote control If a battery has leaked on the remote control carefully wipe case clean and install new batteries Risk of an explosion if battery is replaced by an incorrect type Dispose of used b...

Страница 13: ...ng in order to provide the best image Center Adjustable Feet The picture tilt and the projection angle can be adjusted by rotating the adjustable feet The projection angle can be adjusted at 8 0 degre...

Страница 14: ...d when an appliance is not used When this projector is connected to the outlet with the AC Power Cord an appliance is in the Stand by Mode and consumes a little electric power Connect the AC Power Cor...

Страница 15: ...onnected from AC outlet Turn the projector and peripheral equipment on before the computer is switched on Installation VGA Cable USB Cable Audio Cable Stereo USB port Audio Output Monitor Output Cable...

Страница 16: ...Audio Output Audio Cable stereo Component video output equipment such as DVD player or high definition TV source Composite Video Output Component Video Output Y Pb Cb Pr Cr Component VGA Cable RCA x 3...

Страница 17: ...R etc before turning on the projector 3 When the projector is cooled down enough to be turned on again the Power indicator turns red again Then you can disconnect the AC power cord 26 The starting dis...

Страница 18: ...ect the item SELECT button Used to move the Pointer up down right left Point buttons Top Control Menu bar Pointer red frame Menu icon Item data Press the Point7 8 buttons to adjust the value or set th...

Страница 19: ...e picture image Contrast Brightness Color Tint Color temp White balance R G B Sharpness Gamma Auto grayscale Progressive P34 35 For video source Same function as menu for the computer source Input Men...

Страница 20: ...ton to reduce the lower part Reduce the upper width with the Point e button Reduce the lower width with the Point d button If a projected picture has keystone distortion correct image with the Keyston...

Страница 21: ...Press the Point 8 button and Press the Point 7 button to decrease volume Press the Point 7 8 buttons to mute the sound Dialog box display is changed to On and sound is muted To restore sound to its p...

Страница 22: ...to Computer and then press the SELECT button The Source Select Menu will appear 1 2 INPUT button Computer Video INPUT MENU Input Menu icon Input Source Selection Computer Input Move the pointer to th...

Страница 23: ...connection of computer and a projector is set correctly Troubleshooting P44 Auto System Menu icon Displays system being selected PC SYSTEM MENU Selecting Computer System Manually System Menu icon Disp...

Страница 24: ...l Move the red frame pointer to Auto PC Adj icon and press the SELECT button PC ADJUST MENU Auto PC Adj PC Adjust Menu icon To store adjustment parameters Adjustment parameters from Auto PC Adjustment...

Страница 25: ...int 7 8 buttons to adjust the value Move the red frame pointer to the item and press the SELECT button PC ADJUST MENU PC Adjust Menu icon Adjust an image as necessary to eliminate flicker from the dis...

Страница 26: ...Off Set On to resize the image with 4 x 3 aspect ratio to fit the screen Full screen Reset Store Close PC Adjust Menu Quit To store adjustment parameters move the red frame pointer to the Store icon...

Страница 27: ...in reproduction of halftones This adjustment is suitable for providing better image in brighter place Real User preset picture adjustment in Image Adjust Menu P28 Image 1 4 Image Select Menu icon Dir...

Страница 28: ...each item is displayed Adjust each level by pressing the Point 7 8 buttons Move the red frame pointer to the item to be selected and then press the SELECT button IMAGE ADJUST MENU Image Level Adjustm...

Страница 29: ...1035i HDTV or 1080i HDTV is selected on PC System Menu P23 True and Digital zoom cannot be selected when 480i 575i 480p 575p is selected on PC System Menu P23 This projector cannot display any resolut...

Страница 30: ...the SELECT button VIDEO Move the pointer to the source and press the SELECT button Source Select Menu VIDEO INPUT MENU INPUT button Video Computer Move the pointer to the source that you want to selec...

Страница 31: ...Source Select Menu will appear 1 2 INPUT button Video Computer Move the pointer to the source that you want to select and then press the SELECT button 3 INPUT MENU Move the pointer red arrow to Comput...

Страница 32: ...ton PAL SECAM NTSC NTSC4 43 PAL M PAL N The projector automatically detects incoming Video signal and adjusts itself to optimize its performance If the projector cannot reproduce proper video image it...

Страница 33: ...justment preset on this projector Standard Picture level adjusted for the picture with fine tone Cinema User preset picture adjustment in Image Adjust Menu P34 35 Image 1 4 Image Select Menu icon Dire...

Страница 34: ...8 buttons to obtain better balance of contrast From 0 to 15 Gamma Press the SELECT button at this icon to display other items Image Adjust Menu icon Press the Point 7 8 buttons to adjust the value Pre...

Страница 35: ...Select L1 for an active picture L2 Select L2 for a still picture progressive Note The Progressive cannot be selected when 1080i 1035i 720p 575p or 480p is selected Screen Size Adjustment This projecto...

Страница 36: ...o set Then press the SELECT button to display the Setting dialog box Blue back When this function is On the projector will project a blue image on the screen if any input signal is not detected Logo T...

Страница 37: ...n on the top control or the remote control is pressed Shutdown When the lamp has been fully cooled down the power will be turned off Off Power management function is canceled Power management Ceiling...

Страница 38: ...or with a computer This item is provided for future use Not available now This function is used to reset the lamp replace counter When replacing the projection lamp reset the lamp replace counter by u...

Страница 39: ...u provide appropriate space for the projector to be ventilated Check the installing condition to see if ventilation slots are not blocked Is the projector not installed near the ventilation duct of ai...

Страница 40: ...t may accumulate on optical elements inside the projector degrading picture quality Do not put small parts into Air Intake Vents It may result in malfunction of the projector RECOMMENDATION We recomme...

Страница 41: ...e AC power cord before cleaning 1 Lightly wipe the projector body with a soft dry cleaning cloth When it is heavily soiled use a small amount of mild detergent and finish with a soft dry cleaning clot...

Страница 42: ...ACE WARNING INPU TOP CONTROL CAUTION Turn off the projector and disconnect the AC plug Allow the projector to cool at least for 45 minutes Remove two screws with a screwdriver and pull out the lamp as...

Страница 43: ...amp with a new one IMMEDIATELY after the projector has cooled down Follow carefully the instructions in the LAMP REPLACEMENT section of this manual Continuous use of the lamp with the LAMP REPLACE IND...

Страница 44: ...the projector from a cool temperature location to a warm temperature location may result in moisture condensation on the projection lens In this case leave the projector off and wait until condensati...

Страница 45: ...rchased the projector or the service center Give the model number and explain the difficulty We will advise you how to obtain service Remote Control does not work Check the battery Make sure nothing i...

Страница 46: ...icator lights red and the projector can be turned on The WARNING indicator keeps flashing Check and clean the air filters Projector Condition The projector is ready to be turned on with the POWER ON O...

Страница 47: ...er Input Main menu Main menu Video Auto Computer Video S Video PC Adjust 640 x 480 720 x 400 800 x 600 1024 x 768 1152 x 864 1280 x 1024 1400 x 1050 Mode 1 Mode 2 Mode 3 Mode 4 Mode 5 Image Select Hig...

Страница 48: ...0 15 0 15 Image 1 Screen Sound Setting English German French Italian Spanish Portuguese Dutch Swedish Chinese Korean Japanese Store Reset On Off On Off Off On Off On Off Off Normal Code 1 Yes No Keys...

Страница 49: ...x 600 38 60 60 31 SVGA 11 800 x 600 38 00 60 51 ON SCREEN DISPLAY RESOLUTION H Freq kHz V Freq Hz XGA 10 1024 x 768 XGA 11 1024 x 768 XGA 12 1024 x 768 XGA 13 1024 x 768 62 04 77 07 XGA 14 1024 x 768...

Страница 50: ...m and focus 4 3 21 2 1 3 m 6 5 m 160 W RCA Type x 1 Video and Mini DIN 4 pin x 1 S Video Projection Lens Throw Distance Projection Lamp Video Input Jack Mini Jack stereo x 1 Audio Input Jack Analog RG...

Страница 51: ...Series B Pin Configuration 2 3 4 1 Optional Parts The parts listed below are optionally supplied When ordering those parts give name and Type No of it to the sales dealer Configuration of Terminals C...

Страница 52: ...el 06126 9371 0 Fax 06126 9371 14 E Mail info eiki de Eastern Europe EIKI CZECH spol s r o Umeleck 15 170 00 Praha 7 Czech Republic Tel 42 02 20570024 42 02 20571413 Fax 42 02 20571411 E Mail easterne...

Отзывы: