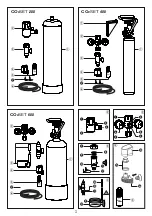


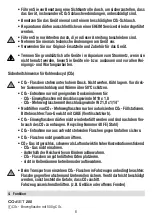
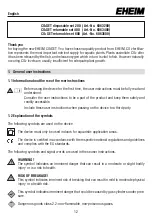


A
CO
2
SET
200
Connection of the pressure regulator
b
to the CO
2
disposable bottle
a
.
Turn the adjustment knob
A
of the pressure regulator counter-clockwise to “
–
“. Close the fine
control valve
D
. Check the gasket in the connection thread
B
of the pressure regulator and the
sealing surface of the bottle valve for cleanliness and damages. Screw the locking nut of the pres-
sure regulator straight onto the connection thread of the bottle valve and tighten it hand-tight.
You may hear a brief hiss. Do not use a tool!
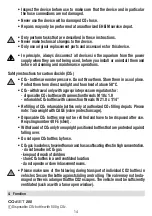
A
CO
2
SET
400 / 600
Connection of the pressure regulator
b
to the CO
2
returnable bottle
a
.
Turn the adjustment knob
A
of the pressure regulator counter-clockwise to “
–
“. Close the fine
control valve
D
. Check the gasket in the connection thread
B
of the pressure regulator and the
sealing surface of the bottle valve for cleanliness and damages. Unscrew the pressure regulator
evenly and tighten it hand-tight. Do not use a tool! You can dissemble the pressure regulator
again at any time. Follow the above procedure in reverse order.
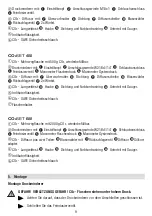
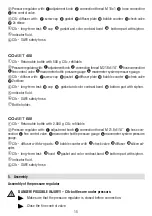
B
CO
2
SET
200 / 400 / 600
Connection of the CO
2
SAFE safety hose
f
to the pressure regulator
b
.
Unscrew the locking nut of the hose connection
C
. Cut the necessary length from the
CO
2
SAFE special hose. Guide the locking nut over the hose. Push the CO
2
SAFE special hose until
it hits the hose connection
C
of the pressure regulator and tighten the locking nut again.
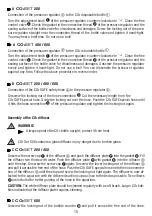
Assembly of the CO
2
diffuser
WARNING!
Always operate the CO
2
bottle upright; protect it from heat.
CO
2
Set 600 contains a glass diffuser, injury danger due to broken glass.
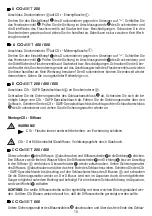
C
CO
2
SET
200 / 400
Unscrew the screw cap
G
of the diffuser
c
and push the diffuser plate
I
into the gasket
H
. Fill
the diffuser two thirds with water. Push the diffuser plate
I
with gasket
H
into the diffuser
c
until the stop. Unscrew the screw cap
G
again. Unscrew the lower locking nut of the diffuser
c
and pull it across the free end of the hose. Push the CO
2
SAFE special hose onto the hose connec-
tion of the diffuser
c
until the stop and screw the locking nut tight again. The diffuser is now at-
tached to the aquarium with the delivered suction cup as close to the bed as possible. Two elbows
Q
are included for better guiding of the hose in the aquarium.
CAUTION:
The white diffuser plate should be cleaned regularly with a soft brush. Larger CO
2
bub-
bles indicate that the diffuser plate requires cleaning.
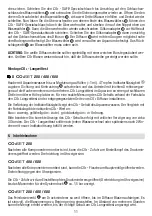
C
CO
2
SET
600
Unscrew the locking nut of the bubble counter
J
and pull it across the free end of the hose.
16