background image

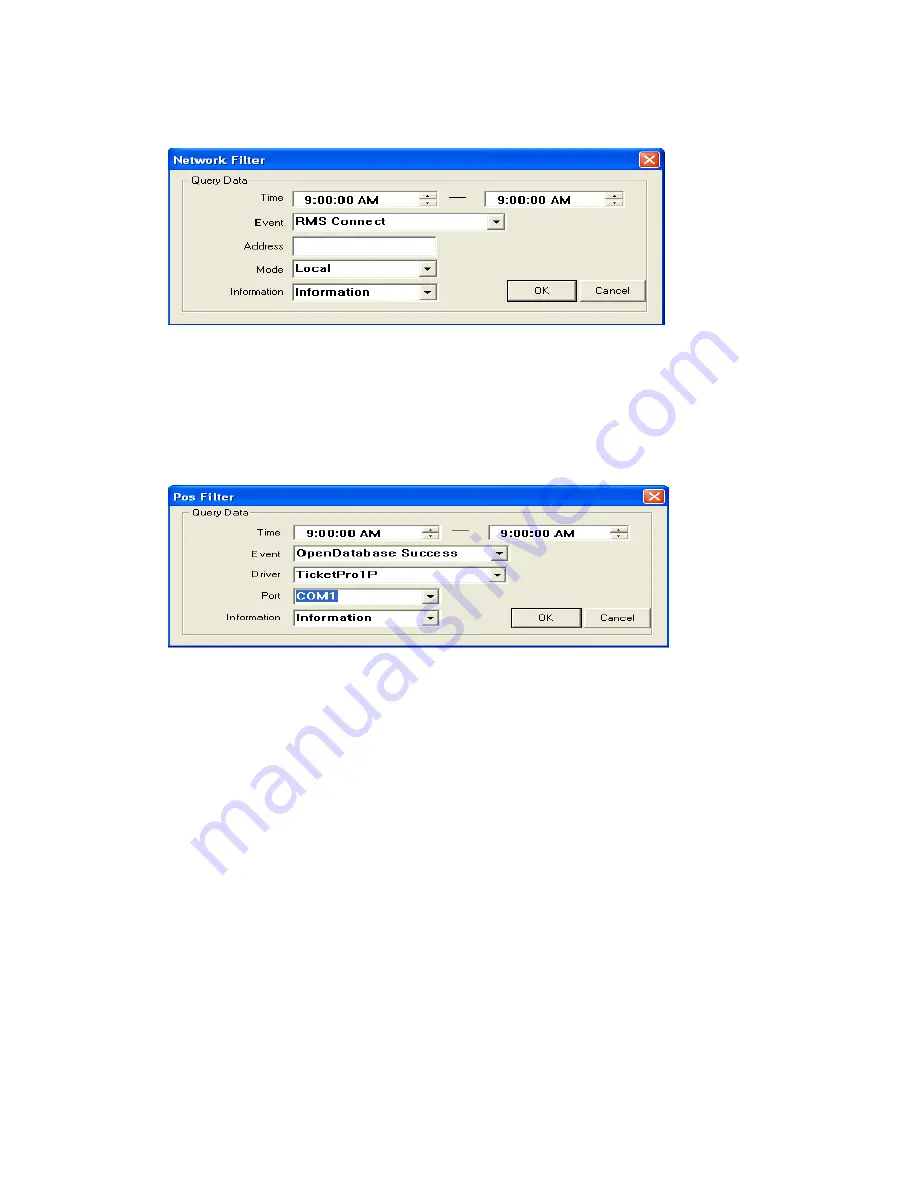
9.6.4. Network 


Time : Select Start time and End Time to search. 
Event : Select the event to search 
Address : Type the IP/Address of RMS to search. 
Mode : Select the mode to search. 
Information : Select the type to search. 


9.6.5. Pos 


Time : Select Start time and End Time to search. 
Event : Select the event to search 
Driver : Select the driver to search. 
Port : Select the Port no to search. 
Information : Select the type to search. 


Users Guide 

Page 

97 

of 

98 

Perpetual Digital


Содержание Navwatch EE904DVS

Страница 1: ......

Страница 2: ...1 4 1 PLAYBACK Default Screen 42 5 Remote Surveillance 48 5 1 Start Remote Program Single Mode 48 5 2 Connect Main System 48 5 3 Setup Site 49 5 4 Remote Navigation 51 5 5 Options 53 5 6 Multi Remote...

Страница 3: ...9 Log Viewer 91 9 1 Event 91 9 2 System 92 9 3 Login 93 9 4 Network 94 9 5 Pos 95 9 6 Filter 96 9 7 Setting 98 Users Guide Page 3 of 98 Perpetual Digital...

Страница 4: ...y abnormal operation or system shut down by interruption of electric power Remote Access You can connect to multiple sites and each site can be connected with multiple users at the same time User Frie...

Страница 5: ...one more DIT 4 or DIT 4 PRO capture card in the existing 4ch DVR system DVR Server RMS You can use both RMS and DVR Server on the same PC at once 1 3 Warning CE Communaut European This is a class A p...

Страница 6: ...2 2 1 Logon to File System When User starts the file manager fsutil exe program this program will ask Account and Password The system has Default Account which is 1 and the Password is nothing After...

Страница 7: ...this DVR system The file system will generate the Database based on this number of cameras Basket Size Select the size of a basket a basket is the unit to handle the image data The default basket size...

Страница 8: ...mmended setting After selecting the rate Click OK button When the File System finished the Database setup this utility will show the following screen This example uses hard disk drive D 100 Required S...

Страница 9: ...wing active window It would be taken about 10 minutes per size of the database Automatically fix file system errors If you tick this box the system will do DB recovery automatically when system is reb...

Страница 10: ...in folder 2 3 2 Monitoring Camera Screens 1 Default Screen When User starts DVR program current captured images from cameras will be displayed as follows 2 Camera Box The Camera Box is at the bottom U...

Страница 11: ...User can select a camera from the Camera Box Multi Screen Mode Display 4 captured image from 4 different cameras Multi Screen Mode Display 6 captured image from 6 different cameras Multi Screen Mode D...

Страница 12: ...events of the system Events Motion Detected including camera number and time Logs System Setting Information ALARM icon if occur input signal from extern sensors will flicker the icon NETWORK icon if...

Страница 13: ...6 PanTilt Control Box If PanTilt camera is installed User can control Focus Zoom Light and Camera directions through this control box Users Guide Page 13 of 98 Perpetual Digital...

Страница 14: ...has Default Account ID which is 1 and the password is nothing After entering Account ID and password Click OK button to start the Setting Menu Instead of using Keyboard User can configure the system...

Страница 15: ...fferent cameras 10 Split Default Screen will display 10 different image from 10 different cameras 13 Split Default Screen will display 13 different image from 13 different cameras 16 Split Default Scr...

Страница 16: ...too big default 60sec 7 Site Information Site Define the name of site Location Specify the information about the system location 8 Shut Down Use When User selects the Use system will be shut down at...

Страница 17: ...User can see the image at the remote side client 2 Frame Rate Use Max Frames If User select the check box system could be recorded by the captured image frame with maximum capacity and distributed im...

Страница 18: ...ill be detected in whole area User Area Mode Motion will be detected in the defined area by the User ADD If User want to defined the area Click this ADD button and define the range through the clickin...

Страница 19: ...7 Advanced Setup Users Guide Page 19 of 98 Perpetual Digital...

Страница 20: ...work by original camera setup for recording schedule After Hour The system will work by an advanced setup during the time outside the time zone established as Work Hour On Alarm or Motion If you want...

Страница 21: ...ings 5 Motion Sensor Mode In this mode system will record the images when the sensor event is occurred and or the Motion is detected 6 Watch Mode In this mode system will not record any images from th...

Страница 22: ...ration Configure the Saturation of image Hue Configure the Hue of image 2 Transaction Data Control If capture board supports POS function this button to active refer POS Manual 3 Pan Tilt Use User can...

Страница 23: ...eck box Additional equipment is required to send the Output Output Port User can define the port that will be used to send the Output User can select port 1 2 3 4 Relay Time User can define the relay...

Страница 24: ...ll allow the remote access through the network TCP IP Port TCP IP port number Auto set to 9871 2 Compression Mode Choose the Mode User can choose M JPEG or M MPEG Image Quality User can control the qu...

Страница 25: ...dem Dial up Connection h Setting in the Server system Windows XP Control Panel Network Connections Create a new connection When the New Connection Wizard shows please click Next Users Guide Page 25 of...

Страница 26: ...elect Setup an advanced connection as Network Connection Type and click Next Select Accept incoming connections as Advanced Connection Options and click Next Users Guide Page 26 of 98 Perpetual Digita...

Страница 27: ...vice to corresponding with Incoming Connections and click Properties Please check if the port speed is same as installed Modem If yes please return to New Connection Wizard and click Next Users Guide...

Страница 28: ...n and click Next Please click Add to register of new user for Dial up Networking connection Please enter User ID Password and click OK Then new user will be created Please tick on the new user and cli...

Страница 29: ...Select Internet Protocol TCP IP and click Properties Please specify TCP IP address for remote connection You can allocate a proper IP address Users Guide Page 29 of 98 Perpetual Digital...

Страница 30: ...Click Finish then the setting is completed If you check the window of Network Connections you can see new connection setting as Incoming Connections Users Guide Page 30 of 98 Perpetual Digital...

Страница 31: ...s follows don t need setting in Windows XP Start Programs Accessories Communications Dial Up Networking When Make New Connection is showing up please insert computer name and select a proper Modem and...

Страница 32: ...Communications Dial Up Networking New icon for new connection was created If you double clicking of new icon following window is showing up Select Server Types and check if TCP IP was ticked Users Gui...

Страница 33: ...nnels of audio If the DVR system has a separate sound card the system will support 5 channels of audio recording If you want to communicate remote site for using Audio you have a sound card And In cas...

Страница 34: ...stem firstly If other recording program is ON running in the system the recording function on the DVR system will not work h Case 2 Please check if the path for input signal will be select as Micropho...

Страница 35: ...Click Advanced in the window of Sounds and Audio Devices Properties Select Options Properties Users Guide Page 35 of 98 Perpetual Digital...

Страница 36: ...the box of Select in the Microphone If not audio recording would not work sometimes If you want to playback the data with audio in the remote site you need to take above steps in the remote PC Users...

Страница 37: ...am Accessories Entertainment Sound Recorder h Note When you playbacks the recording data including sound please set the playback speed to 1x Also please check there was no tick on the Mute all and pro...

Страница 38: ...connection Lan Modem ISDN Choose a way of transmission Password of IUSER_NOTIFY If you select MODEM or ISDN insert password of IUSER_NOTIFY that is exist in the Remote Surveillance System Events Chec...

Страница 39: ...of the selected site 3 Delete Select one of the added remote sites and User can delete a site 4 Schedules Camera Select a specific camera Notify After push a button Notify make a schedule draw a zone...

Страница 40: ...ystem Setup Search Backup Remote Control Pan Tilt Information Account User ID this will be used when a User logon to the system Information Password Password this will be used when a User logon to the...

Страница 41: ...er can run the Search program through clicking the PLAYBACK button at the Action Button When User starts the Search program this program will ask LOGON ID and password After entering Account ID and pa...

Страница 42: ...a from the Record Table Multi Screen Mode Display 4 recorded image from 4 different cameras Multi Screen Mode Display 9 recorded image from 9 different cameras Multi Screen Mode Display 16 recorded im...

Страница 43: ...Show the type of captured image Size of Image Show the size of captured image 4 1 3 Calendar Window This calendar will show the dates when image is recorded If the color of a date is RED there are som...

Страница 44: ...n control the speed save the image record displayed images and print the displayed image SAVE save the captured image into Floppy Diskette or able to back up specific recording data by AVI file PRINT...

Страница 45: ...ow the recording information in an hour 4 1 9 Exit Button When User clicks this EXIT button PLAYBACK Search program will be stopped 4 1 10 Bookmark You can make a bookmark of some specific images for...

Страница 46: ...ems Modification Add note for the selected item 4 1 11 Motion Object Search You can make a setting a motion detection for the specific object from the existing recording data and make a data file for...

Страница 47: ...f User want to delete the area that was defined or added Click this Delete button Add to the bookmark with result data If you click this box the sorted image data will be book marked automatically Sen...

Страница 48: ...Files ARGUS Remote folder 5 2 Connect Main System The first screen of ARGUS Remote program is almost same as the ARGUS Main screen Remote Screen has CONNECT button to connect the ARGUS Main System Wh...

Страница 49: ...When User Click ADD button Site Information Window will be displayed as follows Site Name Enter the Name of a Site User can define any name that User can remember or recognize easily IP Address Enter...

Страница 50: ...e out of the open server and cameras 3 Delete At the Site Information Window Click any Site that User wants to delete from the list and Click Remove button 4 Modify At the Site Information Window Clic...

Страница 51: ...s PLAY BACK Menu Note User can see action button of If user click this icon during the remote search the icon will be changed to green and the transmitting image data will be recorded at the remote P...

Страница 52: ...ide the capture image there are 11 different display type buttons Single Screen Mode Multi Screen Mode Multi Screen Mode Multi Screen Mode Multi Screen Mode Multi Screen Mode Full Screen Mode Next Scr...

Страница 53: ...mage 4 Pan Tilt Control Box If Pan Tilt camera is installed User can control Focus Zoom Light and Camera directions through this control box 5 5 Options If User click right button of mouse on the disp...

Страница 54: ...er close all service If User select the check box all REMOTE services will be shut down when user close the remote viewer program Use buffering space for data receiving If You use local LAN for data r...

Страница 55: ...t ID and password user can access systems without separate Login during remote notification 3 Two way Audio If you select Sound you can see following sub menu box and you can send receive the sound an...

Страница 56: ...ion Single One remote PC able to connect with one Argus server Multi Channel One remote PC able to connect max 16 cameras server 1 Connection to Sever 1 1 Server connection per each camera partitioned...

Страница 57: ...connected After log on the system showing up following window and it shows the cameras status which were connected at the server Please select desired camera No which you want to monitor at the remot...

Страница 58: ...You can connect other channels as above 1 2 Using Group table When you select Multi Channel and click CONNECT you can see following window If you select desired group from group table and click OK you...

Страница 59: ...Remote system When User click this SETTING button the Setting Menu Window will be displayed and operate just same as Main s Setting Menu except that User can not use USER setting from the remote site...

Страница 60: ...n in the ARGUS Remote program the PLAY BACK Window will be displayed and operate just same as Main s PLAY BACK Menu Site If User select Site button following window will be shown and User can select t...

Страница 61: ...rch If User click this button User can search those image data refer to section 5 4 1 Action Buttons Remote Search REMOTE User can record current transmitting image from Server system through Remote V...

Страница 62: ...ically For data back up please run Windows key Start Programs Argus Image Back up dvBackup exe or Click a button of BACKUP from monitoring screen The initial Account is 1 and no password Please insert...

Страница 63: ...ck Backup Start button for Quick back up 5 Stop stop or pause button on the back up 6 Option Setting Manual Back Up or Schedule Back up 7 Viewer Viewer button of Back up data 8 To be added later 6 2 2...

Страница 64: ...red color 6 3 2 Select device or folder for Back up 6 3 3 Start Manual Back Up After setting of the desired recording data and device or folder the start button will be activated with a blue color Cl...

Страница 65: ...r program Note If the backup data would be exceed 2 GB it would be a problem 6 4 1 Select desired recording data for Back up Please refer to section 6 3 1 6 4 2 Make a Backup exe file If you select th...

Страница 66: ...le the back up viewer will be showing up and you can playback the back up data 6 5 Quick Back Up Click Quick Backup button from Tool bar the quick backup setting menu will be displayed Select Cameras...

Страница 67: ...of 1 8 9 10 14 15 16 cameras could be backed up into F at now 6 6 Auto Back Up 6 6 1 Option setting Click Option button out of Tool bar and select which you want Note If the Backup program is running...

Страница 68: ...rent Note If user want to setting all cameras for concurrent back up please click a cell of USE Lastest backup time Shows latest back up time of schedule back up Backup start pointer of time Starting...

Страница 69: ...er can back up the whole recording data by daily or weekly by Schedule back up Note 1 If user wants to set all cameras please click a Day cell If user wants to back up the data at same time of the day...

Страница 70: ...data of Sunday 6 7 Backup Viewer User can play back the back up data by this Viewer If user click button of Viewer the Backup Viewer program could be run and showing following window for back up view...

Страница 71: ...Browse button following window will be shown and User can select the desired directory for search of the back up data from DVR system 7 POS Options 7 1 Setting Single Serial CR Users Guide Page 71 of...

Страница 72: ...x Casio610001 Camera Choose the camera number to display the cash register data Port Choose Port these ports have to differ per cash register Speed 9600 default Flow Bits 8 default Stop Bits 1 default...

Страница 73: ...amera number to display the cash register data Add Add the selected camera Delete Delete the selected camera Can select multi camera for CR Port Choose Port these ports have to differ per cash registe...

Страница 74: ...he cash register type ex Fuijits1S Camera Choose the camera number to display the cash register data Add Add the selected camera Delete Delete the selected camera Can select multi camera for CR Port T...

Страница 75: ...7 4 Transaction Search These buttons are used to query transaction data Users Guide Page 75 of 98 Perpetual Digital...

Страница 76: ...action List Header meaning No Transaction list sequence Number Time DVR save time of the transaction CAM Camera Number Register Cash Register Type Register Time Cash Register Time EpsonCR Cash registe...

Страница 77: ...utton If you click the Transaction list the right dialog displays the original receipt data When you click the Play button you can see the video clips of the selected transaction If you want to go bac...

Страница 78: ...Time 09 33 31 Time 09 34 09 POS Button and POS CR Button is toggle button Users Guide Page 78 of 98 Perpetual Digital...

Страница 79: ...Query button A D B E C F A Start Day Time Choose start day time B End Day Time Choose end day time C Camera Choose camera number D Item Edit the Item to search E Code Choose the Action Code to search...

Страница 80: ...Ex C Select Camera Number 3 Enter camer 3 and press Query to query to database Users Guide Page 80 of 98 Perpetual Digital...

Страница 81: ...Ex D Edit the Item BANANA Users Guide Page 81 of 98 Perpetual Digital...

Страница 82: ...Ex E Code Select Action Code Cash Amount Users Guide Page 82 of 98 Perpetual Digital...

Страница 83: ...Ex E Value Edit the value 6 00 Users Guide Page 83 of 98 Perpetual Digital...

Страница 84: ...F Report If you want to see statistical graph click this button Your computer has installed MS Excel program when you see this report Users Guide Page 84 of 98 Perpetual Digital...

Страница 85: ...yed on screen Use Motion Display Transaction Data Control Button to change the font If displayed data on screen is still cut after you change the font size now there is no way to display entire data e...

Страница 86: ...nt exe in C Program Files Argus Main General Domain name insert the name of the domain within 32 characters Password create your password within 16 characters E Mail insert E Mail address for informin...

Страница 87: ...e necessary information click register If your on line register is successful following window is showing up If your domain name is already duplicated on the DNS server following window will be showin...

Страница 88: ...in button check if your domain name is registered on the DNS server or not Domain name is registered on the DNS server Domain name is not registered on the DNS server Users Guide Page 88 of 98 Perpetu...

Страница 89: ...insert DNS server IP Port insert Port No Time out Waiting time for connection with server Apply button click Apply button for running You must restart the System for application Users Guide Page 89 of...

Страница 90: ...tting In RMS DNS server insert DNS server IP the same DVR Main Port insert Port No IP Address insert the name of your domain registered on the DNS server in DVR Main Users Guide Page 90 of 98 Perpetua...

Страница 91: ...2 Sensor This means sensor event occurred 3 Video Loss This means video loss occurred Information 1 Information This shows information occurred 2 Warning This shows warning occurred 3 Error This show...

Страница 92: ...earch Program Exit DVR Backup Program Start DVR Backup Program Exit DVR Color Control Start PlugIn Load Load Values Set Values Service Restart Device Load Video Initialize Mode This column shows wheth...

Страница 93: ...his column shows the ID of the login user User Loggout This column shows the ID of the logout user Status This column shows whether login or logout attempts were successful or failed Mode This column...

Страница 94: ...ect 2 RMS Disconnect Address This column shows the IP Address of RMS connected Mode This column shows whether events are being taken in local side or remote side 1 Local 2 Lan Information 1 Informatio...

Страница 95: ...enDatabase Success OpenDatabase Fail Device started Driver This column shows the name of the driver to be loaded Port This column shows the Port no associated with Driver Information 1 Information Thi...

Страница 96: ...and End Time to search Event Select the event to search Mode Select the mode to search Information Select the type to search 9 6 3 Login Time Select Start time and End Time to search Process Select th...

Страница 97: ...RMS to search Mode Select the mode to search Information Select the type to search 9 6 5 Pos Time Select Start time and End Time to search Event Select the event to search Driver Select the driver to...

Страница 98: ...ays Save logfile period of 30 days Change Search s user and password Type User and Password to run Search exe Set to tray icon on exit If you check this this program is set to tray icon when you click...

Отзывы: