background image

OLIVE SECOND SEAT KIT - USE + CARE GUIDE

21

OLIVE - USE + CARE GUIDE

31

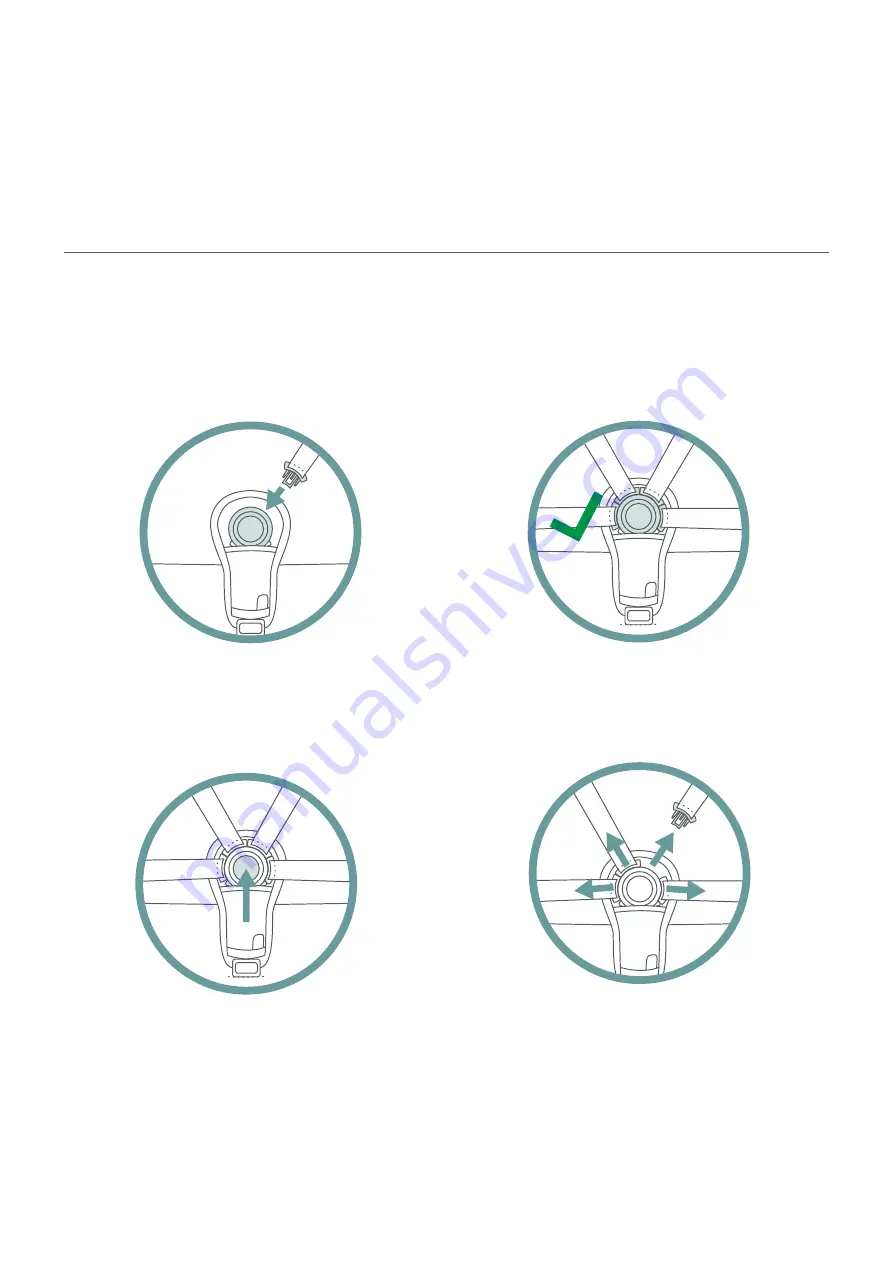
1 . 

Insert one harness tongue into the 
harness buckle until you hear a click. 

1 . 

Push the button at the centre 
of the buckle. 

2 . 

Repeat step one for each of the 
remaining three harness tongues.

2 . 

Remove the four harness tongues.

Using the harness buckle

Locking the buckle

Unlocking the buckle

Содержание EC211-103

Страница 1: ...Olive Second Seat Kit EC211 103 NZ AU EN Use Care Guide ...

Страница 2: ...wborn Insert Cushion accessory Independently safety tested for compliance with the Australian and New Zealand Standard AS NZS 2088 2013 IMPORTANT Always follow the manufacturer s instructions Read all instructions carefully before assembly and use of this stroller The correct use and maintenance of this product is essential ...

Страница 3: ...e second seat unit 13 Extending the canopy 15 Attaching the bumper bar 17 Removing the bumper bar 17 11 correct layouts for using this Olive Second Seat Kit 18 Reclining the second seat unit 21 Adjusting the footrest 22 Using the harness buckle 23 Adjusting the shoulder strap height 24 Adjusting the harness straps 25 Attaching the Newborn Insert Cushion 26 Removing the Newborn Insert Cushion 28 Ho...

Страница 4: ...IN THE HARNESS AT ALL TIMES DO NOT CARRY EXTRA CHILDREN OR BAGS ON THIS STROLLER MAKE SURE CHILDREN ARE CLEAR OF ANY MOVING PARTS IF YOU ADJUST THIS STROLLER USE THE HARNESS AT ALL TIMES USE THE STRAP TO STOP THE STROLLER ROLLING AWAY DO NOT USE THE SEAT UNIT WITH ANY OTHER MODELS OF STROLLER DO NOT USE THE BASSINET ONCE THE CHILD CAN SIT UP UNAIDED TO AVOID INJURY OR DEATH ...

Страница 5: ... is important that your child can be released quickly in an emergency Keeping fingers away from moving parts Take care of fingers and NEVER let a child fold or unfold the stroller Fingers may jam in moving parts when folding or unfolding the stroller Do not use the stroller as a substitute baby cot or bed The stroller is only designed to transport children safely The stroller is not a baby cot or ...

Страница 6: ...increase the risk of the stroller tipping The brakes must be applied when the stroller is not moving Do not use the stroller on sand or near or in salt water Store your stroller in a sheltered dry place and avoid beach use Salt water or excessive moisture may cause corrosion on the fastenings and moving parts of this stroller The manufacturer s warranty does not cover corrosion caused by environme...

Страница 7: ...IVE SECOND SEAT KIT USE CARE GUIDE 7 What s in the box 1 x set of Lower Adapters for use on stroller s lower connection points Use Care Guide this instruction manual 1 x second seat unit bumper bar canopy ...

Страница 8: ...OLIVE SECOND SEAT KIT USE CARE GUIDE 8 Olive Second Seat Kit components Seat Unit second lower seat Bumper Bar Canopy Lower Adapter ...

Страница 9: ...OLIVE SECOND SEAT KIT USE CARE GUIDE 9 Using the Olive Second Seat Kit ...

Страница 10: ... lower adapter over the right hand connection point and click into place Repeat on left side R Right L left Pull each adapter upwards to check they are both secure You will hear a click when the adapters connect and lock correctly L Left R Right L Left R Right L Left R Right L Left R Right L Left R Right L Left R Right L Left R Right L Left R Right R Right L Left R Right Note The stroller can be f...

Страница 11: ...OLIVE SECOND SEAT KIT USE CARE GUIDE 11 1 Press the button on the inner side of the adapter 2 Remove the adapter from the rear cross bar Forward position Removing the lower adapters ...

Страница 12: ...s are installed on the rear cross bar 2 Insert the second seat unit s connectors into the lower adapters Pull the seat upwards to check it is secure You will hear a click when the seat unit connects correctly Note The second seat can only be used in the forward facing position Forward position ...

Страница 13: ...nection points 2 Push in one seat release button until it stays in place Note The second seat can only be used in the forward facing position 3 Push in the seat release button on the other lower adapter until it stays in place Note The buttons do not need to be pressed simultaneously 4 Lift the seat straight up Note Do not lift the seat on an angle ...

Страница 14: ... canopy 1 Locate the zip on the left side of the canopy and undo 2 Once undone extend the canopy upwards Note The canopy extension is designed to be used when the second seat is reclined Using the extension while upright may interfere with the upper seat ...

Страница 15: ...ttons below the bumper bar s two connection points 2 Press and hold one button while pulling the end of the bumper out Repeat at the other end 2 Insert metal pins into the connection points on either side of the seat unit until they click into place Pull the bumper bar to ensure it is securely connected You will hear a click when the pins connect securely within the housing ...

Страница 16: ...Lower Avery Capsule 13kg max Upper main seat unit 22kg max Lower Carry Cot 9kg max Upper Avery Capsule 13kg max Lower second seat unit 22kg max The illustrations below show 11 correct layouts for using this Olive Second Seat Kit with the Olive stroller Note Main seat in upper adapters can also be used in reverse position Second seat in lower adapters can only be used in forward position ...

Страница 17: ...UIDE 17 Upper Avery Capsule 13kg max Lower Carry Cot 9kg max Upper Avery Capsule 13kg max Lower Avery Capsule 13kg max Upper Carry Cot 9kg max Lower Carry Cot 9kg max Upper other brand capsule 13kg max Lower second seat unit 22kg max ...

Страница 18: ...COND SEAT KIT USE CARE GUIDE 18 Upper main seat unit 22kg max Lower second seat unit 22kg max Upper main seat unit 22kg max Lower Carry Cot 9kg max Upper main seat unit 22kg max Lower second seat unit 22kg max ...

Страница 19: ... of these buttons in simultaneously to raise or lower the seat to the desired position The seat can be set at one of three heights Upright Reclined and Horizontal Upright Reclined Horizontal 6 months 6 months sleeping position WARNING newborn when using the seat in this position for a newborn the Newborn Insert Cushion must be used See Using the Newborn Insert Cushion ...

Страница 20: ...SE CARE GUIDE 20 Adjusting the footrest 1 To lower the footrest press both buttons and lower the footrest to the desired position 2 To raise the footrest push upwards until you hear a click then you know it s secured in place ...

Страница 21: ...ne harness tongue into the harness buckle until you hear a click 1 Push the button at the centre of the buckle 2 Repeat step one for each of the remaining three harness tongues 2 Remove the four harness tongues Using the harness buckle Locking the buckle Unlocking the buckle ...

Страница 22: ...l loops on the end of the shoulder straps Thread these onto the harness loops at the required height Note There are three height positions for the shoulder straps As your child grows it is necessary to move the shoulder straps according to your child s height The shoulder straps should be positioned at about level or just above your child s shoulders Loosen Tighten Loosen Tighten Correct fit for h...

Страница 23: ...rap and adjust to the desired length Adjusting the hip and shoulder straps Adjusting the harness buckle strap Note The harness should be firm but not too tight around your child It is adjusted correctly when you can fit two of your fingers between the harness and your child WARNING Never leave a harness connected when not fitted to a child in the stroller A connected harness can form loops which m...

Страница 24: ...Insert Cushion converts the seat unit into a surface approved for use with newborn babies 2 Check the lumbar wedge is in position in the back of the Newborn Insert Cushion WARNING This cushion is not a substitute for a bassinet or a bed Never leave a baby asleep in the stroller unattended The Newborn Insert Cushion is designed to be used with the seat unit in the horizontal position ...

Страница 25: ...trap height is at the lowest position 4 Thread the shoulder hip and crotch straps through the liner 5 Guide the shoulder straps through the loops at the back of the head hugger 6 Thread each shoulder strap through the shoulder pads Put the stroller crotch pad back onto the harness buckle ...

Страница 26: ...buckle Slide the shoulder pads off the shoulder straps Remove the shoulder straps from the loops at the back of the head hugger 2 Thread the harness buckle hip and shoulder straps back through the liner 3 Remove the Newborn Insert Cushion from the stroller seat Note When storing the Newborn Insert Cushion take care to keep all parts together ...

Страница 27: ... Examples are battery acid or petroleum products Corrosion is not covered under our warranty see the Warranty in this Instruction Manual NEVER immerse or soak or spray your stroller with water Water can damage the internal mechanisms of your stroller including the brake system Clean your stroller carefully Use a damp cloth to clean the seat fabric and or sun canopy To dampen a cloth dip the cloth ...

Страница 28: ...s Instruction Manual Use your stroller in sunlight for short periods Always park your stroller in a shaded area Only use your stroller in direct sunlight for short periods This will help reduce fabric fading and damage Read our Servicing Guide before using the stroller on the beach or near salt water If you live within 3kms of the sea take extra care to park store your stroller indoors and away fr...

Страница 29: ...ivet or screw to dry overnight Spray a rag with some WD 40 This applies an extra coating over the rivets and screws to help protect against corrosion Inspect the wheels Remove the front and rear wheels Wipe the wheels with a clean rag to remove any dirt sand or other debris Wipe out the wheel housing Rear wheels only Spray the wheel pins with some WD 40 Spraying will help to keep the wheel release...

Страница 30: ...he stroller on the beach Sand and salt will interfere with moving parts WARNING Do not immerse or rinse your stroller with water Water can damage the internal parts of your stroller including the brake system Service your stroller at least once every 6 months We recommend you get your stroller serviced at least once every 6 months To get your stroller serviced contact us at hello edwardsandcobaby ...

Страница 31: ...ng the product not following instructions transportation damage including airline or freight damage poorly maintained product dropped goods negligence second hand product modified product colour fading over inflation mould damage to handle foam in use or fabric cuts and tears Our warranty also does not cover tyre punctures or corrosion to frames or fasteners as a result of atmospheric or environme...

Страница 32: ...BABY COM Come along on the journey Visit our comprehensive support centre online edwardsandcobaby zendesk com hc en us Designed with love Watch helpful instructional videos edwardsandcobaby youtube com c EdwardsCo ...

Отзывы: