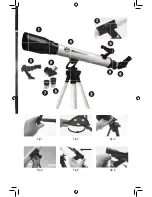
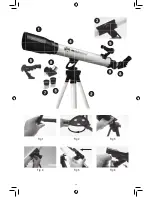
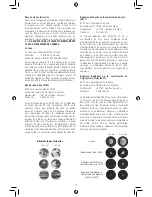
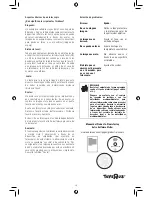
background image

2

3

Parts listing

Please check while unpacking, if all parts are complete:

1 Objective lens

2 Tripod with accessory tray

3 Telescope mounting arm with clamp

4 Telescope tube with dew shield

5 Red Dot Finderscope

6 Eyepiece 26mm

7 Eyepiece 9.7mm

8 Diagonal mirror

9 Focus wheel

Setting up

It is recommended to do the fi rst set-up during the 

daytime to familiarise yourself with steps and 

components of setting up your telescope. By doing 

this exercise it will make it easier to set up the 

telescope even in low light.

1. Open the tripod legs until the tripod spreaders are 

level. Afterwards, put the accessory tray in place and 

lock it by turning by 60° 

Fig 2

. Now you can set the 

tripod height by adjusting the single legs with their 

locking clamps 

Fig 1

.

2. Insert the mounting arm from above into the 

mount hole at the tripod head and lock it with the 

black screw 

Fig 3

.

3. Set the telescope tube with the threaded bolts from 

the left into the clamp so that the bolts fi t into the 

clamp’s holes. Then screw the black locking nuts and 

tighten them to a fi rm feel 

Fig 4

.

4. Finally, put the Red Dot Finderscope back in its 

holder 

Fig 5

.

5. Slide diagonal mirror into Focuser (turn silver 

screws until snug) and insert the 26mm eyepeice in 

to the diagonal (turn silver screws until snug).

Aligning the Red Dot Finderscope

Your telescope is designed for terrestrial and 

astronomical observations. Please keep in mind that 

heat turbulences in the air are also magnifi ed. In warm 

conditions, it can be useful to limit observations to 

medium magnifi cations.

First, remove the dust cover from the objective 

lens.

First, remove the dust cover from the objective 

First, remove the dust cover from the objective 

Please make sure to remove plastic insulator from 

battery 

Fig 6

.

Insert the 26mm Eyepiece into the diagonal, you

may now adjust the focus with the draw tube’s 

wheel. The Red Dot Finderscope is activated by 

sliding the switch on its right side; there are two 

intensities available. Before the fi rst observation, 

the Red Dot Finderscope has to be aligned to the 

telescope. For this, point at a striking target (e.g. 

telephone pole) with the telescope’s eyepiece. 

Now, without moving the telescope, switch on the 

Red Dot Finderscope and adjust the red dot with 

the 2 adjustment screws (left and right - up and 

down) until it fi ts to the eyepiece’s view. Now the 

Red Dot Finderscope is aligned and ready to point 

for the telescope.

Hint:

Do not forget to switch off the Red Dot 

Finderscope after use!

Cleaning / Maintenance

Your telescope should, like every optical 

instrument, be treated with care and stored dry. 

Doing so will maintain its optical performance for 

many years. After using, the dust cover should 

be closed after dew has dried off. The lenses can 

be cleaned with a soft cloth available from photo 

stores. Do not use harsh cleaning fl uids to clean 

the optics.

The Red Dot Finderscope is powered by a battery 

type CR-2032 (3V); if a replacement is necessary, 

it is drawn out by spreading the holding spring 

down. Please keep in mind that a new battery has 

to be placed with the positive (+) side downwards!

Technical data

Aperture: 70mm

Focal length: 700mm
Focal ratio: f/10

Magnifi cations

w/ eyepiece 26mm: 26.9x
w/ eyepiece 9.7mm: 72x

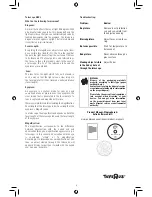
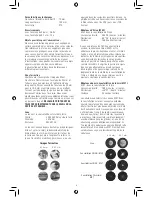
Possible objects for observation:

We have compiled and explained a number of 

very interesting celestial bodies and star clusters 

for you but we suggest that you start practicing 

during the day focusing on terrestrial objects 

such as birds or trees at varying distances from 

you. On the accompanying images at the end of 

the instruction manual, you can see how objects 

will appear in good viewing conditions through 
your telescope at varying powers.

Warning:

Never use a telescope to look at the sun! Looking 

at or near the sun will cause instant and 

irreversible damage to your eye. Eye damage is 

often painless, so there is no warning to the 

observer that damage has occurred until it is too 

late. Do not point the telescope or its viewfi nder at 

or near the sun. Do not look through the telescope 

or its viewfi nder as it is moving. Children should 

always have adult supervision while observing.

Содержание T700HD

Страница 1: ...ge Never take the device apart Please consult your Customer Service if there are any defects The dealer will contact our service center and send the device in for repair if needed Do not subject the device to temperatures exceeding 140ºF 60º TIPS on cleaning Clean the lens objective and eyepiece only with a soft lint free cloth e g micro fibre Do not use excessive pressure this may scratch the len...

Страница 2: ...2 Fig 1 Fig 4 Fig 2 Fig 5 Fig 3 Fig 6 8 8 7 6 5 5 4 3 2 1 9 8 8 8 7 7 6 6 5 5 4 2 1 9 ...

Страница 3: ... intensities available Before the first observation the Red Dot Finderscope has to be aligned to the telescope For this point at a striking target e g telephone pole with the telescope s eyepiece Now without moving the telescope switch on the Red Dot Finderscope and adjust the red dot with the 2 adjustment screws left and right up and down until it fits to the eyepiece s view Now the Red Dot Finde...

Страница 4: ...ut with over 10 degrees over the half of the Orion constellation The expanse of this enormous cloud stretches several hundred light years Ring Nebula in Lyra constellation M 57 M 57 in the Lyra constellation Right ascension 18 53 Hours Minutes Declination 33º 01 Degrees Minutes Distance 2 3 light years The famous Ring Nebula M 57 in the constellation of Lyra is often viewed as the prototype of a p...

Страница 5: ...nification In a telescope the magnification depends on both the focal length of the telescope tube and the focal length of the eyepiece Magnification The magnification corresponds to the difference between observation with the naked eye and observation through a magnification apparatus e g a telescope In this scheme observation with the eye is considered single or 1x magnification Accordingly if a...

Страница 6: ... oculaire seulement avec un chiffon doux non pelucheux p ex microfibre N utilisez pas de pression excessive cela peut rayer les lentilles Imbiber le chiffon de nettoyage avec un liquide de nettoyage pour optiques et ne l utiliser que sur les lentilles très sales Protéger l appareil contre la saleté et la poussière Rangez le correctement après utilisation à température ambiante Puis mettre le cache...

Страница 7: ...7 8 8 7 6 5 5 4 3 2 1 9 Fig 1 Fig 4 Fig 2 Fig 5 Fig 3 Fig 6 8 8 8 7 7 6 6 5 5 4 2 1 9 ...

Страница 8: ... oculaire de 20 mm dans le diagonal avant d effectuer la mise au point à l aide de la molette située sur le tube de rosée Le pointeur LED peut être activé en basculant l interrupteur vers la droite deux intensités sont disponibles Avant de commencer à observer le viseur doit être aligné avec le télescope Pour ce faire pointez l oculaire du télescope sur un objet marquant ex un poteau téléphonique ...

Страница 9: ...nence on s en aperçoit dans les cycles des quartiers de lune La période entre deux phases lunaires successives de la Nouvelle Lune est de 29 5 jours env 709 heures Nébuleuse d Orion M 42 M 42 dans la constellation d Orion L ascension droite 05 32 9 heures minutes Déclinaison 05º 25 degré minutes Distance 1 500 années lumière Avec une distance de 1 500 années lumière environ la nébuleuse Orion M42 ...

Страница 10: ... Oculaire Un oculaire est un système fait pour votre œil et constitué d une ou de plusieurs lentilles Dans un oculaire l image nette qui est engendrée au point focal d une lentille est captée et subit un grossissement Une formule simple permet de calculer le grossissement Le grossissement est égal à la longueur focale du tube télescopique divisée par la longueur focale de l oculaire Dépannage Solu...

Страница 11: ...daño del material No desmonte el dispositivo Consulte con el Servicio de atención al cliente si presenta cualquier defecto El distribuidor se pondrá en contacto con nuestro centro de asistencia y enviará el dispositivo para repararlo si fuera necesario No exponga el dispositivo a temperaturas superiores a 60 ºC CONSEJOS de limpieza Limpie la lente objetivo y ocular únicamente con un paño suave ant...

Страница 12: ...12 Fig 1 Fig 4 Fig 2 Fig 5 Fig 3 Fig 6 8 8 7 6 5 5 4 3 2 1 9 8 8 8 7 7 6 6 5 5 4 2 1 9 ...

Страница 13: ...l visor debe alinearse con el telescopio Para ello apunte hacia un objetivo claramente visible como un poste telefónico con el ocular del telescopio A continuación sin mover el telescopio active el visor y ajuste el punto rojo con los 2 tornillos de ajuste izquierda y derecha arriba y abajo hasta que coincida con la vista del ocular El visor ya está alineado y listo para apuntar con el telescopio ...

Страница 14: ...e más de 10 grados por el centro de la constelación de Orión Esta inmensa nube ocupa en toda su extensión varios cientos de años luz Nebulosa del Anillo en la constelación de Lyra M 57 M 57 en la constelación de Lyra Ascensión recta 18 53 horas minutos Declinación 33º 01 grados minutos Distancia 2 3 años luz La famosa Nebulosa del Anillo M 57 de la constelación de Lyra suele emplearse como ejemplo...

Страница 15: ...nto de la distancia focal del tubo del telescopio como de la del ocular Aumento El aumento equivale a la diferencia entre observación a simple vista y observación a través de un dispositivo de ampliación por ejemplo un telescopio En este sistema la observación a simple vista se considera sencilla o de aumento 1x Por consiguiente si un telescopio cuenta con un aumento de 30x el objeto observado por...

Страница 16: ...16 ...

Отзывы: