background image


22


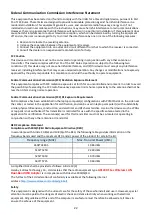
Federal Communication Commission Interference Statement 


This equipment has been tested and found to comply with the limits for a Class B digital device, pursuant to Part 

15 of FCC Rules. These limits are designed to provide reasonable protection against harmful interference in a 
residential installation. This equipment generates, uses, and can radiate radio frequency energy and, if not 
installed and used in accordance with the instructions, may cause harmful interference to radio communications. 

However, there is no guarantee that interference will not occur in a particular installation. If this equipment does 

cause harmful interference to radio or television reception, which can be determined by turning the equipment 
off and on, the user is encouraged to try to correct the interference by one or more of the following measures: 


1. Reorient or relocate the receiving antenna. 
2. Increase the separation between the equipment and receiver. 

3. Connect the equipment into an outlet on a circuit different from that to which the receiver is connected. 

4. Consult the dealer or an experienced radio technician for help. 


FCC Caution 

This device and its antenna must not be co-located or operating in conjunction with any other antenna or 
transmitter. This device complies with Part 15 of the FCC Rules. Operation is subject to the following two 
conditions: (1) this device may not cause harmful interference, and (2) this device must accept any interference 
received, including interference that may cause undesired operation. Any changes or modifications not expressly 
approved by the party responsible for compliance could void the authority to operate equipment. 
 

Federal Communications Commission (FCC) Radiation Exposure Statement 

This equipment complies with FCC radiation exposure set forth for an uncontrolled environment. In order to avoid 
the possibility of exceeding the FCC radio frequency exposure limits, human proximity to the antenna shall not be 
less than 0.5cm during normal operation. 
 

Federal Communications Commission (FCC) RF Exposure Requirements 

SAR compliance has been established in the laptop computer(s) configurations with PCMCIA slot on the side near 
the center, as tested in the application for certification, and can be used in laptop computer(s) with substantially 
similar physical dimensions, construction, and electrical and RF characteristics. Use in other devices such as PDAs 
or lap pads is not authorized. This transmitter is restricted for use with the specific antenna tested in the 
application for certification. The antenna(s) used for this transmitter must not be co-located or operating in 
conjunction with any other antenna or transmitter. 
 

RED Compliance Statement 
Compliance with 2014/53/EU Radio Equipment Directive (RED) 

In accordance with Article 10.8(a) and 10.8(b) of the RED, the following table provides information on the 
frequency bands used and the maximum RF transmit power of the product for sale in the EU: 

Frequency range (MHz) 

Max. Transmit Power (dBm) 

2400~2483.5 

19.84 dBm 

5150~5250 

22.40 dBm 

5250~5350 

19.70 dBm 

5470~5725 

19.69 dBm 

A simplified DoC shall be provided as follows: Article 10(9) 
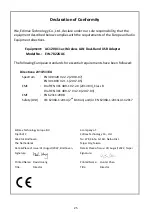
Hereby, Edimax Technology Co., Ltd. declares that the radio equipment type 

AC1200 11ac Wireless LAN 

Dual-Band USB Adapter


is in compliance with Directive 2014/53/EU 

The full text of the EU declaration of conformity is available at the following internet 
address: 

http://www.edimax.com/edimax/global/


Safety 

This equipment is designed with the utmost care for the safety of those who install and use it. However, special 
attention must be paid to the dangers of electric shock and static electricity when working with electrical 
equipment. All guidelines of this and of the computer manufacture must therefore be allowed at all times to 
ensure the safe use of the equipment. 

Содержание EW-7822UAC

Страница 1: ...EW 7822UAC User Manual 08 2022 V1 0...

Страница 2: ...Plug and Play 2 II 3 Select Connect Wi Fi Network 3 III Windows Driver Installation 5 III 1 Insert the USB Adapter 5 III 2 Download Install the Driver 5 III 3 Connect to a Wi Fi Network 8 IV macOS Dr...

Страница 3: ...V 2 Hardware WPS 18 VI Frequently Asked Question FAQ 19 VII More Information 19 VIII Safety Instructions 20 IX Simplified EU Declaration of Conformity 20...

Страница 4: ...ws 7 8 x 10 11 macOS 10 7 10 15 Linux To use with USB 3 2 Gen 1 USB 3 0 port is recommended for best 5GHz performance Additional version information may be announced on the EDIMAX website LED Status D...

Страница 5: ...The Network icon will be displayed on the bottom right corner of the Windows taskbar if the Plug and Play function is supported If Network icon doesn t display please refer to VI FAQ Q1 Notice that t...

Страница 6: ...k SSID click Connect and enter the password if it is required 1 For Windows 11 users click the Network icon and then click the right arrow icon to show the existing Wi Fi Network SSID and select the o...

Страница 7: ...w the existing Wi Fi Network SSID and select the one you want to connect 3 Enter the password if it is required 4 Establish the Wi Fi connection and you can access the Internet when you see the Wi Fi...

Страница 8: ...use force to insert the USB adapter III 2 Download Install the Driver 1 You can find the driver from the Edimax website https www edimax com download If your computer can not access the Internet dire...

Страница 9: ...the computer desktop or a location you prefer Ensure you download the right version Copy the driver to the USB flash drive first if you downloaded the driver on another Internet Enabled device and ins...

Страница 10: ...to continue 7 When the installation is completed you will be asked to select whether you wish to restart your computer now or later Select Yes and click Finish to continue 8 Please make sure your com...

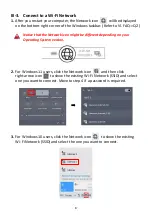
Страница 11: ...twork icon might be different depending on your Operating System version 2 For Windows 11 users click the Network icon and then click right arrow icon to show the existing Wi Fi Network SSID and selec...

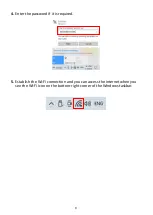
Страница 12: ...9 4 Enter the password if it is required 5 Establish the Wi Fi connection and you can access the Internet when you see the Wi Fi icon on the bottom right corner of the Windows taskbar...

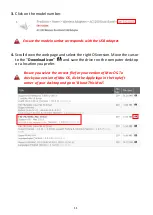
Страница 13: ...ort and then switch on your computer Never use force to insert the USB adapter IV 2 Download Install the Driver 1 You can find the driver from the Edimax website https www edimax com download If your...

Страница 14: ...nd select the right OS version Move the cursor to the Download icon and save the driver on the computer desktop or a location you prefer Ensure you select the correct file for your version of Mac OS T...

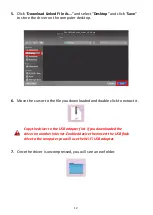
Страница 15: ...he file you downloaded and double click to extract it Copy the driver to the USB adapter first if you downloaded the driver on another Internet Enabled device then insert the USB flash drive to the co...

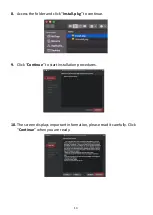
Страница 16: ...Access the folder and click Install pkg to continue 9 Click Continue to start installation procedures 10 The screen displays important information please read it carefully Click Continue when you are...

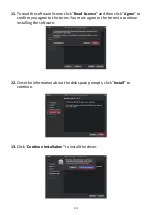
Страница 17: ...e and then click Agree to confirm you agree to the terms You must agree to the terms to continue installing the software 12 Once the information about the disk space prompts click Install to continue...

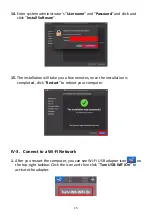
Страница 18: ...allation will take you a few minutes once the installation is completed click Restart to reboot your computer IV 3 Connect to a Wi Fi Network 1 After you restart the computer you can see Wi Fi USB ada...

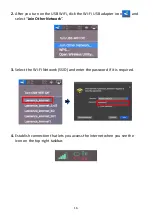
Страница 19: ...ick the Wi Fi USB adapter icon and select Join Other Network 3 Select the Wi Fi Network SSID and enter the password if it is required 4 Establish connection that lets you access the Internet when you...

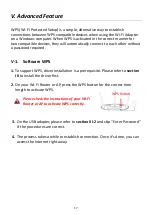
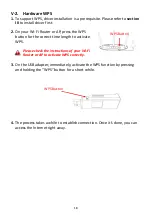
Страница 20: ...V 1 Software WPS 1 To support WPS driver installation is a prerequisite Please refer to section III to install the driver first 2 On your Wi Fi Router or AP press the WPS button for the correct time...

Страница 21: ...on for the correct time length to activate WPS Please check the instructions of your Wi Fi Router or AP to activate WPS correctly 3 On the USB adapter immediately activate the WPS function by pressing...

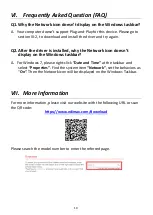
Страница 22: ...lled why the Network icon doesn t display on the Windows taskbar A For Windows 7 please right click Date and Time at the taskbar and select Properties Find the system item Network set the behaviors as...

Страница 23: ...never disassemble the product Do not spill food or liquid on your product and never push any objects into the openings of your product Do not use this product near water areas with high humidity or c...

Страница 24: ...old or licensed as is Should the programs prove defective following their purchase the buyer and not this company its distributor or its dealer assumes the entire cost of all necessary servicing repai...

Страница 25: ...ontrolled environment In order to avoid the possibility of exceeding the FCC radio frequency exposure limits human proximity to the antenna shall not be less than 0 5cm during normal operation Federal...

Страница 26: ...rk Estonia Finland France Germany Greece Hungary Ireland Italy Latvia Lithuania Luxembourg Malta Netherlands Poland Portugal Romania Slovakia Slovenia Spain Sweden Turkey and United Kingdom The ETSI v...

Страница 27: ...n Richtlinien 2014 53 EU 2014 35 EU Espa ol El presente equipo cumple los requisitos esenciales de la Directiva 2014 53 EU 2014 35 EU Italiano Questo apparecchio conforme ai requisiti essenziali e all...

Страница 28: ...Spectrum EN 300 328 V2 2 2 2019 07 EN 301 893 V2 1 1 2017 05 EMC Draft EN 301 489 1 V2 2 0 2017 03 Class B Draft EN 301 489 17 V3 2 0 2017 03 EMF EN 62311 2008 Safety LVD IEC 62368 1 2014 2nd Edition...

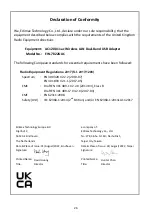
Страница 29: ...7 S I 2017 1206 Spectrum EN 300 328 V2 2 2 2019 07 EN 301 893 V2 1 1 2017 05 EMC Draft EN 301 489 1 V2 2 0 2017 03 Class B Draft EN 301 489 17 V3 2 0 2017 03 EMF EN 62311 2008 Safety LVD IEC 62368 1 2...

Отзывы: