background image

29 


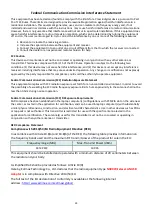
Federal Communication Commission Interference Statement 


This equipment has been tested and found to comply with the limits for a Class B digital device, pursuant to Part 

15 of FCC Rules. These limits are designed to provide reasonable protection against harmful interference in a 
residential installation. This equipment generates, uses, and can radiate radio frequency energy and, if not 

installed and used in accordance with the instructions, may cause harmful interference to radio communications. 

However, there is no guarantee that interference will not occur in a particular installation. If this equipment does 
cause harmful interference to radio or television reception, which can be determined by turning the equipment 

off and on, the user is encouraged to try to correct the interference by one or more of the following measures: 


1. Reorient or relocate the receiving antenna. 

2. Increase the separation between the equipment and receiver. 

3. Connect the equipment into an outlet on a circuit different from that to which the receiver is connected. 
4. Consult the dealer or an experienced radio technician for help. 


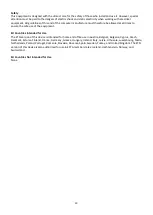
FCC Caution 

This device and its antenna must not be co-located or operating in conjunction with any other antenna or 
transmitter. This device complies with Part 15 of the FCC Rules. Operation is subject to the following two 
conditions: (1) this device may not cause harmful interference, and (2) this device must accept any interference 
received, including interference that may cause undesired operation. Any changes or modifications not expressly 
approved by the party responsible for compliance could void the authority to operate equipment. 
 

Federal Communications Commission (FCC) Radiation Exposure Statement 

This equipment complies with FCC radiation exposure set forth for an uncontrolled environment. In order to avoid 
the possibility of exceeding the FCC radio frequency exposure limits, human proximity to the antenna shall not be 
less than 0.5cm during normal operation. 
 

Federal Communications Commission (FCC) RF Exposure Requirements 

SAR compliance has been established in the laptop computer(s) configurations with PCMCIA slot on the side near 
the center, as tested in the application for certification, and can be used in laptop computer(s) with substantially 
similar physical dimensions, construction, and electrical and RF characteristics. Use in other devices such as PDAs 
or lap pads is not authorized. This transmitter is restricted for use with the specific antenna tested in the 
application for certification. The antenna(s) used for this transmitter must not be co-located or operating in 
conjunction with any other antenna or transmitter. 
 

RED Compliance Statement 

Compliance with 2014/53/EU Radio Equipment Directive (RED) 

In accordance with Article 10.8(a) and 10.8(b) of the RED, the following table provides information on 

the frequency bands used and the maximum RF transmit power of the product for sale in the EU: 

Frequency range (MHz) 

Max. Transmit Power (dBm) 

2412-2472 

19.995 

This equipment should be installed and operated with a minimum distance of 20 centimeters between 
the radiator and your body. 


A simplified DoC shall be provided as follows: Article 10(9) 

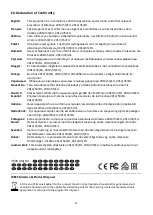
Hereby, Edimax Technology Co., Ltd. declares that the radio equipment type 

N300 Wireless LAN USB 

Adapter

 is in compliance with Directive 2014/53/EU 

The full text of the EU declaration of conformity is available at the following internet 

address: 

http://www.edimax.com/edimax/global/


Содержание EW-7722UTn V3

Страница 1: ...1 EW 7722UTn V3 Quick Installation Guide 07 2019 v1 0 ...

Страница 2: ...stallation 6 III 2 1 Windows 7 6 III 2 2 Windows 8 8 1 6 III 2 3 Windows 10 7 IV Mac OS 8 IV 1 Driver Installation 8 IV 2 Driver Uninstallation 12 V Disabling Network Adapters 13 V 1 Windows 7 13 V 2 Windows 8 8 1 13 V 3 Windows 10 14 V 4 Mac 16 VI Using The Adapter 17 VI 1 Windows 17 VI 2 Mac Connecting to a Wi Fi network 19 VI 3 Mac Wireless Utility 20 VI 4 Mac WPS 24 VI 5 WPS Setup 27 ...

Страница 3: ...five seconds to indicate a successful WPS connection Flashing Wireless activity transmitting or receiving data Fast Flashing 3 x per second WPS is active Off No wireless activity I 3 System Requirements Windows 7 8 8 1 10 Mac OS 10 13 Linux Kernel 2 6 4 15 USB 2 0 Port Hard Disk 100MB LED EW 7722UTn V3 QIG ...

Страница 4: ...en under 3 years old Please keep the wireless adapter out of reach of children 4 Do not place the wireless adapter on paper cloth or other flammable materials The wireless adapter will become hot during use 5 There are no user serviceable parts inside the wireless adapter If you experience problems with the wireless adapter please contact your dealer of purchase and ask for help 6 The wireless ada...

Страница 5: ...nsert the USB adapter 2 Please download driver from https www edimax com download by entering the model number EW 7722UTn V3 into the search box 3 If a Hardware Wizard Driver Installation window opens as shown to the left please click Cancel or Close 4 Please follow the instructions in the appropriate chapter for your operating system ...

Страница 6: ...ease download driver from https www edimax com download by entering the model number EW 7722UTn V3 into the search box 2 Click Install Driver to install the drivers for your EW 7722UTn V3 3 Click Next to install the drivers for your EW 7722UTn V3 ...

Страница 7: ...r is installing 5 Before you can use the wireless adapter you need to restart your computer When the installation is complete you will be asked to choose whether you wish to restart your computer now or later Click Finish to continue ...

Страница 8: ...ce on doing so please refer to VI Using The Adapter III 2 Driver Uninstallation III 2 1 Windows 7 1 Go to Start Programs Edimax Wireless LAN Uninstall 2 Follow the on screen instructions An uninstall wizard will guide you through the process III 2 2 Windows 8 8 1 1 Right click anywhere on the Start screen and then click the All apps icon in the bottom right corner 2 Locate the Edimax Wireless LAN ...

Страница 9: ... 2 3 Windows 10 1 Open WinX menu by holding Windows and X keys together and then click Programs and Features 2 Look for Edimax Wireless LAN Driver and Utility in the list click on it and then click Uninstall ...

Страница 10: ... of Mac OS X 10 9 10 14 and double click the Install pkg file to open the driver installation wizard 2 Click Continue to proceed to the next step 3 The next screen displays important information please read it carefully after the driver is installed you need to enable the wireless adapter in System Preferences Network You can click Print or Save to print save this information if you need or the in...

Страница 11: ...9 4 Select a language and click Continue to install the driver ...

Страница 12: ...nue installing the software 6 Click Install to install the driver 7 You may be prompted to enter your system administrative password before the installation can begin Enter your password and click Install Software 8 You will be prompted that you must restart your computer when the installation is complete Click Continue Installation to proceed ...

Страница 13: ...restart your computer 11 When the adapter is connected to your computer after your system has restarted the wireless utility will open automatically 12 Next please disable any other wireless adapters as described in V Disabling Network Adapters Then Mac users can connect to a Wi Fi network using the included utility software For guidance on doing so please refer to VI Using The Adapter ...

Страница 14: ...of Mac OS To check your version of Mac OS click the Apple logo in the top left corner of your desktop and go to About This Mac 1 Open the Wlan_11ac_USB_MacOS10 folder for your version of Mac OS X 10 9 10 14 2 Double click the Uninstall command file and follow the on screen instructions ...

Страница 15: ... to the user manual for your computer or follow the guidance below V 1 Windows 7 Go to Start Control Panel Click View network status and tasks Wireless Network Connection and click Disable V 2 Windows 8 8 1 1 Switch to desktop mode by clicking your cursor in the bottom left of the Windows 8 8 1 Start screen Then go to File Explorer right click Network Properties Change adapter settings 2 Right cli...

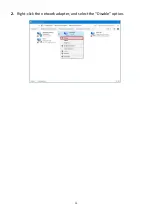
Страница 16: ...14 V 3 Windows 10 1 Open Settings The click on Network Security Status Change adapter options ...

Страница 17: ...15 2 Right click the network adapter and select the Disable option ...

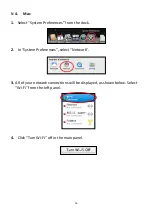
Страница 18: ...lect System Preferences from the dock 2 In System Preferences select Network 3 All of your network connections will be displayed as shown below Select Wi Fi from the left panel 4 Click Turn Wi Fi off in the main panel ...

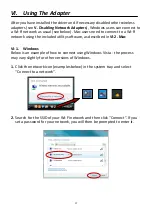
Страница 19: ...Wi Fi network using the included utility software as described in VI 2 Mac VI 1 Windows Below is an example of how to connect using Windows Vista the process may vary slightly for other versions of Windows 1 Click the network icon examples below in the system tray and select Connect to a network 2 Search for the SSID of your Wi Fi network and then click Connect If you set a password for your netwo...

Страница 20: ...18 3 After correctly entering your password you will be successfully connected to your Wi Fi network ...

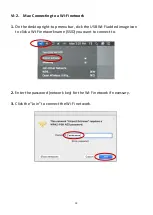
Страница 21: ...1 On the desktop right top menu bar click the USB Wi Fi added image icon to click a Wi Fi network name SSID you want to connect to 2 Enter the password network key for the Wi Fi network if necessary 3 Click the Join to connect the Wi Fi network ...

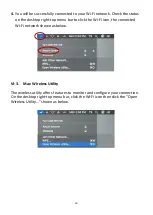
Страница 22: ...right top menu bar to click the Wi Fi icon the connected Wi Fi network shown as below VI 3 Mac Wireless Utility The wireless utility offers features to monitor and configure your connection On the desktop right top menu bar click the Wi Fi icon then click the Open Wireless Utility shown as below ...

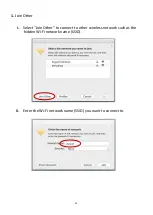
Страница 23: ...21 1 Join Other i Select Join Other to connect to other wireless network such as the hidden Wi Fi network name SSID ii Enter the Wi Fi network name SSID you want to connect to ...

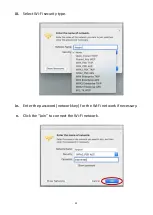
Страница 24: ...22 iii Select Wi Fi security type iv Enter the password network key for the Wi Fi network if necessary v Click the Join to connect the Wi Fi network ...

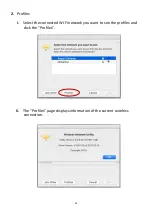
Страница 25: ...23 2 Profiles i Select the connected Wi Fi network you want to see the profiles and click the Profiles ii The Profiles page displays information of the current wireless connection ...

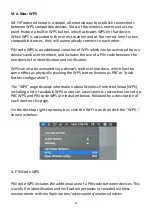
Страница 26: ...ion and verification WPS can also be activated via a device s web user interface which has the same effect as physically pushing the WPS button known as PBC or push button configuration The WPS page displays information about Wireless Protected Setup WPS including a list of available WPS routers or access points Instructions to set up PBC WPS and PIN code WPS are included below followed by a descr...

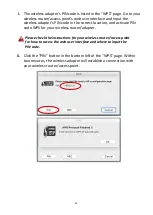
Страница 27: ...ect location and activate PIN code WPS for your wireless router adapter Please check the instructions for your wireless router access point for how to access the web user interface and where to input the PIN code ii Click the PIN button in the bottom left of the WPS page Within two minutes the wireless adapter will establish a connection with your wireless router access point ...

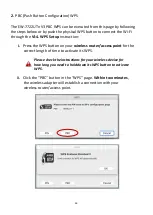
Страница 28: ...WPS Setup instruction i Press the WPS button on your wireless router access point for the correct length of time to activate its WPS Please check the instructions for your wireless device for how long you need to hold down its WPS button to activate WPS ii Click the PBC button in the WPS page Within two minutes the wireless adapter will establish a connection with your wireless router access point...

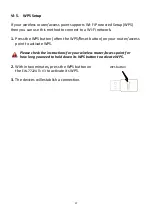
Страница 29: ...work 1 Press the WPS button often the WPS Reset button on your router access point to activate WPS Please check the instructions for your wireless router access point for how long you need to hold down its WPS button to activate WPS 2 Within two minutes press the WPS button on the EW 7722UTn V3 to activate its WPS 3 The devices will establish a connection ...

Страница 30: ...sold or licensed as is Should the programs prove defective following their purchase the buyer and not this company its distributor or its dealer assumes the entire cost of all necessary servicing repair and any incidental or consequential damages resulting from any defect in the software Edimax Technology Co Ltd reserves the right to revise this publication and to make changes from time to time in...

Страница 31: ...ity to operate equipment Federal Communications Commission FCC Radiation Exposure Statement This equipment complies with FCC radiation exposure set forth for an uncontrolled environment In order to avoid the possibility of exceeding the FCC radio frequency exposure limits human proximity to the antenna shall not be less than 0 5cm during normal operation Federal Communications Commission FCC RF Ex...

Страница 32: ... ensure the safe use of the equipment EU Countries Intended for Use The ETSI version of this device is intended for home and office use in Austria Belgium Bulgaria Cyprus Czech Denmark Estonia Finland France Germany Greece Hungary Ireland Italy Latvia Lithuania Luxembourg Malta Netherlands Poland Portugal Romania Slovakia Slovenia Spain Sweden Turkey and United Kingdom The ETSI version of this dev...

Страница 33: ...4 53 EU 2014 35 EU Deutsch Dieses Gerät erfüllt die Voraussetzungen gemäß den Richtlinien 2014 53 EU 2014 35 EU Español El presente equipo cumple los requisitos esenciales de la Directiva 2014 53 EU 2014 35 EU Italiano Questo apparecchio è conforme ai requisiti essenziali e alle altre disposizioni applicabili della Direttiva 2014 53 EU 2014 35 UE Nederlands Dit apparaat voldoet aan de essentiële e...

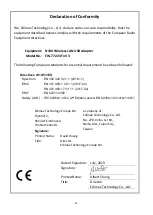
Страница 34: ...rectives 2014 53 EU Spectrum EN 300 328 V2 1 1 2016 11 EMC EN 301 489 1 V2 1 1 2017 02 EN 301 489 17 V3 1 1 2017 02 EMF EN 62311 2008 Safety LVD IEC 62368 1 2014 2nd Edition and or EN 62368 1 2014 A11 2017 Date of Signature July 2019 Signature Printed Name Albert Chang Title Director Edimax Technology Co Ltd Edimax Technology Europe B V Fijenhof 2 5652 AE Eindhoven The Netherlands a company of Edi...

Отзывы: