background image


COPYRIGHT


Copyright


©


Edimax


Technology


Co.,


Ltd.


all


rights


reserved.


No


part


of


this


publication


may


be


reproduced,


transmitted,


transcribed,


stored


in


a


retrieval


system,


or


translated


into


any


language


or


computer


language,


in


any


form


or


by


any


means,


electronic,


mechanical,


magnetic,


optical,


chemical,


manual


or


otherwise,


without


the


prior


written


permission


from


Edimax


Technology


Co.,


Ltd.


Edimax


Technology


Co.,


Ltd.


makes


no


representations


or


warranties,


either


expressed


or


implied,


with


respect


to


the


contents


hereof


and


specifically


disclaims


any


warranties,


merchantability,


or


fitness


for


any


particular


purpose.


Any


software


described


in


this


manual


is


sold


or


licensed


as


is.


Should


the


programs


prove


defective


following


their


purchase,


the


buyer


(and


not


this


company,


its


distributor,


or


its


dealer)


assumes


the


entire


cost


of


all


necessary


servicing,


repair,


and


any


incidental


or


consequential


damages


resulting


from


any


defect


in


the


software.


Edimax


Technology


Co.,


Ltd.


reserves


the


right


to


revise


this


publication


and


to


make


changes


from


time


to


time


in


the


contents


hereof


without


the


obligation


to


notify


any


person


of


such


revision


or


changes.


The


product


you


have


purchased


and


the


setup


screen


may


appear


slightly


different


from


those


shown


in


this


QIG.


The


software


and


specifications


are


subject


to


change


without


notice.


Please


visit


our


website


www.edimax.com


for


updates.


All


brand


and


product


names


mentioned


in


this


manual


are


trademarks


and/or


registered


trademarks


of


their


respective


holders.


Содержание EW?7711ULC

Страница 1: ...1 EW 7711ULC Quick Installation Guide 06 2014 v1 0 ...

Страница 2: ...installation 8 III 2 1 Windows XP Vista 7 8 III 2 2 Windows 8 8 1 8 III 3 Using The Adapter 9 IV Mac 11 IV 1 Driver Installation 11 IV 2 Driver Uninstallation 14 IV 3 Using The Adapter 15 IV 3 1 Connect to a Wi Fi network 15 IV 3 2 Wireless Utility 18 IV 3 2 1 Profile 18 IV 3 2 2 Link Status 20 IV 3 2 3 Site Survey 21 IV 3 2 4 Statistics 22 IV 3 2 5 WPS 23 IV 3 2 6 About 27 ...

Страница 3: ...nel CD il Q I G in Italiano Magyar A magyar telepítési útmutató megtalálható a mellékelt CD n Nederlands De nederlandse Q I G treft u aan op de bijgesloten CD Polski Skrócona instrukcja instalacji w języku polskim znajduje się na załączonej płycie CD Português Incluído no CD o G I R em Portugues Русский Найдите Q I G на pусскoм языке на приложеном CD Türkçe Ürün ile beraber gelen CD içinde Türkçe ...

Страница 4: ...apter s For help using the adapter after setup please refer to III 3 or IV 3 Using The Adapter I 1 Package Contents EW 7711ULC QIG CD ROM I 2 LED Status I 3 System Requirements Windows XP Vista 7 8 8 1 Mac OS X 10 6 10 9 Minimum USB 2 0 Port Hard Disk 100MB CD ROM Drive LED LED Status Description WLAN On Wireless activity transmitting or receiving data Off No wireless activity LED ...

Страница 5: ...on your computer and insert the USB adapter into an available USB port of your computer Never use force to insert the USB adapter 2 If a Hardware Wizard Driver Installation window opens as shown below please click Cancel or Close ...

Страница 6: ...imax website 4 For Windows users the setup wizard will open For Mac users the CD s Mac folder will open If the CD doesn t auto run please browse to the Autorun or Mac folder of the CD for Windows or Mac users respectively 5 Please follow the instructions in the appropriate chapter for your operating system III Windows IV MAC ...

Страница 7: ...4 III Windows III 1 Driver Installation 1 Click the EW 7711ULC wireless USB adapter to continue 2 Click Install Driver to continue to install the drivers for your EW 7711ULC ...

Страница 8: ...5 3 Please wait while the setup wizard prepares to install the drivers 4 Click Next to continue ...

Страница 9: ...6 5 Click Install to install the driver 6 Please wait while the driver is installing ...

Страница 10: ...8 Click Exit to close the setup wizard The multi language QIG is also included on the CD ROM To open it click Multi language QIG 9 Users can connect to an available Wi Fi network as usual For guidance on doing so please refer to III 3 Using The Adapter ...

Страница 11: ...2 Follow the on screen instructions An uninstall wizard will guide you through the process III 2 2 Windows 8 8 1 1 Right click anywhere on the Start screen and then click the All apps icon in the bottom right corner 2 Locate the Edimax Wireless LAN category select Uninstall and follow the on screen instructions ...

Страница 12: ...er versions of Windows 1 Click the network icon examples below in the system tray and select Connect to a network 2 Your new wireless adapter will be listed in addition to your existing wireless adapter In the example below it is named Wireless Network Connection 3 Search for the SSID of your 5GHz Wi Fi network and then click Connect If you set a password for your network you will then be prompted...

Страница 13: ... After correctly entering your password you will be successfully connected to your Wi Fi network You can disconnect the wireless adapter in the same way you usually would for your existing wireless adapter ...

Страница 14: ... Mac IV 1 Driver Installation 1 Double click the AC450_USB_Installer pkg file 2 Double click the AC450_USB Install pkg file to open the driver installation wizard 3 Click Continue to proceed to the next step ...

Страница 15: ...ted to enter your system administrative password before the installation can begin Enter your password and click Install Software 6 You will be prompted that you must restart your computer when the installation is complete Click Continue Installation to proceed ...

Страница 16: ...7 Please wait while the driver is installing 8 When the installation is complete you will see the following screen informing you that The installation was successful Click Restart to restart your computer ...

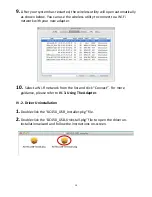
Страница 17: ...Fi network with your new adapter 10 Select a Wi Fi network from the list and click Connect For more guidance please refer to IV 3 Using The Adapter IV 2 Driver Uninstallation 1 Double click the AC450_USB_Installer pkg file 2 Double click the AC450_USB Uninstall pkg file to open the driver un installation wizard and follow the instructions on screen ...

Страница 18: ...t to a Wi Fi network using the included utility software IV 3 1 Connect to a Wi Fi network 1 If the wireless utility software window shown below is not already open please click the E icon in the top right of the screen and select Open Wireless Utility ...

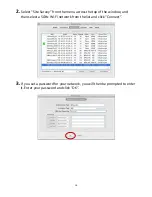
Страница 19: ... from the menu across the top of the window and then select a 5GHz Wi Fi network from the list and click Connect 3 If you set a password for your network you will then be prompted to enter it Enter your password and click OK ...

Страница 20: ...17 4 After correctly entering your password you will be successfully connected to your Wi Fi network ...

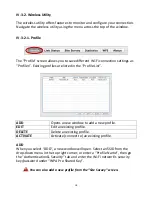
Страница 21: ...s are listed in the Profile List ADD Opens a new window to add a new profile EDIT Edit an existing profile DELETE Delete an existing profile ACTIVATE Activate connect to an existing profile ADD When you select ADD a new window will open Select an SSID from the drop down menu in the top right corner or enter a Profile Name then go the Authentication Security tab and enter the Wi Fi network s securi...

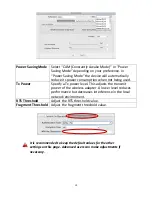
Страница 22: ...ower Specify a Tx power level This adjusts the transmit power of the wireless adapter A lower level reduces performance but decreases interference in the local network environment RTS Threshold Adjust the RTS threshold value Fragment Threshold Adjust the fragment threshold value It is recommended to keep the default values for the other settings on this page Advanced users can make adjustments if ...

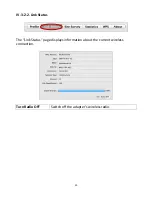
Страница 23: ...20 IV 3 2 2 Link Status The Link Status page displays information about the current wireless connection Turn Radio OFF Switch off the adapter s wireless radio ...

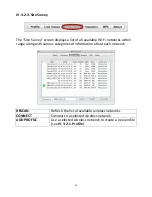
Страница 24: ...Wi Fi networks within range along with various categories of information about each network RESCAN Refresh the list of available wireless networks CONNECT Connect to a selected wireless network ADD PROFILE Use a selected wireless network to create a new profile see IV 3 2 1 Profile ...

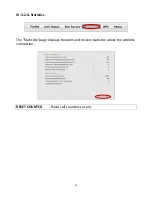
Страница 25: ...22 IV 3 2 4 Statistics The Statistics page displays transmit and receive statistics about the wireless connection RESET COUNTER Resets all counters to zero ...

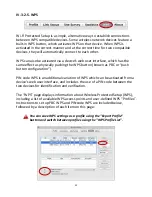
Страница 26: ...y pushing the WPS button known as PBC or push button configuration PIN code WPS is an additional variation of WPS which can be activated from a device s web user interface and includes the use of a PIN code between the two devices for identification and verification The WPS page displays information about Wireless Protected Setup WPS including a list of available WPS access points and user defined...

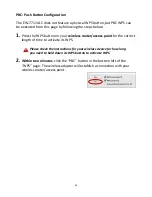
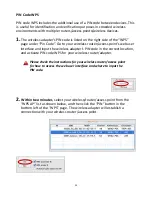
Страница 27: ...tton on your wireless router access point for the correct length of time to activate its WPS Please check the instructions for your wireless device for how long you need to hold down its WPS button to activate WPS 2 Within two minutes click the PBC button in the bottom left of the WPS page The wireless adapter will establish a connection with your wireless router access point ...

Страница 28: ...r access point s web user interface and input the wireless adapter s PIN code in the correct location and activate PIN code WPS for your wireless router adapter Please check the instructions for your wireless router access point for how to access the web user interface and where to input the PIN code 2 Within two minutes select your wireless router access point from the WPS AP list as shown below ...

Страница 29: ...ings of the wireless router access point This is the default setting Registrar Registrar means the other WPS device will follow the settings of the wireless adapter Enrollee mode above is recommended Profile Detail Show details of selected WPS profile Connect Connect to selected WPS profile Rotate Rotate WPS profile Disconnect Disconnect from selected WPS profile Export Profile Save current WPS se...

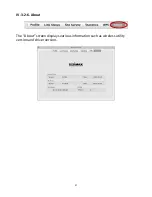
Страница 30: ...27 IV 3 2 6 About The About screen displays various information such as wireless utility version and driver version ...

Страница 31: ...old or licensed as is Should the programs prove defective following their purchase the buyer and not this company its distributor or its dealer assumes the entire cost of all necessary servicing repair and any incidental or consequential damages resulting from any defect in the software Edimax Technology Co Ltd reserves the right to revise this publication and to make changes from time to time in ...

Страница 32: ...controlled environment In order to avoid the possibility of exceeding the FCC radio frequency exposure limits human proximity to the antenna shall not be less than 2 5cm 1 inch during normal operation Federal Communications Commission FCC RF Exposure Requirements This EUT is compliance with SAR for general population uncontrolled exposure limits in ANSI IEEE C95 1 1999 and had been tested in accor...

Страница 33: ...1999 5 ES 2009 125 ES Deutsch Dieses Gerät erfüllt die Voraussetzungen gemäß den Richtlinien 1999 5 EC 2009 125 EC Español El presente equipo cumple los requisitos esenciales de la Directiva 1999 5 EC 2009 125 EC Italiano Questo apparecchio è conforme ai requisiti essenziali e alle altre disposizioni applicabili della Direttiva 1999 5 CE 2009 125 CE Nederlands Dit apparaat voldoet aan de essentiël...

Страница 34: ...s 1999 5 EC Spectrum ETSI EN 301 893 V1 7 1 2012 06 EMC EN 301 489 1 V1 9 2 2011 09 EN 301 489 17 V2 2 1 2012 09 Safety LVD IEC 60950 1 2005 2nd Edition Am 1 2009 EN 60950 1 2006 A11 2009 A1 2010 A12 2011 Recommendation 99 519 EC EMF EN 62311 2008 Directives 2006 95 EC Safety LVD IEC 60950 1 2005 2nd Edition Am 1 2009 EN 60950 1 2006 A11 2009 A1 2010 A12 2011 Edimax Technology Co Ltd No 3 Wu Chuan...

Страница 35: ......
Отзывы: