background image


16

5.2.2 Trunk Configuration


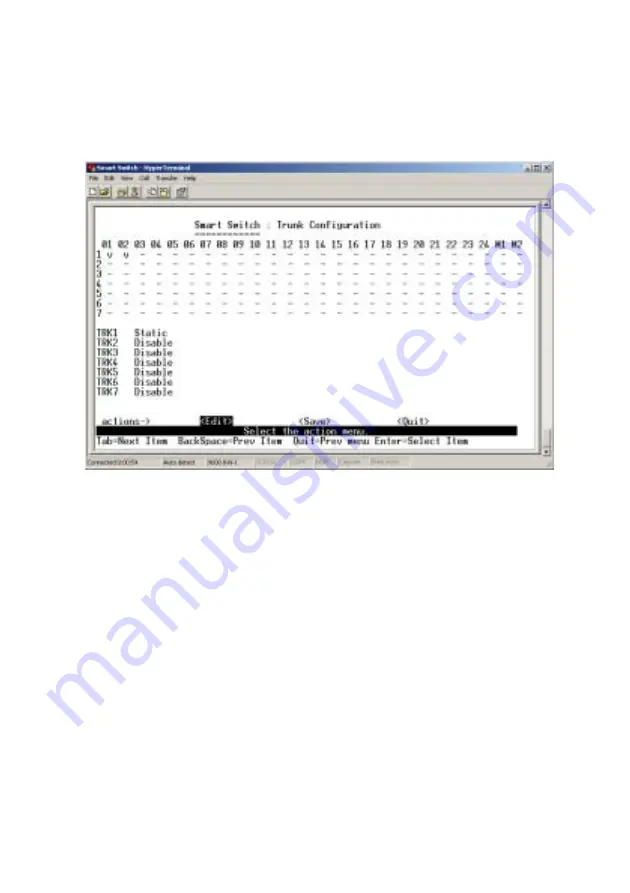
There are seven trunk groups to configure. You can arbitrarily 

select up to four ports from port 1 ~ port 24 or port 25 ~ port 26 
to build a trunk group. 

Configure a trunk group as the following steps: 

1. Select <

Edit

> on actions menu and then press 

Space

 key to 

configure the member ports of each trunk group. 

2.  Besides choosing the member ports, you have to set “Static” 

for the corresponding trunk group of TRK1~TRK7 item. 

3. Press 

Ctrl+A

 to go back actions menu line, and select 

<

Save

> to save all configure values. 

4.  If the item of TRK1~TRK7 is set ”Disable”, it means the 

trunk group is deleted. 

5.  All ports in the same trunk group will be treated as single 

port. So when you set VLAN members and Port 
configurations they will be toggled on or off simultaneously. 

NOTE: If VLAN group exists, all of the members of trunk group 
must be in the same VLAN group.


Содержание ES-3124RE+

Страница 1: ...24 Port Fast Gigabit Ethernet Smart Switch VLAN Trunking QoS ES 5224R ES 5224RF ES 5224RE ES 3124RE User s Manual...

Страница 2: ...urn your computer on and off while your radio or TV is showing interference If the interference disappears then when you turn the computer off and reappears then you turn the computer on something in...

Страница 3: ...1 Port Configuration 14 5 2 2 Trunk Configuration 16 5 2 3 VLAN Configuration 17 5 2 3 1 VLAN Configure 18 5 2 3 2 Create a VLAN Group 20 5 2 3 3 Edit Delete a VLAN Group 22 5 2 4 Misc Configuration...

Страница 4: ...ted devices with auto negotiation providing the capability to connect to 100 10Mbps 1000 100 10Mbps for Gigabit ports network devices It also supports backpressure and IEEE 802 3x advanced flow contro...

Страница 5: ...option Fast Ethernet Smart Switch 100 10Mbps UTP connector RJ 45 100Mbps Fiber SC ST connector multi single mode Provides two Gigabit Ethernet Modules option Gigabit Ethernet Smart Switch only 1000 10...

Страница 6: ...single mode Console Port DB9 1 Forwarding Method Store and Forward MAC Address 14K Buffer Memory 512KBytes Flow control Back pressure for half duplex and IEEE802 3x for full duplex Auto negotiation A...

Страница 7: ...s of your package for following parts One Fast Gigabit Ethernet Smart Switch One User s manual One Power cord One RS 232 Cable If any of the items are missing or damaged please contact your local deal...

Страница 8: ...familiarize yourself with its display indicators and ports All LEDs are located on the front panel of the switch They serve the purpose of monitoring the operation and performance of the switch at a g...

Страница 9: ...he RJ 45 port will auto detect and auto switch to the correct MDI MDI X mode do not need to connect to a specific uplink port or cross over cable 2 Connect one end of the network cable to the RJ 45 po...

Страница 10: ...to PC Attach a RS 232 serial cable 9 pin male connector to the female connector on the switch Plug the other side of this cable to your PC Using Hyper Terminal to connect to Switch In MS Windows laun...

Страница 11: ...10 4 Adjust the settings of the communication port 4 1 Select the using by connect interface such as COM1 COM2 4 2 Select the Bits per second at 9600 4 3 Set the flow control value as None...

Страница 12: ...on the swtich it will boot up automatically and the welcome window will ask you to enter user name and password If this is your first time to log into the configuration program then the default user n...

Страница 13: ...nfiguration Configure the switch Such as port speed and duplex trunk configure VLAN MISC and QoS Reboot Switch Restart the system or configure the switch to default values Logout Exit the system Note...

Страница 14: ...te auto negotiation speed duplex and flow control Trunk Configuration Configure the trunk group VLAN Configuration Configure the VLAN group Misc Configuration Display the firmware version change user...

Страница 15: ...tiation of each port Press Space key to choose items as follows AUTO enable auto negotiation NWAY_FORCE force the port in specified speed duplex and enable auto negotiation FORCE disable auto negotiat...

Страница 16: ...s menu and return to the previous menu Edit Configure all items After finished configure press Ctrl A to go back action menu line Save Save all configure value Previous Page Return to previous page to...

Страница 17: ...esides choosing the member ports you have to set Static for the corresponding trunk group of TRK1 TRK7 item 3 Press Ctrl A to go back actions menu line and select Save to save all configure values 4 I...

Страница 18: ...ing a VLAN from a switch is logically equivalent of reconnecting a group of network devices to another Layer 2 switch However all the network devices are still plug into the same switch physically Thi...

Страница 19: ...18 5 2 3 1 VLAN Configure In this menu you can set VLAN mode as port based VLAN or 802 1Q VLAN or just disable this function...

Страница 20: ...Port VID Set the port VLAN ID that will be assigned to untagged traffic on a given port This feature is useful for accommodating devices that you want to participate in the VLAN but that don t support...

Страница 21: ...de this item means VLAN group ID The group ID range is 1 26 3 Member Press Space key to choose VLAN members There are two types to selected in port based VLAN mode a NO This port is NOT member of this...

Страница 22: ...e three types to selected in 802 1Q VLAN mode a NO this port is NOT the member of this VLAN group b Untagged this port is the member of this VLAN group and outgoing frames are NO VLAN Tagged frames c...

Страница 23: ...or Delete item 2 Choose the VLAN group that you want to edit or delete and then press Enter 3 You can modify the member port as tagged or un tagged and remove some member ports from this VLAN group 4...

Страница 24: ...23 5 2 4 Misc Configuration Display the firmware version change user name and password 5 2 4 1 SW version This menu shows the firmware version Press ESC key to return to the previous menu...

Страница 25: ...4 2 Change Username 1 Press Edit 2 Type a new username 3 Press Ctrl A to go back to actions menu line 4 Press Save to save configure 5 2 4 3 Change User Password In this menu you can change login pas...

Страница 26: ...ity queues of each port Select the Port Static Priority option and you will see the following menu You can set the priority as High or Low for each port When packets are buffered in this switch the po...

Страница 27: ...26 5 3 Reboot Switch Restart the system or configure the switch to default value 5 3 1 Default Press y to reset this switch to default configuration...

Страница 28: ...27 5 3 2 Restart Reboot the switch in software reset...

Страница 29: ...etwork device is turned on 2 Check if the network cable is properly connected to the switch and the network device 3 Make sure the UTP cables comply with EIA TIA 568 and Category 5 specification 3 Col...

Отзывы: