Edge-Core ECS4110-52P Скачать руководство пользователя страница 11

Chapter 1

  |  Switch Description

Overview

–  11  –

Key Hardware

Components

The switch consist of serveral key hardware components. This manual describes 
each specific component, or related components, together with their installation 
requirements and procedures in each chapter. To understand each component in 
detail, refer to the relevant section.

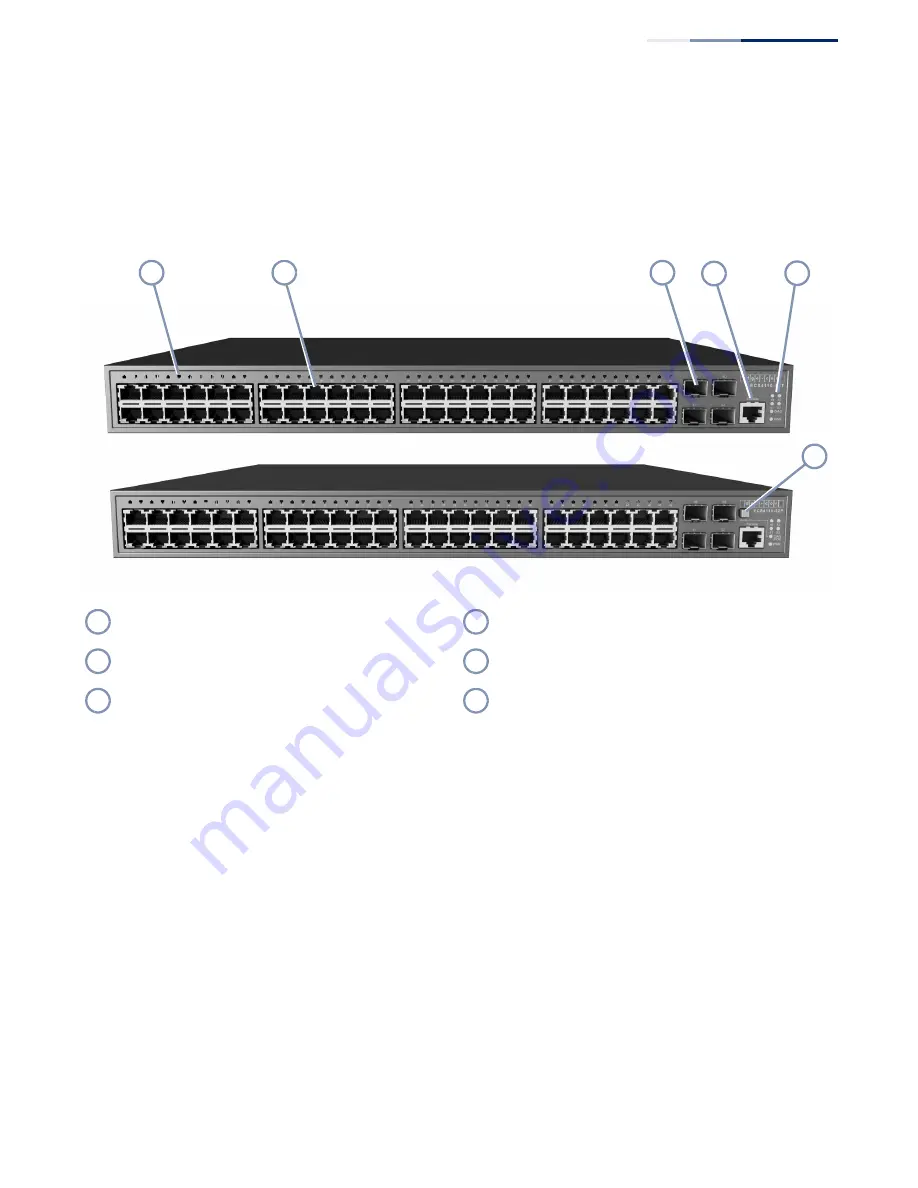
Figure 1:  Front Panel ECS4110-52T (upper) and ECS4110-52P (lower)

10/100/1000BASE-T RJ-45 Ports

The switch contains 48 10/100/1000BASE-T RJ-45 ports that support 10/100/
1000BASE-T copper links to other devices. For more information, see 

“How to 

Connect to Twisted-Pair Copper Ports” on page 32

.

Gigabit SFP Slots

The switch contains four Small Form Factor Pluggable (SFP) transceiver slots that 
operate up to Gigabit full duplex. For more information, see 

“How to Connect to 

SFP Fiber Optic Ports” on page 36

.

Mode Button (ECS4110-52P only)

Pressing the Mode button on the front panel will change the Diag LED to display 
PoE status. For more information, see 

“Understanding the System Status LEDs” on 

page 40

.

Port LEDs

RJ-45 Console Port

1000BASE-T RJ-45 Ports

System LEDs

Gigabit SFP Slots

LED Mode Button (ECS4110-52P only)

1

3

4

5

2

6

1

4

2

5

3

6

Содержание ECS4110-52P

Страница 1: ...Installation Guide www edge core com ECS4110 52T ECS4110 52P 52 Port Layer 2 Gigabit Ethernet Switches...

Страница 2: ...ch Layer 2 Gigabit Ethernet Switch with 48 10 100 1000BASE T RJ 45 Ports 4 Gigabit SFP Ports ECS4110 52P Gigabit Ethernet Switch Layer 2 Gigabit Ethernet Switch with 48 10 100 1000BASE T RJ 45 PoE Por...

Страница 3: ...ter includes information about a specific component with relevant specifications and installation procedures A switch overview section is also provided For Users New to Switches If you are new to netw...

Страница 4: ...rmation and regulatory statements see the following document Quick Start Guide Safety and Regulatory Information Conventions The following conventions are used throughout this guide to show informatio...

Страница 5: ...How to Use This Guide 5 January 2013 Revision This is the first revision of this guide...

Страница 6: ...ackage Contents 14 Switch Installation Tasks 15 3 Switch Chassis 19 General Installation Guidelines 19 How to Install the Switch in a Rack 20 Rack Mounting Items 20 Rack Mount Procedure 20 How to Inst...

Страница 7: ...32 1000BASE T Assignments 33 Power over Ethernet 34 Connection Procedure 35 How to Connect to SFP Fiber Optic Ports 36 Connection Procedure 37 6 Switch Management 39 Understanding the System Status LE...

Страница 8: ...Switch in a Rack 21 Figure 10 Attaching the Adhesive Feet 22 Figure 11 Switch Cooling 23 Figure 12 AC Power Supply Socket 24 Figure 13 Grounding Terminal 25 Figure 14 AC Power Cord and Power Socket 2...

Страница 9: ...ble Lengths 32 Table 5 10 100BASE TX MDI and MDI X Port Pinouts 33 Table 6 1000BASE T MDI and MDI X Port Pinouts 33 Table 7 Maximum Gigabit Ethernet Fiber Cable Lengths 36 Table 8 Maximum Fast Etherne...

Страница 10: ...10 52P are Gigabit Ethernet Layer 2 switches with 48 10 100 1000 BASE T ports and four Small Form Factor Pluggable SFP transceiver slots for fiber connectivity The switches also include an SNMP based...

Страница 11: ...hat support 10 100 1000BASE T copper links to other devices For more information see How to Connect to Twisted Pair Copper Ports on page 32 Gigabit SFP Slots The switch contains four Small Form Factor...

Страница 12: ...is labeled Console provides an out of band serial connection to a terminal or a PC running terminal emulation software The port can be used for performing switch monitoring and configuration For more...

Страница 13: ...andwidth 104 Gbps Switching Database 16K MAC address entries LEDs System Power Diag Diagnostic Ports 1 52 Status link activity speed AC Input Power ECS4110 52P AC 100 240 V 50 60 Hz 7 A ECS4110 52T AC...

Страница 14: ...After unpacking the switch check the contents to be sure you have received all the components ECS4110 52T or ECS4110 52P Switch AC Power Cord either US Continental Europe or UK Console cable RJ 45 to...

Страница 15: ...k the package contents to be sure you have received all the items See Package Contents on page 14 Install the Chassis The switch is designed to be installed in either a standard 19 inch equipment rack...

Страница 16: ...wer Verify Switch Operation Verify basic switch operation by checking the system LEDs When operating normally the Power and Diag LED should both be on green If any of the LEDs are on amber see Diagnos...

Страница 17: ...e port to perform this task The serial port s configuration requirements are as follows 115200 bps 8 characters no parity one stop bit 8 data bits and no flow control You can log in to the command lin...

Страница 18: ...10BASE T connections use 100 ohm category 5 or better ethernet cable for 100BASE TX and 1000BASE T connections Install SFP transceivers and then connect fiber optic cabling to the transceiver ports A...

Страница 19: ...d be able to maintain its temperature within 0 to 50 C 32 to 116 F and its humidity within 5 to 95 non condensing provide adequate space approximately five centimeters or two inches on all sides for p...

Страница 20: ...ent temperature is within the specified operating temperature range See Switch Cooling Requirements on page 23 Mechanical Loading Do not place any equipment on top of a rack mounted unit Circuit Overl...

Страница 21: ...ed with the marked holes 4 The second person should secure the switch in the rack using four rack mounting screws not provided Figure 9 Installing the Switch in a Rack 5 If installing a single switch...

Страница 22: ...tach the four adhesive feet to the bottom of the first switch Figure 10 Attaching the Adhesive Feet 2 Set the device on a flat surface near an AC power source making sure there are at least two inches...

Страница 23: ...itch Figure 11 Switch Cooling Rack Cooling When mounting the switch in an enclosed rack or cabinet be sure to check the following guidelines to prevent overheating Make sure that enough cool air can f...

Страница 24: ...ower from an external AC power supply that can provide 100 to 240 VAC 50 60 Hz A standard AC power socket is located on the rear panel of the switch The power socket is for the AC power cord Figure 12...

Страница 25: ...that there is a good electrical connection to the grounding point on the rack no paint or isolating surface treatment 3 Disconnect all power cables to the switch 4 The switch chassis is connected inte...

Страница 26: ...a grounded 3 pin AC power source Figure 14 AC Power Cord and Power Socket 2 Insert the plug on the other end of the power cord directly into the AC input socket on the back of the switch Note Your cou...

Страница 27: ...48 10 100 1000BASE T RJ 45 ports and four Gigabit SFP transceiver slots The sections that follow describe these interfaces This chapter includes these sections Cable Labeling and Connection Records on...

Страница 28: ...lines Clearly label the opposing ends of each cable Using your building s floor plans draw a map of the location of all network connected equipment For each piece of equipment identify the devices to...

Страница 29: ...orts 1 48 Link Activity On Blinking Amber Port has a valid 10 100 Mbps link Blinking indicates traffic on the port On Blinking Green Port has a valid 1000 Mbps link Blinking indicates traffic on the p...

Страница 30: ...P transceiver do the following 1 Consider network and cabling requirements to select an appropriate transceiver type that is also compatible with the switch transceiver support 2 If the SFP slot is co...

Страница 31: ...ow to Install an SFP Transceiver 31 Figure 16 Inserting an SFP Transceiver into a Slot Note To remove a transceiver First disconnect the network cable then pull the tab to remove the transceiver from...

Страница 32: ...5 5e or better cable for 1000BASE T connections Category 5 or better for 100BASE TX connections and Category 3 or better for 10BASE T connections Protection from radio frequency interference emissions...

Страница 33: ...Table 5 10 100BASE TX MDI and MDI X Port Pinouts Pin MDI Signal Namea a The and signs represent the polarity of the wires that make up each wire pair MDI X Signal Name 1 Transmit Data plus TD 52V pow...

Страница 34: ...4 W simultaneously or all 48 ports can supply up to 8 5 W simultaneously Any PoE compliant device attached to a port can directly draw power from the switch over the Ethernet cable without requiring...

Страница 35: ...nect cables to 1000BASE T RJ 45 twisted pair copper ports 1 Attach one end of a twisted pair cable segment to the device s RJ 45 connector Figure 18 Making Twisted Pair Connections 2 Attach the other...

Страница 36: ...aximum fiber optic cable length for a particular link Note Maximum distances may vary for different SFP vendors Table 7 Maximum Gigabit Ethernet Fiber Cable Lengths Cable Type Fiber Bandwidth Maximum...

Страница 37: ...product You must also use an approved Laser Class 1 SFP transceiver 1 Remove and keep the fiber port s rubber plug When not connected to a fiber cable the rubber plug should be replaced to protect th...

Страница 38: ...is valid Note Be sure to secure cables properly and route them away from the switch without exceeding the minimum bending radius for fiber cables typically a few inches Use cable ties to bunder cables...

Страница 39: ...le port out of band or you can manage it through a network connection in band using Telnet Secure Shell SSH a web browser or SNMP based network management software For a detailed description of the sw...

Страница 40: ...is connected or the internal power supply has failed Diag Diagnostic On Green The system diagnostic test has completed successfully On Amber System diagnostic in progress Blinking Amber The system sel...

Страница 41: ...DTE COM port Note To connect to notebooks or other PCs that do not have a DB 9 COM port use a USB to male DB 9 adapter cable not included with the switch Figure 21 Console Port The following table des...

Страница 42: ...a management PC 2 Plug in the RJ 45 end of the serial cable to the Console port on the switch 3 Configure the PC s COM port required settings using VT 100 terminal emulator software such as HyperTerm...

Страница 43: ...e Reset button for 3 to less than 6 seconds to restart the system software using the current saved configuration file Press the Reset button for 6 seconds or more to restart the system software using...

Страница 44: ...the AC power outlet Check the AC power outlet is supplying 110 240 VAC Contact your dealer for assistance Diag LED is blinking Amber Power cycle the switch to try and clear the condition If the condit...

Страница 45: ...ear to be malfunctioning such as the power cord or network cabling test them in an alternate environment where you are sure that all the other components are functioning properly In Band Access You ca...

Страница 46: ...onal 26 D diagnosing LED indicators 44 E electrical interference avoiding 19 equipment checklist 14 Ethernet connectivity rules 36 I in band access 45 indicators LED 29 40 installation power requireme...

Страница 47: ...Index 47 W web based management 39...

Страница 48: ...ECS4110 52T ECS4110 52P E112015 AP R03 149100000213A The Declaration of Conformity DoC can be obtained from www edge core com support download declarations certifications...

Отзывы: