


Hints and Tips Handbook
Eden
Greenhouses
Customer
Helpline
+44
(0)1242
676625
13
Section
9
This
section
shows
you
how
to
glaze
your
greenhouse
with
your
chosen
glazing
method.
The
Eden
Zero
‐
threshold
TM
range
has
three
different
glazing
options.
These
are
3mm
horticultural
glass,
3mm
long
paned
toughened
glass
and
6mm
twin
walled
polycarbonate.
All
the
tips
and
hints
covered
in
this
handbook,
if
followed
correctly,
help
make
the
glazing
easy
and
help
minimise
adjustments
needed.
For
safety
reasons
we
recommend
you
begin
by
glazing
the
roof.
First,
you
must
attach
the
roof
glass
retaining
clips
(58/R)
to
the
top
lip
of
the
gutter
(2)
as
shown
right.
If
you
have
chosen
the
3mm
horticultural
glazing
method
,
referring
to
your
instruction
manual
for
the
desired
pane
of
glass,
start
by
placing
the
bottom
roof
pane
between
the
two
glazing
bars
resting
it
on
the
58/R
retaining
clips.
Then
secure
this
pane
in
position
with
spring
wire
glazing
clips
(W).
At
least
two
per
side
is
recommended
per
pane
of
glass.
For
the
sides,
place
two
z
‐
clips
roughly
150mm
from
either
side
on
top.
Place
the
next
pane
on
the
z
‐
clips
as
shown
below
right
.
Secure
this
pane
in
position
with
spring
wire
glazing
clips
(W).
NOTE:
IF
YOU HAVE HORTICULTURAL GLAZING AND
YOUR
GREENHOUSE
IS
IN
AN
EXPOSED
OR
WINDY
AREA,
MORE
SPRING
WIRE
GLAZING
CLIPS
ARE
RECOMMENDED
.
WE
SUGGEST
INCREASING
THEM
TO
FOUR
PER
SIDE
OF
EACH
PANE
OF
GLASS.
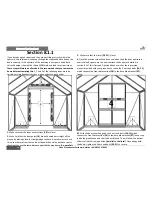
For
safety
reasons
we
recommend
you
begin
by
glazing
the
roof.
First,
you
must
attach
the
roof
glass
retaining
clips
(58/R)
to
the
top
lip
of
the
gutter
(2)
as
shown
right.
If
you
have
chosen
the
3mm
long
pane
toughened
glazing
method
,
referring
to
your
instruction
manual
for
the
desired
pane
of
glass,
start
by
placing
the
roof
pane
between
the
two
glazing
bars,
resting
it
on
the
58/R
retaining
clips
as
shown
right
.
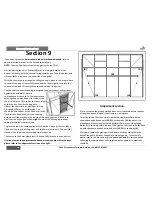
The
Eden
toughened
glass
capping
is
designed
to
be
very
robust
and
resistant
against
wind
and
water
but
as
a
consequence
it
is
hard
to
fit.
We
recommend
spraying
soapy
water
down
either
side
of
the
glass
pane
to
lubricate,
then
centre
the
glass
within
the
bay.
Start
by
capping
both
sides
at
the
same
time,
beginning
at
the
top.
Put
roughly
50mm
in
on
either
side.
You
should
be
able
to
hear
a
click
if
done
correctly.
Once
this
has
been
done,
carry
on
capping
both
sides
all
the
way
down
the
length
of
the
pane
as
shown
below
.
You
should
be
able
to
hear
a
click
as
you
go.
Some
of
the
C2
capping
requires
cutting
for
the
roof
vent
bays
only.
If
for
any
reason
the
glass
does
not
seem
square
within
the
bays
please
refer
to
the
next
page
in
the
adjustment
section.
R
/
58
R
/
58
R
/
58
R
/
58


