background image

TROLLEY

UK

35

TROLLEY

UK

34

• The hot air fan comes on automatically about 15 minutes after ignition, at the first speed,

and levels itself at the selected power for the normal operating cycle, 25 minutes after
ignition.

• It is possible to adjust the hot air fan separately from fuel loading rate (only for the first

two power levels); the two functions are currently set proportionately by the manufac-
turer.

• To switch off the stove completely just press the 

ON/OFF

button again; after the flame has

gone out the stove will remain in operation for about 20 minutes until all the internal
parts have cooled down.

IMPORTANT

Continuous operation of the stove at maximum power could shorten the life of the electronic and
mechanical components, and also reduce safety.
The stove is able to operate continuously for long periods of 10/15 hours if the selected pellet load-
ing power level does not exceed the third position.
Using the stove at the fourth or fifth loading rate for long periods will reduce safety, therefore an au-
tomatic power limiting device has been installed as standard in the stove.

If the automatic power limiting device is disabled at the user’s request (this should be done
by the installer technician following an evaluation of the conditions under which the stove
is to be used), it is necessary to connect the stove to the flue gas exhaust system using stain-
less steel pipes, or pipes painted with airtight seals. If the fourth power level is selected we
advise operating the stove continuously at this level only if it is alternated hourly with op-
eration at lower load rates, while the fifth level should only be used continuously for a max-
imum of 30 minutes.

ATTENTION:

During operation, changing the function between 

MAN

and 

AUTO

will be treated as a new

command for initial ignition, therefore the stove will re-activate the start cycle for 25 min-
utes.

NOTE

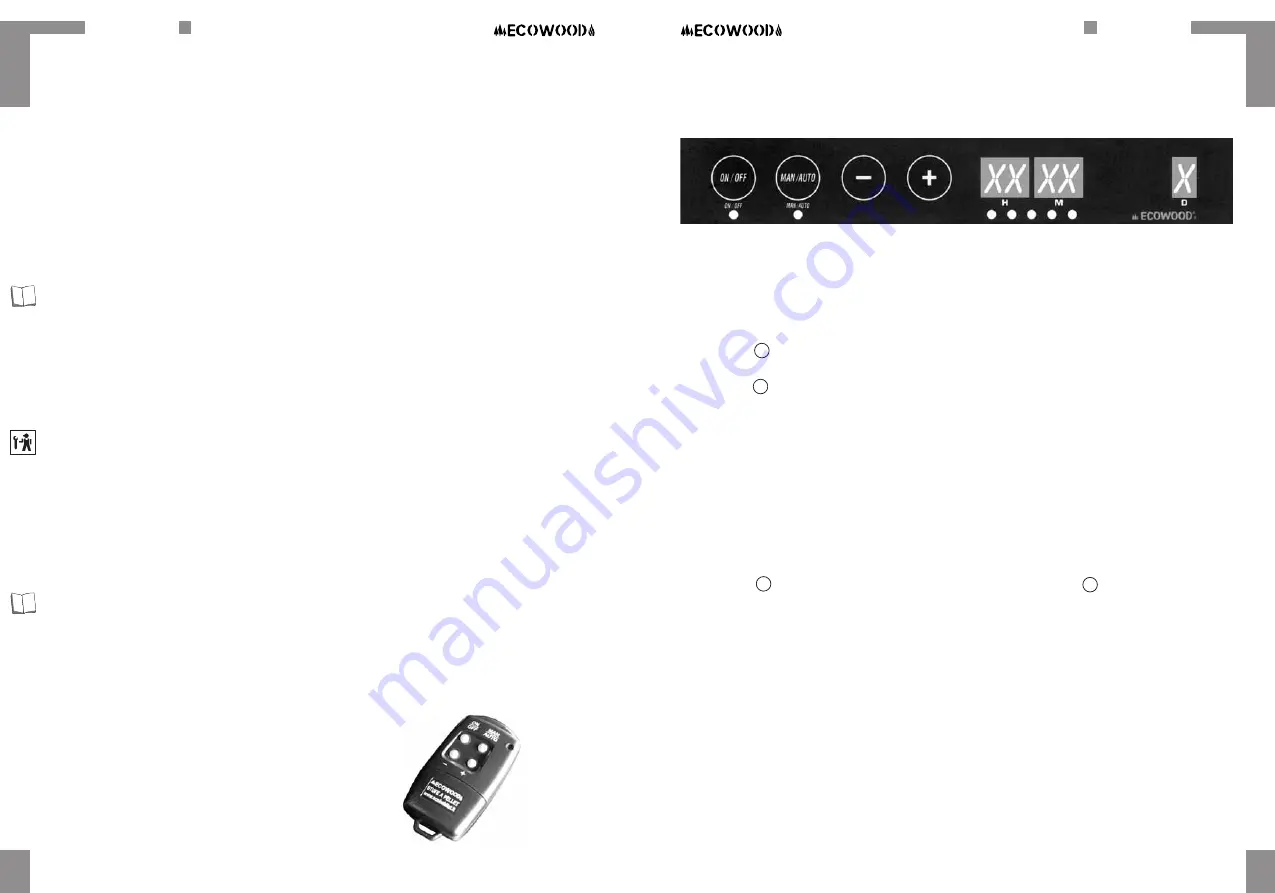
: the functions on the remote control are identical.

To switch on by phone

To switch on by phone, as the main board will allow,
it is necessary to connect a modem (optional).

PROGRAMMING INSTRUCTIONS

The fire must be extinguished when the clock and automatic 

ON/OFF

cycles are programmed in

the stove.

1. To enter programming, press the 

ON/OFF

and 

MAN/AUTO

buttons one after the other and keep

them both pressed for a few moments, then release them together.The display will show the
message 

PR

.

2. Press the  

+

button followed by the 

ON/OFF

and 

MAN/AUTO

buttons one after another, so that

time is displayed.

3. Press the  

-

button followed by the 

ON/OFF

and 

MAN/AUTO

buttons one after another, to dis-

able the time display.

4. Press 

MAN/AUTO

to set the clock.

5. Press 

ON/OFF

to set the automatic 

ON/OFF

cycles for the stove.

6. To exit programming, press 

ON/OFF

and then 

MAN/AUTO

immediately afterwards.

SETTING THE DATE AND TIME

1. To enter programming, press the 

ON/OFF

and 

MAN/AUTO

buttons one after the other and keep

them both pressed for a few moments, then release them together.The display will show the
message PR.

2. Press 

MAN/AUTO

to set the clock (the first digit on the left in the “

H

” display will flash).

3. Press the  

+

button to increase the flashing value; if you press the  

-

button you will shift to

the previous display.

4. To enter and confirm each setting, press the 

ON/OFF

button; every time you confirm a setting

the next display will start to flash.
Continue programming the settings for the hour “

H

” and minutes “

M

” and then programme

the current day of the week “

D

” (e.g. 1=Monday; 2=Tuesday; 7=Sunday).

When you have finished programming (after selecting the last number on the right in the “

D

display, the message 

PR

will reappear.

5. To exit programming, press 

ON/OFF

and then 

MAN/AUTO

immediately afterwards.

PROGRAMMING AUTOMATIC ON AND OFF TIMES

1. To enter programming, press the 

ON/OFF

and 

MAN/AUTO

buttons one after the other and keep

them both pressed for a few moments, then release them together.The display will show the
message 

PR

.

Содержание TROLLEY

Страница 1: ...TROLLEY Ed 02 2007 IT UK MANUALE INSTALLAZIONE USO E MANUTENZIONE pagina 2 INSTALLATION USER S AND MAINTENANCE HANDBOOK page 22 STUFA A PELLET PELLET STOVE ...

Страница 2: ...tà di ricerca ed innovazione sono volte ad un co stante lavoro di miglioramento per ottenere un prodotto superiore offrendo il meglio in termini di sicurezza affida bilità prestazioni comodità confortevolezza e design La invitiamo a leggere con attenzione e seguire scrupolo samente tutte le indicazioni ed i consigli contenuti nel pre sente manuale questo Le garantirà un migliore utilizzo sfruttand...

Страница 3: ...TROLLEY IT 5 TROLLEY IT 4 FRONTE SEZIONE RETRO RETRO SENZA GRIGLIA ...

Страница 4: ...locali Durante le prime ore di funzionamento la guarnizione della porta del focolaio può incollarsi alla stufa se ciò avviene staccare la guarnizione dalla stufa spolverarla con della cenere è un ottimo antiaderente ed inserirla nella sede della porta stessa senza utilizzare alcun tipo di collante TROLLEY IT TROLLEY IT 6 DATI DI SICUREZZA IMPORTANTI PREDISPOSIZIONE PER L INSTALLAZIONE Per prevenir...

Страница 5: ...he i gas espulsi non vengano in alcun modo a contatto con persone o animali Qualora la stufa sia posta vicino ad una parete rivestita di legno o che il tubo dello scarico dei gas sia a contatto con materiali analoghi isolarli adeguatamente con prodotti ignifughi e resistenti al fuoco Qualora la stufa venga installata su un edificio con pareti potenzialmente combustibili si rende ne cessaria l inte...

Страница 6: ... accensione alla prima velocità stabilizzandosi alla potenza selezionata in fase di ciclo normale di funzionamen to 25 minuti dopo la fase di accensione È possibile regolare l aria calda in modo separato dal carico del combustibile solo per le pri me due potenze le due funzioni sono attualmente impostate dal costruttore in modo pro porzionale La stufa è costruita interamente in metallo nel focolai...

Страница 7: ...telefonica Collegare alla scheda elettronica il modem telefonico esterno optional ISTRUZIONI PER LA PROGRAMMAZIONE La regolazione dell orologio e la programmazione dei cicli di accensione e spegnimento au tomatico della stufa devono essere effettuate con il fuoco spento 1 Per accedere alla programmazione premere i pulsanti ON OFF e MAN AUTO in successio ne tenendoli premuti entrambi per qualche is...

Страница 8: ... la lettera A indicando che si può modificare il carico del combustibile nella fase di ac censione Il valore impostato posizionato in centro scala si evidenzia nel display attraverso le spie led di colore giallo Per modificare i valori si utilizzano i pulsanti e Il pulsante ON OFF serve per confermare la modifica e per cambiare il settore dove si deve variare il carico pre impostato Dopo la letter...

Страница 9: ...ibi li ad una temperatura di 90 a contatto Qualora sia utilizzato il tubo flessibile SIL3 è necessario ai fini della sicurezza rimuoverlo dal la stufa e procedere alla pulizia interna dello stesso una volta alla settimana L utilizzo del tubo SIL3 è consigliato solo per brevi periodi ed esclusivamente al la presenza dell utilizzatore MANUTENZIONE Attenzione Prima di eseguire qualsiasi inter vento t...

Страница 10: ... La vite senza fine non sia ostruita da un corpo estraneo ve rificare togliendo il combustibile dalla vasca Il vacuostato non sia bloccato da cattiva combustione o lo scarico sia ostruito riattivarlo soffiando ed aspirando finché si sente l interruttore funzionare Il tubo per l uscita dei fumi sia ben inserito sullo scarico se ciò non fosse un dispositivo elettrico blocca il funzionamento della st...

Страница 11: ...2 kW Potenza termica nominale 4 03 kW Emissione di CO nei prodotti di combustione alla potenza termica minima 0 037 alla potenza termica nominale 0 023 Potenza massima assorbita 321 W fase di accensione Potenza a regime P1 90 W Potenza a regime P5 100 W Tensione nominale 230 V Frequenza nominale 50 Hz Dati rilevati in laboratorio con pellet con potere calorifico di 5300 Kcal h certificato SINAL La...

Страница 12: ...TROLLEY TROLLEY UK INSTALLATION USER S AND MAINTENANCE HANDBOOK PELLET STOVE ...

Страница 13: ... research and innovation activities are aimed at con tinual improvement of the product in order to offer the best in terms of safety reliability performance conven ience comfort and design Please read this handbook carefully and follow the instruc tions and advice meticulously This will guarantee optimal use of the product and exploit its advantages to the full You have bought a stove that has bee...

Страница 14: ...ion air intake pipe Mains power supply cable input Rear wheels Control probe Pellet loading screw motor Flue gas exhauster motor Flue gas exhaust pipe Flue gas fan ventilator Microdust deposit box Tangential convection motor Base Front control panel Hopper pellet box Rear protection grille Pellet feed pipe Pellet loading screw motor Electrical ignition resistance Combustion air intake pipe Microdu...

Страница 15: ...e off an odour caused by stabilisa tion of the paint and protective grease to lessen the discomfort air the rooms well For the first few hours of operation the gasket on the door of the hearth may stick to the stove if this happens detach the stove gasket dust it with ash this is an excellent non stick agent and then insert it in its seating on the door without using any kind of adhesive IMPORTANT...

Страница 16: ...positioned near a wood lined wall or the gas exhaust pipe is in contact with similar material insulate the material with suitable fireproof or fire resistant products If the stove is installed in a building with poten tially combustible walls it will be necessary to place an insulating sleeve between the wall and the flue gas exhaust pipe and similarly for the overhanging part of the building s ro...

Страница 17: ...tes after ignition It is possible to adjust the hot air fan separately from fuel loading rate only for the first two power levels the two functions are currently set proportionately by the manufacturer The stove is built entirely of metal refractory material has not been used in the fireplace in order to exploit as much of the heat created by the fire as possible If the heat probe detect overheati...

Страница 18: ...tart cycle for 25 min utes NOTE the functions on the remote control are identical To switch on by phone To switch on by phone as the main board will allow it is necessary to connect a modem optional PROGRAMMING INSTRUCTIONS The fire must be extinguished when the clock and automatic ON OFF cycles are programmed in the stove 1 To enter programming press the ON OFF and MAN AUTO buttons one after the ...

Страница 19: ...show that you can modify pellet loading rate at the ignition stage The setting positioned in the centre of the scale is shown on the display by the yel low LED s Use the and buttons to change the values The ON OFF button is used to confirm the change and to change the sector for which the preset loading rate is to be modified After the letter A the pellet loading rates will appear in sequence 1 2 ...

Страница 20: ... positioned so that it does not damage the surface on which it rests keeping it away from objects fabrics curtains etc that are inflammable or self combustible at a contact temperature of 90 C If a SIL3 flexibile pipe is used for safety reasons it is necessary to remove it from the stove and clean the inside of the pipe once a week The use of SIL3 flexibile pipe is allowed only for a short time we...

Страница 21: ... if there is power and it does not heat up replace it with a new one The worm is not obstructed by a foreign body check by re moving the fuel from the fuel box The vacuum pressure switch has not been blocked by poor combustion or an obstruction in the exhaust pipe re activate it by blowing and sucking until you hear the switch come in to operation The flue gas outlet pipe is inserted properly into...

Страница 22: ...rating 4 03 kW CO emission produced during combustion at the minimum heat rating 0 037 at the nominal heat rating 0 023 Maximum absorbed power 321 W during ignition Working power P1 90 W Working power P5 100 W Rated voltage 230 V Rated frequency 50 Hz Data obtained in the laboratory using pellets with thermal value 5300 Kcal h certified by SINAL The stove has been built in compliance with the foll...

Страница 23: ... used as required in the instruction handbook For the first two years cleaning is carried out by technical staff who have been authorised by ECOWOOD The guarantee is not applicable for damage caused by weather conditions chemicals electro chemicals fire negligence or improper use failure to observe the legislation in force faults in the electrical system lack of maintenance tamper ing with the pro...

Страница 24: ... materia di sicurezza in vigore nella CEE sono The following harmonised standards or technical specifications designations which comply with good engineering practice in safety matters in force within the EEC have been applied Norme o altri documenti normativi Standards or other normative documents EN 14785 EN 60335 1 EN 55014 1 EN 55014 2 EN 50165 EN 61000 2 3 EN 61000 3 3 Rapporto di collaudo Sc...

Страница 25: ... DISTRIBUTION Sede Legale Registered Office Via Borgo 36 36034 Malo VI Italy Tel Fax 0445 602079 Show Room Via Bologna 4 36034 Malo VI Italy Tel Fax 0445 580725 E mail info ecohabitat it Web Site www ecohabitat it print www centrostampaschio com ...

Отзывы: