background image

EN

8

3. Operating and Programming

3.2 Quick Start

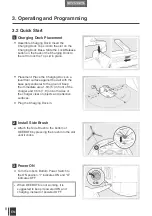
Charging Dock Placement

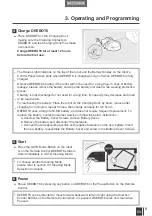
Install Side Brush

Power ON

Assemble Charging Dock: Insert the 

Charging Dock Top Lid into the slot on the 

Charging Dock Base. Slide the Lock/Release 

button on the back of the Charging Dock to 

the left to lock the Top Lid in place. 

Placement: Place the Charging Dock on a 

level floor surface against the wall with the 

base perpendicular to the ground. Keep 

the immediate area 1.5m (5') in front of the 

charger and 0.5m (1.6') on both sides of 

the charger clear of objects and reflective 

surfaces.

Plug the Charging Dock in.

Attach the Side Brush to the bottom of 
DEEBOT6 by pressing the brush into the slot 
until it clicks. 

Turn the robot’s Bottom Power Switch to 
the ON position. “I” indicates ON and “O” 
indicates OFF.

1

2

3

When DEEBOT6 is not working, it is 

suggested to keep it powered ON and 

charging, instead of powered OFF.

*

0.5m

 (1.6')

0.5m

 (1.6')

1.5m (5')

ON

Содержание D63S

Страница 1: ...Instruction Manual EN Mode d emploi Benutzerhandbuch Manual de instrucciones FR DE ES ...

Страница 2: ...e not been properly addressed in this Instruction Manual please contact our Customer Service Center where a technician can address your specific problem or question For more information please visit the Ecovacs official website www ecovacs com The company reserves the right to make technological and or design changes to this product for continuous improvement Thank you for choosing DEEBOT Instruct...

Страница 3: ... 2 Specifications 4 2 3 Product Diagram 5 3 Operating and Programming 7 3 1 Notes before Cleaning 7 3 2 Quick Start 8 3 3 Cleaning Mode Selection 10 3 4 Intelligent Scheduling 12 4 Maintenance 13 4 1 Dust Bin and Filters 13 4 2 Main Brush and Side Brush 14 4 3 Other Components 15 5 Troubleshooting 16 Contents ...

Страница 4: ...battery information please refer to Specifications section 8 Do not use without dust bin and or filters in place 9 Do not operate the Appliance in an area where there are lit candles or fragile objects 10 Do not use in extremely hot or cold environments below 5 C 23 F or above 40 C 104 F 11 Keep hair loose clothing fingers and all parts of body away from any openings and moving parts 12 Do not ope...

Страница 5: ...iance 26 Please dispose of used batteries according to local laws and regulations 27 Do not incinerate the Appliance even if it is severely damaged The batteries can explode in a fire 28 When not using the Charging Dock for a long period of time please unplug it 29 The Appliance must be used in accordance with the directions in this Instruction Manual Ecovacs Robotics cannot be held liable or resp...

Страница 6: ...e Control Model RC0917 Input voltage V 3 Battery Ni MH SC 2100mAh 4 2 Package Contents and Technical Specifications 2 1 Package Contents Robot 2 Side Brushes Technical and design specifications may be changed in the course of continuous product improvement Charging Dock Instruction Manual Multi Function Cleaning Tool Remote Control with Batteries 2 2 Specifications Instruction Manual EN ...

Страница 7: ... Display 2 Return to Charger Mode Indicator 3 Alarm Indicator 4 AUTO Cleaning Mode Indicator 5 Intelligent Scheduling Indicator 10 Main Brush Screw 11 Main Brush 12 Universal Wheel 13 Driving Wheels 14 Bottom Power Switch 15 Battery Cover 16 Battery Cover Screws 17 Dust Sensors 6 Intensive Cleaning Mode Indicator 7 AUTO Mode Button 8 Intelligent Scheduling Button 9 Return to Charger Mode Button 10...

Страница 8: ...nfrared Signal Generator 5 Anti Slip Strips 6 Charging Dock Base 1 2 3 4 3 6 7 2 4 6 1 5 8 5 2 Package Contents and Technical Specifications Remote Control Charging Dock 1 Pause Button 2 AUTO Mode Button 3 Spot Cleaning Mode Button 4 Edge Cleaning Mode Button 5 Direction Control Buttons 6 Intensive Cleaning Mode Button 7 Return to Charger Mode Button 8 Infrared Emitter Dust Bin 1 2 3 4 5 6 6 ...

Страница 9: ...gle the product Please be aware that the robot needs at least a 9cm 3 5 clearance to clean under furniture without complications The product is not suitable for use on long pile carpet If there is a step or stairs the cleaning area please operate DEEBOT6 to ensure its Anti Drop Sensors can detect the drop off It may be necessary to place a physical barrier at the edge of the drop off to keep the u...

Страница 10: ...urface against the wall with the base perpendicular to the ground Keep the immediate area 1 5m 5 in front of the charger and 0 5m 1 6 on both sides of the charger clear of objects and reflective surfaces Plug the Charging Dock in Attach the Side Brush to the bottom of DEEBOT6 by pressing the brush into the slot until it clicks Turn the robot s Bottom Power Switch to the ON position I indicates ON ...

Страница 11: ...If battery is fully discharged or not used for a long time its capacity may decrease and need to be reactivated To reactivating the battery Place the robot on the Charging Dock by hand remove after charging for 3 minutes repeat 3 times then charge normally for 3 5 hours DEEBOT6 uses a long life Ni MH battery and does not require frequent replacement To replace the battery contact Customer Service ...

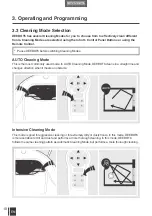
Страница 12: ...ty floors In this mode DEEBOT6 is more sensitive to dirt and dust and performs a more thorough cleaning In this mode DEEBOT6 follows the same cleaning pattern as Automatic Cleaning Mode but performs a more thorough cleaning 3 3 Cleaning Mode Selection DEEBOT6 has several Cleaning Modes for you to choose from to effectively clean different floors Cleaning Modes are selected using the robot s Contro...

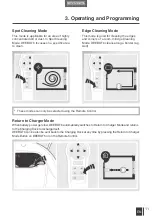
Страница 13: ... corners of a room In Edge Cleaning Mode DEEBOT6 cleans along a border e g wall When battery power gets low DEEBOT6 automatically switches to Return to Charger Mode and returns to the Charging Dock to recharge itself DEEBOT6 can be also be sent back to the Charging Dock at any time by pressing the Return to Charger Mode Button on DEEBOT6 or on the Remote Control 3 Operating and Programming These m...

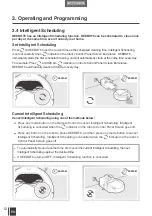
Страница 14: ...igent Scheduling DEEBOT6 has an Intelligent Scheduling function DEEBOT6 can be scheduled to clean once per day at the same time even if nobody is at home Press any mode button on the Remote Control to cancel Intelligent Scheduling Intelligent Scheduling is cancelled when the indicator on the robot s Control Panel Screen goes off Press any button on the robot to pause DEEBOT6 and then press any mod...

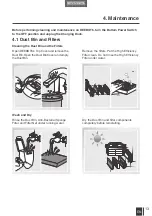
Страница 15: ...arging Dock 4 1 Dust Bin and Filters Open DEEBOT6 s Top Cover and remove the Dust Bin Open the Dust Bin Cover and empty the Dust Bin Rinse the Dust Bin Anti Bacterial Sponge Filter and Filter Net under running water Dry the Dust Bin and filter components completely before reinstalling Remove the filters Pat the High Efficiency Filter clean Do not rinse the High Efficiency Filter under water ...

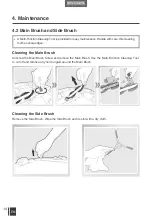
Страница 16: ...sh Screw and remove the Main Brush Use the Multi Function Cleaning Tool to cut off and remove any hair tangled around the Main Brush Remove the Side Brush Wipe the Side Brush and its slot with a dry cloth A Multi Function Cleaning Tool is provided for easy maintenance Handle with care this cleaning tool has sharp edges ...

Страница 17: ...l Wipe the Dust Sensors with the brush or the felt side of the Multi Function Cleaning Tool to maintain their effectiveness Wipe the Anti Drop Sensors with the brush or the felt side of the Multi Function Cleaning Tool to maintain their effectiveness Wipe the Charging Contacts and Charging Dock Pins clean with a dry cloth ...

Страница 18: ...tops DEEBOT6 is tangled with something on the floor electrical cords drooping curtains carpet fringe etc DEEBOT6 will try various ways to get itself out of trouble If it is unsuccessful manually remove the obstacles and restart 3 DEEBOT6 returns to the Charging Dock before it finishes cleaning When battery power gets low DEEBOT6 automatically switches to Return to Charger Mode and returns to the C...

Страница 19: ...Make sure DEEBOT6 s Bottom Power Switch is ON and fully charged The infrared signal cannot be transmitted because the Infrared Emitter on the Remote Control or DEEBOT6 s Infrared Receiver on DEEBOT6 is dirty Use a dry cloth or the Multi Function Cleaning Tool to wipe the Infrared Emitter on Remote Control and the Infrared Receiver on DEEBOT6 There is other equipment interfering with the infrared s...

Страница 20: ...us deviez rencontrez des situations qui n ont pas été correctement abordées dans ce manuel veuillez contacter notre service clientèle un technicien sera a votre service pour répondre à vos questions Pour plus d informations veuillez visiter le site officiel de Ecovacs www ecovacs com Dans un souci d amélioration constante de nos produits nous nous réservons le droit de modifications techniques de ...

Страница 21: ...ques 20 2 3 Schéma du produit 21 3 Fonctionnement et programmation 23 3 1 Indications avant le nettoyage 23 3 2 Démarrage rapide 24 3 3 Sélection du mode de nettoyage 26 3 4 Programmation intelligente 28 4 Entretien 29 4 1 Bac à poussière et filtres 29 4 2 Brosse principale et brosses latérales 30 4 3 Autres composants 31 5 Dépannage 32 Contenu ...

Страница 22: ...de chargement 6 UNIQUEMENT conçu pour une utilisation en INTÉRIEUR N utilisez pas l appareil à l extérieur ou dans les environnements commerciaux ou industriels 7 Utilisez uniquement la pile rechargeable originale et l équipement de charge fourni avec le produit par le fabricant 8 L appareil doit être impérativement doté de son bac à poussière et ou d un filtre avant d être utilisé 9 N utilisez pa...

Страница 23: ...magée laissée à l extérieur ou au contact de l eau Si tel est le cas ces éléments doivent être réparés par le fabricant ou par son technicien de service pour en garantir l utilisation sécurisée 22 Mettez le commutateur d alimentation en position OFF avant d entreprendre le nettoyage ou l entretien de l appareil 23 Retirez la fiche de la prise avant d entreprendre le nettoyage ou l entretien de la ...

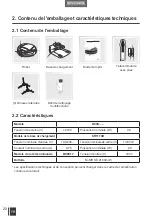
Страница 24: ...le de la télécommande RC0917 Tension d entrée V 3 Batterie Ni MH SC 2100mAh 20 2 Contenu de l emballage et caractéristiques techniques 2 1 Contenu de l emballage Robot 2 Brosses latérales Les spécifications techniques et de conception peuvent changer dans le cadre de l amélioration continue du produit Base de chargement Mode d emploi Outil de nettoyage multifonctions Télécommande avec piles 2 2 Ca...

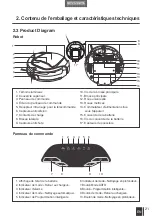
Страница 25: ...r au chargeur 3 Indicateur d alarme 4 Indicateur de mode Nettoyage automatique 5 Indicateur de Programmation intelligente 10 Vis de la brosse principale 11 Brosse principale 12 Roue universelle 13 Roues motrices 14 Commutateur d alimentation situé sous l appareil 15 Couvercle de la batterie 16 Vis du couvercle de la batterie 17 Capteurs de poussière 6 Indicateur de mode Nettoyage en profondeur 7 B...

Страница 26: ...r base de chargement 4 Générateur de signaux infrarouges 5 Bandes antidérapantes 6 Base de chargement 1 2 3 4 3 6 7 2 4 6 1 5 8 5 Télécommande Base de chargement 1 Bouton Pause 2 Bouton Mode AUTO 3 Mode Nettoyage ciblé 4 Mode Nettoyage des bords 5 Boutons de contrôle de la direction 6 Bouton mode Nettoyage en profondeur 7 Bouton mode Retour au chargeur 8 Transmetteur infrarouge Bac à poussière 1 2...

Страница 27: ... enchevêtrer Veuillez tenir compte du fait que le robot a besoin d un espace minimum de 9 cm 3 5 pouces pour nettoyer sous les meubles L appareil n est pas adapté pour une utilisation sur des tapis à poils longs En cas de présence d une marche ou d un escalier dans la zone à nettoyer commandez le DEEBOT6 afin de s assurer que ses capteurs anti chute détectent la différence de hauteur Il peut s avé...

Страница 28: ...a base en position perpendiculaire par rapport au sol Laissez un espace d 1 5 m devant la base de chargement et de 0 5 m sur les côtés libres de tout objet et surface réfléchissante Branchez la base de chargement Attachez la brosse latérale au bas du DEEBOT6 en appuyant la brosse sur chaque emplacement jusqu à ce qu elle s encliquète Mettez le commutateur d alimentation du robot situé sous l appar...

Страница 29: ...de la réactiver Pour réactiver la batterie placez manuellement le robot sur la base de chargement retirez le après un chargement de 3 minutes et répétez cette opération 3 fois avant de le laisser se recharger normalement pendant 3 5 heures Le DEEBOT6 est équipé d une batterie Ni MH de longue durée qui ne nécessite pas d être remplacée fréquemment Pour remplacer la batterie contactez le service apr...

Страница 30: ...sensible à la poussière et aux saletés et effectue un nettoyage plus minutieux Il effectue les mêmes déplacements de nettoyage qu en mode Nettoyage automatique mais il nettoie plus minutieusement 3 3 Sélection du mode de nettoyage Le DEEBOT6 dispose de plusieurs modes de nettoyage afin de nettoyer efficacement différents types de sol Les modes de nettoyage sont sélectionnés à l aide des boutons de...

Страница 31: ...pièce Lorsqu il est utilisé dans ce mode le DEEBOT6 nettoie le long d un bord par exemple un mur Lorsque la batterie devient faible le DEEBOT6 commute automatiquement en mode Retour au chargeur et se dirige de lui même vers la base de chargement pour se recharger Le DEEBOT6 peut également être renvoyé à tout moment à la base de chargement en appuyant sur le bouton Mode Retour au chargeur dont il d...

Страница 32: ...insi être programmé pour nettoyer une fois par jour à la même heure même si personne n est présent Appuyez sur n importe quel bouton de mode sur la télécommande pour supprimer la programmation intelligente La Programmation intelligente est supprimée correctement lorsque l indicateur de l écran du panneau de commande s éteint Appuyez sur n importe quel bouton de mode sur le robot pour mettre le DEE...

Страница 33: ...Bac à poussière et filtres Ouvrez le couvercle supérieur du DEEBOT6 et retirez le bac à poussière Ouvrez le couvercle du bac à poussière et videz le bac Rincez le bac à poussière le filtre éponge antibactérien et l élément filtrant sous l eau courante Séchez complètement le bac à poussière et les composants du filtre avant de les remettre en place Retirez les filtres Tapotez le filtre à efficacité...

Страница 34: ...ale Utilisez l outil de nettoyage multifonctions de la brosse principale pour couper et retirer les cheveux enchevêtrés dans la brosse principale Retirez la brosse latérale Essuyez la ainsi que son emplacement à l aide d un chiffon sec Un outil de nettoyage multifonctions est fourni pour faciliter l entretien Manipulez le avec précaution car il comporte des arêtes vives 4 Entretien ...

Страница 35: ... ou du côté feutré de l outil de nettoyage multifonctions pour qu ils préservent leur efficacité Essuyez les capteurs anti chute à l aide de la brosse ou du côté feutré de l outil de nettoyage multifonctions pour qu ils préservent leur efficacité Essuyez les contacts de chargement et les broches de la base de chargement à l aide d un chiffon sec 4 Entretien ...

Страница 36: ...ur que sa batterie soit entièrement rechargée et qu il puisse effectuer une tâche à tout moment La batterie est complètement déchargée Réactivez la batterie Placez manuellement le DEEBOT6 sur la base de chargement retirez le 3 minutes après chargement et répétez cette opération 3 fois avant de le laisser se recharger normalement 2 Le DEEBOT6 est en difficulté pendant qu il fonctionne et s arrête L...

Страница 37: ...osse principale et les brosses latérales 5 Panne de la télécommande la marge de contrôle efficace de la télécommande est de 5 m 16 pouces Les piles de la télécommande doivent être remplacées Remplacez les avec de nouvelles piles en veillant à ce qu elles soient correctement installées Le commutateur d alimentation situé en dessous du DEEBOT6 est sur OFF ou la batterie est faible Assurez vous que l...

Страница 38: ...die in dieser Bedienungsanleitung nicht zu Ihrer Zufriedenheit behandelt wurden kontaktieren Sie unseren Kundendienst Unsere Kundendiensttechniker stehen Ihnen gern zur Verfügung um Ihre speziellen Probleme zu lösen und Ihre Fragen zu beantworten Für weitere Informationen besuchen Sie bitte die Ecovacs offizielle Website www ecovacs com Technische und konstruktive Änderungen am Gerät die aufgrund ...

Страница 39: ...Daten 36 2 3 Produktübersicht 37 3 Bedienung und Programmierung 39 3 1 Vor dem Reinigen 39 3 2 Kurzanleitung 40 3 3 Wahl des Reinigungsmodus 42 3 4 Intelligente Programmierung 44 4 Wartung 45 4 1 Staubbehälter und Filter 45 4 2 Hauptbürste und Seitenbürsten 46 4 3 Sonstige Bauteile 47 5 Fehlerbehandlung 48 Inhalt ...

Страница 40: ...benen Netzspannung übereinstimmt 6 Verwenden Sie das Gerät AUSSCHLIESSLICH für INNENRÄUME im Haushalt Verwenden Sie das Gerät nicht im Freien oder für kommerzielle oder industrielle Anwendungen 7 Verwenden Sie als Akku und als Ladestation nur das vom Hersteller mitgelieferte Original Zubehör 8 Verwenden Sie das Gerät nicht ohne Staubbehälter bzw Filter 9 Verwenden Sie das Gerät nicht in Bereichen ...

Страница 41: ...uss der Stecker aus der Steckdose gezogen werden 24 Entfernen Sie vor dem Entsorgen des Gerätes den Akku Nehmen Sie hierzu das Gerät aus der Ladestation und schalten Sie es aus Betriebsschalter OFF 25 Vor dem Entsorgen des Gerätes ist der Akku entsprechend den örtlichen Gesetzen und Vorschriften zu entfernen und zu entsorgen 26 Gebrauchte Akkus sind entsprechend den örtlichen Gesetzen und Vorschri...

Страница 42: ...g mit Fernbedienung RC0917 Eingangsspannung V 3 Akku Ni MH SC 2100mAh 36 2 Packungsinhalt und Technische Daten 2 1 Packungsinhalt Roboter 2 Seitenbürsten Technische Daten und Bauweise können aufgrund ständiger Weiterentwicklungen des Produktes abweichen Ladestation Benutzerhandbuch Multifunktions Reinigungswerkzeug Fernbedienung mit Batterien 2 2 Technische Daten Instruction Manual EN ...

Страница 43: ... 3 Warnleuchte 4 Kontrollleuchte Automatikbetrieb 5 Kontrollleuchte Intelligente Programmierung 10 Befestigungsschraube für Hauptbürste 11 Hauptbürste 12 Universalrad 13 Antriebsräder 14 Hauptschalter an der Unterseite 15 Akkuabdeckung 16 Befestigungsschrauben für Akkuabdeckung 17 Staubsensoren 6 Kontrollleuchte Intensivreinigung 7 Taste für Reinigung im AUTO Modus 8 Taste für intelligente Program...

Страница 44: ...ation 4 Infrarotsender 5 Gleitschutzstreifen 6 Untere Abdeckung Ladestation 1 2 3 4 3 6 7 2 4 6 1 5 8 5 2 Packungsinhalt und Technische Daten Fernbedienung Ladestation 1 Pause Knopf 2 Taste für Reinigung im AUTO Modus 3 Taste für Punktreinigung 4 Taste für Randreinigung 5 Richtungssteuerungstasten 6 Taste für Intensivreinigung 7 Taste für Rückführung zur Ladestation 8 Infrarot Sender Staubbehälter...

Страница 45: ...fangen könnten vom Boden Bitte beachten Sie dass zum problemlosen Reinigen unter Möbeln ein Spielraum von mindestens 9 cm vorhanden sein muss Das Gerät ist nicht für den Einsatz auf langflorigen Teppichen geeignet Wenn sich im zu reinigenden Bereich Stufen oder Treppen befinden stellen Sie bitte sicher dass die Absturzsensoren des D63 diese erkennen und ein Herunterfallen des Gerätes verhindern Es...

Страница 46: ...ner ebenen Bodenfläche senkrecht an die Wand Halten Sie die unmittelbare Umgebung in einem Abstand von 1 5 m vor der Ladestation und 0 5 m seitlich frei von Gegenständen und reflektierenden Oberflächen Schließen Sie die Ladestation ans Netz an Setzen Sie die Seitenbürsten mit leichtem Druck in die jeweilige Öffnung an der Unterseite des Gerätes ein bis ein Klickgeräusch zu hören ist Schalten Sie d...

Страница 47: ...die Ladekapazität abnehmen In diesem Fall muss der Akku reaktiviert werden Reaktivieren des Akkus Setzen Sie den Roboter manuell in die Ladestation und entnehmen ihn nach einer Ladezeit von 3 Minuten Wiederholen Sie diesen Vorgang dreimal und laden Sie das Gerät anschließend 3 bis 5 Stunden normal auf Der DEEBOT6 wird mit einem Longlife Ni MH Akku betrieben der nur in großen Zeitabständen ausgewec...

Страница 48: ...mutz und Staub so dass eine gründlichere Reinigung gewährleistet ist Dabei bewegt sich das Gerät nach dem gleichen Muster wie im Automatikbetrieb mit dem Unterschied dass eine gründlichere Reinigung erfolgt 3 3 Wahl des Reinigungsmodus Um unterschiedliche Böden möglichst effektiv reinigen zu können sind verschiedene Reinigungsmethoden wählbar Der Reinigungsmodus wird mit Hilfe der Tasten auf dem B...

Страница 49: ...inigung von Ecken und Rändern in einem Raum Im Randreinigungs Modus reinigt das Gerät am Rand entlang z B an der Wand Sobald der Akkuladestand niedrig ist wird das Gerät automatisch zur Ladestation zurückgeführt und dort aufgeladen Durch Drücken der Taste für die Rückführung zur Ladestation am Gerät oder auf der Fernbedienung kann das Gerät jederzeit zur Ladestation zurückgeschickt werden Dieser R...

Страница 50: ...eine intelligente Programmierfunktion Das Gerät kann so programmiert werden dass jeden Tag zur gleichen Zeit ein Reinigungsvorgang gestartet wird selbst wenn niemand zu Hause ist Drücken Sie eine beliebige Betriebsart Taste an der Fernbedienung Wenn die Programmeinstellungen gelöscht sind erlischt die Kontrollleuchte im Bedienfeld am Gerät Drücken Sie eine beliebige Taste am Gerät um den Betrieb d...

Страница 51: ...bdeckung des DEEBOT6 und nehmen Sie den Staubbehälter heraus Öffnen Sie die Abdeckung des Staubbehälters und leeren Sie diesen Spülen Sie den Staubbehälter den antibakteriellen Gewebefilter und den Filter unter fließendem Wasser ab Trocknen Sie den Staubbehälter und die Filter vollständig bevor Sie sie wieder einsetzen Nehmen Sie die Filter heraus Klopfen Sie den Staub aus dem Feinstaubfilter Spül...

Страница 52: ... sich eventuell um die Hauptbürste gewickelt haben lassen sich mit dem Multifunktionswerkzeug durchschneiden und entfernen Entfernen Sie die Seitenbürsten Wischen Sie Seitenbürsten und die Aufnahmeöffnungen mit einem trockenen Tuch ab Das mitgelieferte Multifunktions Reinigungswerkzeug gewährleistet eine problemlose Wartung Bitte gehen Sie vorsichtig mit diesem Werkzeug um da es scharfe Kanten hat...

Страница 53: ...taubsensoren mit der Bürste oder der Filzseite des Multifunktionswerkzeuges um ihre Leistungsfähigkeit zu erhalten Reinigen Sie die Absturzsensoren mit der Bürste oder der Filzseite des Multifunktionswerkzeuges um ihre Leistungsfähigkeit zu erhalten Reiben Sie die Ladekontakte der Ladestation sowie die Ladekontakte mit einem trockenen Tuch ab ...

Страница 54: ...vorgang geladen ist Akku ist vollständig entladen Reaktivieren Sie den Akku folgendermaßen Setzen Sie den DEEBOT6 manuell in die Ladestation nehmen Sie ihn nach einer Ladezeit von 3 Minuten heraus und wiederholen Sie diesen Vorgang dreimal Laden Sie das Gerät anschließend normal auf 2 Störungen während des Betriebs und Stillstand Auf dem Boden liegende Gegenstände Stromkabel bis zum Boden reichend...

Страница 55: ...r um um die Einsaugöffnung und die Seitenbürsten zu reinigen 5 Fernbedienung funktioniert nicht der Wirkungsbereich der Fernbedienung beträgt 5 m Die Batterien der Fernbedienung müssen ausgewechselt werden Wechseln Sie die Batterien aus und stellen Sie sicher dass die neuen Batterien richtig eingesetzt sind Das Gerät ist abgeschaltet Ein Ausschalter am Boden des Gerätes auf OFF oder der Akku des D...

Страница 56: ...idades En caso de encontrar problemas no descritos en este Manual de Instrucciones por favor póngase en contacto con nuestro Centro de Atención al Cliente donde un técnico le orientará sobre su problema Para más información por favor visite la web oficial de Ecovacs www ecovacs com La compañía se reserva el derecho a realizar cambios tecnológicos y o de diseño en sus productos para una continua me...

Страница 57: ... 2 3 Esquema del producto 53 3 Funcionamiento y programación 55 3 1 Observaciones antes de limpiar 55 3 2 Inicio rápido 56 3 3 Selección del modo de limpieza 58 3 4 Programación inteligente 60 4 Mantenimiento 61 4 1 Recipiente para el polvo y filtros 61 4 2 Cepillo principal y cepillo lateral 62 4 3 Otros componentes 63 5 Solución de problemas 64 Índice ...

Страница 58: ...ara su USO EXCLUSIVO EN ESPACIOS INTERIORES No utilice el dispositivo al aire libre o en espacios comerciales o industriales 7 Emplee únicamente la batería recargable original y la estación de carga que el fabricante suministra con el dispositivo 8 No utilice el dispositivo si éste no contiene el recipiente para polvo y o los filtros en la posición correcta 9 No ponga en marcha el dispositivo en u...

Страница 59: ...der Warten der Ladestation muss der Stecker aus der Steckdose gezogen werden 24 Entfernen Sie vor dem Entsorgen des Gerätes den Akku Nehmen Sie hierzu das Gerät aus der Ladestation und schalten Sie es aus Betriebsschalter OFF 25 Vor dem Entsorgen des Gerätes ist der Akku entsprechend den örtlichen Gesetzen und Vorschriften zu entfernen und zu entsorgen 26 Gebrauchte Akkus sind entsprechend den ört...

Страница 60: ...o a distancia RC0917 Tensión de entrada V 3 Batería Ni MH SC 2100mAh 52 2 Contenido del embalaje y especificaciones técnicas 2 1 Contenido del embalaje Robot 2 Cepillos laterales Las especificaciones técnicas y de diseño pueden variar en el marco del programa de mejora continua de nuestros productos Estación de carga Manual de instrucciones Herramienta de limpieza multifunción Mando a distancia co...

Страница 61: ...Indicador de modo de retorno al cargador 3 Indicador de alarma 4 Indicador de modo de limpieza automática 5 Indicador de programación inteligente 10 Tornillo del cepillo principal 11 Cepillo principal 12 Rueda universal 13 Ruedas motrices 14 Interruptor de encendido 15 Tapa de la batería 16 Tornillos de tapa de la batería 17 Sensores de polvo 6 Indicador de modo de limpieza intensiva 7 Botón de mo...

Страница 62: ...s antideslizantes 6 Base de la estación de carga 1 2 3 4 3 6 7 2 4 6 1 5 8 5 2 Contenido del embalaje y especificaciones técnicas Mando a distancia Estación de carga 1 Botón de pausa 2 Botón de modo automático 3 Botón de modo de limpieza localizada 4 Botón de modo de limpieza de bordes 5 Botones de control de dirección 6 Botón de modo de limpieza intensiva 7 Botón de modo de retorno al cargador 8 ...

Страница 63: ...pequeños que puedan enredarse con el dispositivo Tenga en cuenta que el robot necesita al menos 9 cm de espacio alrededor para pasar bajo los muebles sin dificultad Este producto no es apto para alfombras de pelo largo Si existe un escalón o escaleras en la zona de limpieza asegúrese de que los sensores anticaídas de DEEBOT6 pueden detectar el desnivel Tal vez resulte necesario colocar una barrera...

Страница 64: ...y con la base en perpendicular al suelo Deje un espacio de 1 5 m delante del cargador y 0 5 m a ambos lados del mismo y cerciórese de que la zona está libre de objetos y superficies reflectantes Enchufe la estación de carga a la toma de corriente Acople el cepillo lateral a la parte inferior de DEEBOT6 introduciéndolo en la ranura hasta que oiga un clic Coloque el interruptor de encendido en la po...

Страница 65: ... ha descargado por completo o no se usa durante un periodo largo de tiempo es posible que disminuya su capacidad y que sea necesario volver a activarla Para volver a activar la batería coloque el robot manualmente en la estación de carga retírelo una vez transcurridos tres minutos de carga Repita esta acción tres veces A continuación cargue el robot de la forma habitual entre 3 y 5 horas El robot ...

Страница 66: ...suciedad y al polvo y realiza una limpieza más a fondo En este modo de funcionamiento DEEBOT6 sigue la misma trayectoria de limpieza que en el modo de limpieza automática pero la limpieza es sin embargo más exhaustiva 3 3 Selección del modo de limpieza DEEBOT6 ofrece varios modos de limpieza para limpiar de manera eficiente distintos tipos de suelos Para seleccionar los modos de limpieza utilice l...

Страница 67: ...es de una estancia En el modo limpieza de rincones DEEBOT6 limpia a lo largo de un borde ej en una pared Cuando el nivel de la batería es bajo DEEBOT6 pasa automáticamente al modo de retorno al cargador y regresa a la estación de carga para volver a cargarse por sí mismo También puede ser enviado a la estación de carga en cualquier momento pulsando el botón de modo de retorno al cargador de DEEBOT...

Страница 68: ...e la mañana 3 4 Programación inteligente DEEBOT6 dispone de una función de programación inteligente que permite programarlo para limpiar una vez al día a la misma hora incluso si no hay nadie en casa Presione cualquier botón de modo de limpieza del mando a distancia La programación inteligente queda cancelada cuando se apaga el indicador en la pantalla del panel de control del robot Presione cualq...

Страница 69: ...Recipiente para el polvo y filtros Abra la cubierta superior de DEEBOT6 y extraiga el recipiente para el polvo Abra la tapa del recipiente y vacíelo Aclare el recipiente para polvo el filtro de esponja antibacterias y la malla del filtro con agua corriente Seque completamente el recipiente para polvo y los componentes del filtro antes de volver a colocarlos Extraiga los filtros Limpie el filtro de...

Страница 70: ...illo Use la herramienta de limpieza multifunción para cortar y retirar el pelo que haya quedado enredado en el cepillo principal Extraiga el cepillo lateral Limpie tanto el cepillo como su ranura con un paño seco A fin de facilitar el trabajo de mantenimiento el dispositivo se suministra con una herramienta de limpieza multifunción Manipúlela con cuidado ya que presenta bordes afilados ...

Страница 71: ... sensores de polvo con el cepillo o con la parte de fieltro de la herramienta de limpieza multifunción para mantener su eficacia Limpie los sensores anticaídas con el cepillo o con la parte de fieltro de la herramienta de limpieza multifunción para mantener su eficacia Limpie los contactos de carga y los conectores de carga con un paño seco ...

Страница 72: ...rgado a fin de iniciar el trabajo en cualquier momento La batería está totalmente descargada Vuelva a activar la batería Coloque DEEBOT6 manualmente en la estación de carga retírelo una vez transcurridos tres minutos de carga Repita esta acción tres veces A continuación cargue el robot de la forma habitual 2 DEEBOT6 presenta dificultades mientras está en funcionamiento y se detiene DEEBOT6 se ha e...

Страница 73: ...s y el cepillo principal 5 Fallo del mando a distancia el rango efectivo de control del mando a distancia es de 5m Es necesario sustituir las pilas del mando a distancia Sustituya las pilas por unas nuevas y asegúrese de colocarlas correctamente El interruptor de encendido de DEEBOT6 se encuentra en la posición de apagado o el nivel de la batería del robot está bajo Cerciórese de que el interrupto...

Страница 74: ......

Страница 75: ......

Страница 76: ...DEEBOT6 038 IM2014R00 ...

Отзывы: