background image

EN

19

6. Troubleshooting

NO.

Malfunction

Possible Causes

Solutions

5

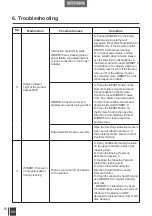
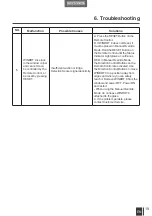
WINBOT 8 is stuck 

in the window corner 

and cannot move, 

be controlled by the 

Remote Control, or 

be reset by pressing 

RESET. 

Insufficient suction or Edge 

Detection Sensor signal abnormity.

A. Press the RESET Button on the 

Remote Control.

B. If WINBOT 8 does not Reset, it 

must be placed in Manual Override 

Mode. Hold the RESET Button on 

the Remote Control until the Status 

Indicator Light glows a continuous 

RED. In Manual Override Mode, 

the Direction Control Buttons on the 

Remote Control are activated. Use 

the Direction Control Buttons to move 

WINBOT 8 to a position away from 

edges and where you can safely 

reach it. Remove WINBOT 8 from the 

window and power OFF. Power ON 

and restart.
* When using the Manual Override 

Mode, do not leave WINBOT 8 

attached to the glass. 

C. If the problem persists, please 

contact Customer Service.

Содержание W850

Страница 1: ...myRobotcenter The expert for robots in your home With one click to the online shop myRobotcenter eu myRobotcenter co uk ...

Страница 2: ...Instruction Manual EN Mode d emploi FR Benutzerhandbuch DE Manuale d Istruzione IT ...

Страница 3: ...OT 8 6 3 1 Notes before Cleaning 6 3 2 Attach Cleaning Pad 8 3 3 Assemble Power Adapter 8 3 4 Install Safety Tether 8 3 5 Place Safety Pod 10 3 6 Spray Cleaning Solution 10 3 7 Start 11 3 8 Pause 12 3 9 Stop 13 4 Maintenance 14 4 1 Cleaning Pad 14 4 2 Fan Sensors and Squeegees 14 4 3 Driving Treads 15 5 Status Indicator Light and Sounds 16 6 Troubleshooting 17 Contents ...

Страница 4: ...ials 12 Do not use the Appliance if it does not firmly attach to the glass or has visible signs of damage 13 To reduce the risk of electrical shock do not put the Appliance in water or other liquid Do not place or store Appliance where it can fall or be pulled into a tub or sink 14 Do not touch power plug or the Appliance with wet hands 15 Do not charge the Appliance in extremely hot or cold envir...

Страница 5: ...le for any damages or injuries caused by improper use Correct Disposal of this Product This marking indicates that this product should not be disposed of with other household waste throughout the EU To prevent possible harm to the environment or human health from uncontrolled waste disposal recycle it responsibly to promote the sustainable reuse of material resources To recycle your used device pl...

Страница 6: ...75A 2 Package Contents and Technical Specifications 2 1 Package Contents WINBOT 8 3 Cleaning Pads Finishing Cloth 1 WINBOT Extension Cord 1 5m 4 11 Remote Control with Batteries Technical and design specifications may be changed in the course of continuous product improvement Power Adapter Instruction Manual WINBOT Cleaning Solution Safety Pod and Tether 2 2 Specifications ...

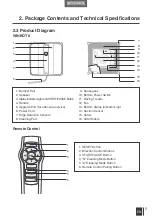
Страница 7: ...le service 6 Power Cord 7 Edge Detection Sensors 8 Cleaning Pad 9 Squeegees 10 Bottom Power Switch 11 Driving Treads 12 Fan 13 Bottom Status Indicator Light 14 Suction Sensor 15 Velcro 16 Side Rollers 1 RESET Button 2 Direction Control Buttons 3 START PAUSE Button 4 N Cleaning Mode Button 5 Z Cleaning Mode Button 6 Remote Control Pairing Button 1 2 3 6 4 5 N Z RESET 1 2 3 4 5 6 7 9 10 11 12 13 14 ...

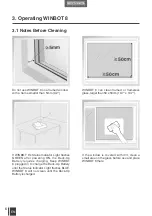
Страница 8: ... ON the Back Up Battery requires charging Keep WINBOT 8 plugged in to charge the Back Up Battery until the Status Indicator Light flashes BLUE WINBOT 8 will not clean until the Back Up Battery is charged WINBOT 8 can clean framed or frameless glass larger than 50 x 50cm 19 7 x 19 7 If the window is covered with dirt clean a small area on the glass before use and place WINBOT 8 there 50 50 ...

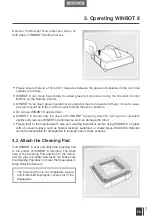
Страница 9: ... with WINBOT Cleaning Solution Using other cleaners significantly reduces WINBOT s performance and can damage the robot Please refer to the manufacturer s care and cleaning instructions before using WINBOT 8 on glass with an uneven surface such as frosted textured patterned or coated glass ECOVACS Robotics cannot be responsible for damage due to improper use on these surfaces 3 2 Attach the Cleani...

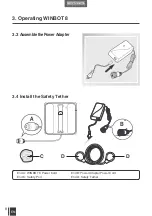
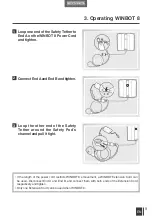
Страница 10: ...EN 8 3 4 Install the Safety Tether 3 3 Assemble the Power Adapter End A WINBOT 8 Power Cord End B Power Adapter Power Cord End C Safety Pod End D Safety Tether 3 Operating WINBOT 8 B C D D ...

Страница 11: ...op the other end of the Safety Tether around the Safety Pod s channel and pull it tight 1 2 3 If the length of the power cord restricts WINBOT 8 s movement a WINBOT Extension Cord can be used Disconnect End A and End B and connect them with both ends of the Extension Cord respectively and tighten Only one Extension Cord can be used when WINBOT 8 ...

Страница 12: ...NBOT 8 is being used to clean an outside window Press the Safety Pod FIRMLY on the inside of the window being cleaned Make sure the Safety Pod is attached and securely in place Spray the upper and lower sides of the Cleaning Pad with the provided WINBOT Cleaning Solution 8 times each After spraying wipe the bottom of WINBOT 8 with the provided Finishing Cloth 3 Operating WINBOT 8 WINBOT should onl...

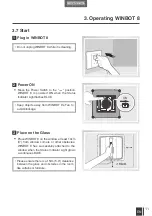
Страница 13: ... WINBOT 8 on the window at least 10cm 4 from window corners or other obstacles WINBOT 8 has successfully attached to the window when the Status Indicator Light glows a continuous BLUE 54 Do not unplug WINBOT 8 while it is cleaning Keep objects away from WINBOT 8 s Fan to avoid blockage Please ensure there is a 15cm 5 9 clearance between the glass and obstacles in the room like curtains or furnitur...

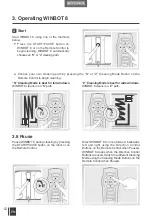
Страница 14: ...de is best for tall windows WINBOT 8 cleans in an N path Z Cleaning Mode is best for wide windows WINBOT 8 cleans in a Z path Pause WINBOT 8 during cleaning by pressing the START PAUSE button on the robot or on the Remote Control Direct WINBOT 8 to move forward backward left and right using the Direction Control Buttons on the Remote Control when Paused WINBOT 8 cleans when the Direction Control B...

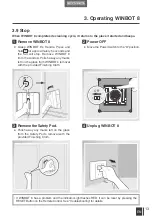
Страница 15: ...conds and the fan will stop Remove WINBOT 8 from the window Polish away any marks left on the glass from WINBOT s removal with the provided Finishing Cloth Polish away any marks left on the glass from the Safety Pod s removal with the provided Finishing Cloth Move the Power Switch to the o position If WINBOT 8 has a problem and the indicator Light flashes RED it can be reset by pressing the RESET ...

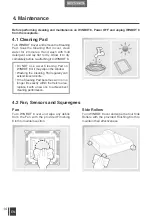
Страница 16: ...aching it to WINBOT 8 Fan Side Rollers Turn WINBOT 8 over and wipe any debris from the Fan with the provided Finishing Cloth to maintain suction Turn WINBOT 8 over and wipe the four Side Rollers with the provided Finishing Cloth to maintain their effectiveness 4 Maintenance Do NOT use a wet Cleaning Pad on WINBOT 8 or it may slip on the window Washing the Cleaning Pad regularly can extend its serv...

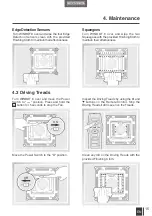
Страница 17: ... the provided Finishing Cloth to maintain their effectiveness 4 3 Driving Treads 54 5 Turn WINBOT 8 over and move the Power Switch to position Press and hold the button for 5 seconds to stop the Fan Inspect the Driving Treads by using the and buttons on the Remote Control Stop the Driving Treads if dirt is seen on the Treads Move the Power Switch to the O position Clean any dirt on the Driving Tre...

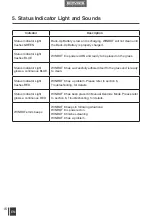
Страница 18: ... BLUE WINBOT 8 has successfully adhered itself to the glass and is ready to clean Status Indicator Light flashes RED WINBOT 8 has a problem Please refer to section 6 Troubleshooting for details Status Indicator Light glows a continuous RED WINBOT 8 has been placed in Manual Override Mode Please refer to section 6 Troubleshooting for details WINBOT emits beeps WINBOT 8 beeps in following situations...

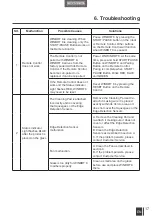
Страница 19: ...tor Light flashes RED WINBOT 8 may need to be reset Reset WINBOT 8 by pressing the RESET Button on the Remote Control 2 Status Indicator Light flashes BLUE after the product is placed on the glass The Cleaning Pad is attached incorrectly and is covering the Squeegees or the Edge Detection Sensors Remove the Cleaning Pad and re attach it making sure it is placed exactly within its Velcro area and d...

Страница 20: ...ion Control buttons on the Remote Control to move WINBOT 8 away from the problem area and at least 10cm 4 from window corners and obstacles Restart WINBOT 8 B Press the RESET Button on the Remote Control then use the Direction Control Buttons to direct WINBOT 8 to clean around the problem area Edge Detection Sensors are dirty Wipe the four Edge Detection Sensors clean as described in section 4 If ...

Страница 21: ...placed in Manual Override Mode Hold the RESET Button on the Remote Control until the Status Indicator Light glows a continuous RED In Manual Override Mode the Direction Control Buttons on the Remote Control are activated Use the Direction Control Buttons to move WINBOT 8 to a position away from edges and where you can safely reach it Remove WINBOT 8 from the window and power OFF Power ON and resta...

Отзывы: