


3 .3
Preparation on a sectional door
3 .3 .1
Door locking on the sectional door
▶
See figure
1 .3a
▶
Completely disassemble the mechanical door locking on
the sectional door.
3 .3 .2
Off-centre reinforcement profile on a sectional
door
▶
See figure
1 .5a
▶
With an off-centre reinforcement profile on the sectional
door, fit the link bracket on the nearest reinforcement
profile to the left or right.
3 .3 .3
Centre locking on a sectional door
▶
See figure
1 .6a
▶
For sectional doors with centre door locking, arrange the
lintel joint and link bracket max. 50 cm off-centre. Before
drilling, mark the position of the lintel ceiling console on
the lintel or ceiling. For this purpose, use the supplied
drill stencil in the appendix of these instructions.
3 .4
Preparation on an up-and-over door
3 .4 .1
Door locking on an up-and-over door
▶
See figure
1 .3b
/
1 .4b
▶
Render the mechanical door locking on the up-and-over
door inoperable.
▶
For
door models not covered here
, block the catches
on site.
3 .4 .2
Up-and-over doors with an ornamental iron
handle
▶
See figure
1 .5b
▶
In a deviation from the illustrated section, attach the lintel
ceiling console and link bracket max. 50 cm off-centre for
up-and-over doors with ornamental iron door handles.
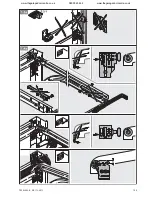
3 .5
Fitting the operator boom
CAUTION
Crushing hazard during boom fitting!
There is a danger of crushing your fingers while fitting the
operator boom.
▶
Make sure that your fingers do not get between the
profile ends.
1 .
Place the operator head on a clean, level surface with the
base plate facing up.
2 .
Grease the moveable plastic parts
(see figure
2 .1
/
2 .2
/
3 .1
/
6 .2
).
3 .
Insert the first boom segment (see figure
2 .2
).
Please note the following:
– The toothed belt must be located in the centre of the
operator disc and be approx.
1300 mm
long on the
left-hand side.
– The toothed belt must not become pinched between
the operator head and boom segment.
– The toothed belt must not be twisted.
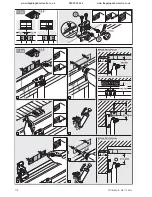
4 .
Turn the operator head around (see figure
3
).
5 .
Assemble the cord knob completely and attach it to the
slide carriage (see figure
3 .1
/
3 .2
).
6 .
Fit the lintel ceiling console (see figure
4 .1 – 4 .3
).
7 .
Completely lay out the toothed belt and fit it along with
the lintel ceiling console and slide carriage
(see figure
5 .1
). While doing so, make sure that the
toothed belt does not become twisted.
8 .
Close the toothed belt and press in the belt teeth all the
way (see figure
5 .2
).
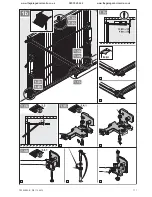
9 .
Place the jackets on the centre boom segment
(see figure
6 .1
).
10 .
Grease the carriage coupling from below (see figure
6 .1
).
11 .
First, insert the last boom segment in the lintel ceiling
console (see figure
6 .2
).
12 .
Completely assemble the boom (see figure
7 .2
/
7 .3
).
13 .
Check the toothed belt tension and adjust if necessary
(see section 7.1)
3 .5 .1
Checking that the slide carriage is easy to move
▶
See figure
8 .1
1 .
Make sure that the individual boom segments are aligned
with one another so that there are
smooth
transitions at
each profile end!
2 .
Check to make sure that the slide carriage can be easily
moved in the boom. To do this, push the slide carriage
back and forth in the boom once. Repeat this procedure,
if necessary.
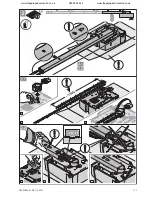
3 .6
Fitting the garage door operator
▶
See figure
8 .2 – 8 .5
WARNING
Unsuitable fixing material
Use of unsuitable fixing material may mean that the
operator is not securely attached and could come loose.
▶
The fitter must check that the fitting materials supplied
are suitable for the purpose and the intended fitting
location.
▶
Only use the provided fixing materials (plugs) in
concrete ≥ B15 (see figures
8 .3a
/
8 .4
).
WARNING
Danger to life from the rope
A running rope may lead to strangulation.
▶
Remove the rope while fitting the operator
(see figure
1 .2a
).
WARNING
Danger of injury due to unwanted door travel
Incorrect assembly or handling of the operator may trigger
unwanted door travel that may result in persons or objects
being trapped.
▶
Follow all the instructions provided in this manual.
Incorrectly attached control devices (e.g. buttons) may
trigger unwanted door travel. Persons or objects may be
trapped as a result.
▶
Install control devices at a height
of at least 1.5 m (out of the reach
of children).
▶
Fit permanently installed control
devices (such as buttons, etc.)
within sight of the door, but away
from moving parts.
24
TR10L003-B RE / 12.2013
ENGLISH
www.thegaragedoorcentre.co.uk
0800 525 442
www.thegaragedoorcentre.co.uk
Содержание liftronic 500
Страница 17: ...108 TR10L003 B RE 12 2013 www thegaragedoorcentre co uk 0800 525 442 www thegaragedoorcentre co uk ...
Страница 18: ...TR10L003 B RE 12 2013 109 www thegaragedoorcentre co uk 0800 525 442 www thegaragedoorcentre co uk ...
Страница 19: ...110 TR10L003 B RE 12 2013 www thegaragedoorcentre co uk 0800 525 442 www thegaragedoorcentre co uk ...
Страница 20: ...TR10L003 B RE 12 2013 111 www thegaragedoorcentre co uk 0800 525 442 www thegaragedoorcentre co uk ...
Страница 21: ...112 TR10L003 B RE 12 2013 www thegaragedoorcentre co uk 0800 525 442 www thegaragedoorcentre co uk ...
Страница 22: ...TR10L003 B RE 12 2013 113 www thegaragedoorcentre co uk 0800 525 442 www thegaragedoorcentre co uk ...
Страница 23: ...114 TR10L003 B RE 12 2013 www thegaragedoorcentre co uk 0800 525 442 www thegaragedoorcentre co uk ...
Страница 24: ...TR10L003 B RE 12 2013 115 www thegaragedoorcentre co uk 0800 525 442 www thegaragedoorcentre co uk ...
Страница 25: ...116 TR10L003 B RE 12 2013 www thegaragedoorcentre co uk 0800 525 442 www thegaragedoorcentre co uk ...
Страница 26: ...TR10L003 B RE 12 2013 117 www thegaragedoorcentre co uk 0800 525 442 www thegaragedoorcentre co uk ...
Страница 27: ...118 TR10L003 B RE 12 2013 www thegaragedoorcentre co uk 0800 525 442 www thegaragedoorcentre co uk ...
Страница 28: ...TR10L003 B RE 12 2013 119 www thegaragedoorcentre co uk 0800 525 442 www thegaragedoorcentre co uk ...
Страница 29: ...120 TR10L003 B RE 12 2013 www thegaragedoorcentre co uk 0800 525 442 www thegaragedoorcentre co uk ...
Страница 30: ...TR10L003 B RE 12 2013 121 www thegaragedoorcentre co uk 0800 525 442 www thegaragedoorcentre co uk ...
Страница 31: ...122 TR10L003 B RE 12 2013 www thegaragedoorcentre co uk 0800 525 442 www thegaragedoorcentre co uk ...
Страница 32: ...TR10L003 B RE 12 2013 123 www thegaragedoorcentre co uk 0800 525 442 www thegaragedoorcentre co uk ...
Страница 33: ...124 TR10L003 B RE 12 2013 www thegaragedoorcentre co uk 0800 525 442 www thegaragedoorcentre co uk ...
Страница 34: ...TR10L003 B RE 12 2013 125 www thegaragedoorcentre co uk 0800 525 442 www thegaragedoorcentre co uk ...
Страница 35: ...126 TR10L003 B RE 12 2013 www thegaragedoorcentre co uk 0800 525 442 www thegaragedoorcentre co uk ...
Страница 36: ...TR10L003 B RE 12 2013 127 www thegaragedoorcentre co uk 0800 525 442 www thegaragedoorcentre co uk ...
Страница 37: ...128 TR10L003 B RE 12 2013 www thegaragedoorcentre co uk 0800 525 442 www thegaragedoorcentre co uk ...
Страница 38: ...TR10L003 B RE 12 2013 129 94 120 www thegaragedoorcentre co uk 0800 525 442 www thegaragedoorcentre co uk ...
Страница 39: ...130 TR10L003 B RE 12 2013 www thegaragedoorcentre co uk 0800 525 442 www thegaragedoorcentre co uk ...
Страница 40: ...TR10L003 B RE 12 2013 131 www thegaragedoorcentre co uk 0800 525 442 www thegaragedoorcentre co uk ...


