background image

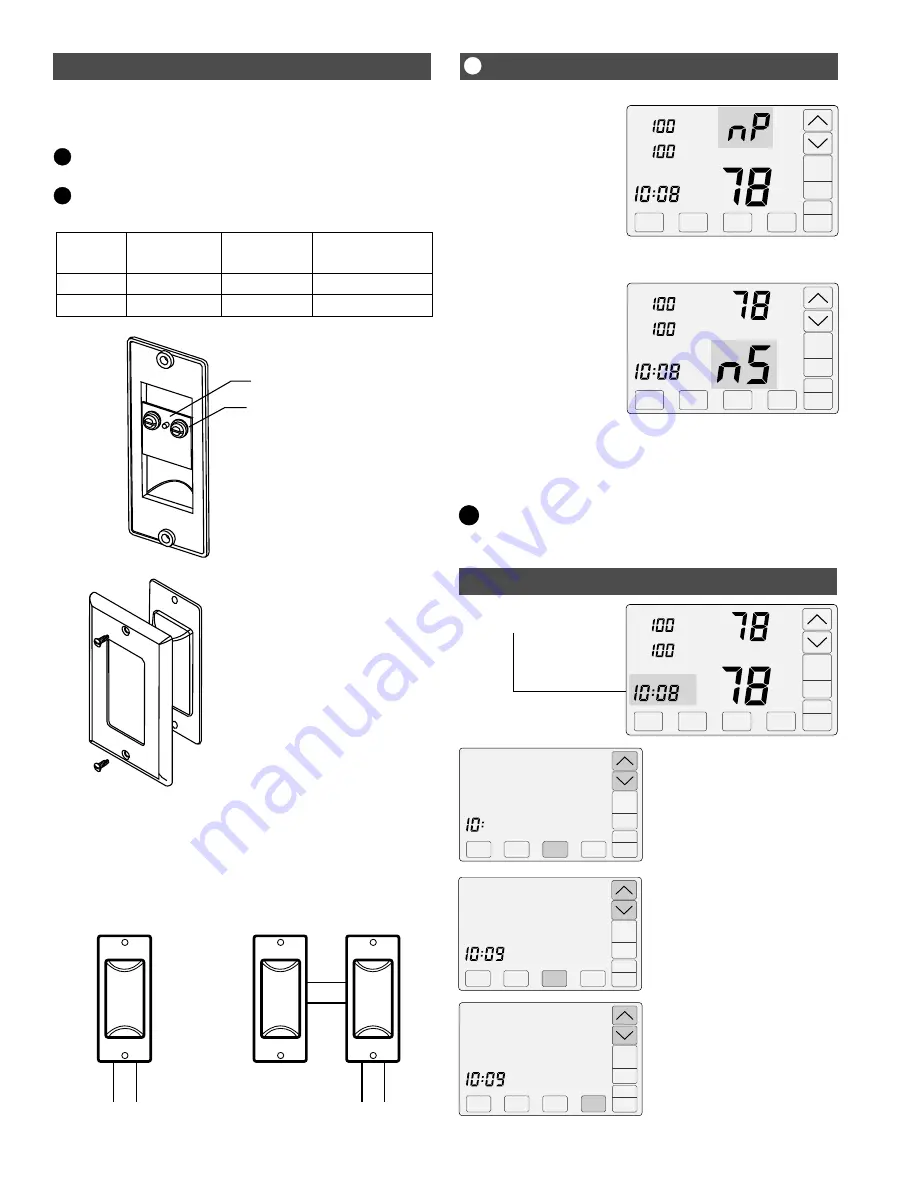
Temperature Sensor Wiring

Place wire between brass 
washer and the printed circuit 
board and hand tighten screw.

The TS5 can be installed in a 
single gang box or directly to 
the wall using the hardware 
provided.

HAND

TIGHTEN

Printed circuit board

Brass washer

Use 2-conductor, 18 or 20 gage, thermostat cable to wire from 
the C365 Thermostat to the temperature sensor in the sleeping 
area.

Thermistor

Thermistor

Function

Sensor

Terminal

SNR

SNR

Wire Color

White

Red

C365

Terminal

TS

TS

i

Single Sensor Installation
Use one (1) Model TS510W sensor.

i

Dual Sensor Installation
Use two (2) Model TS520W sensors.

Single Temp

Sensor

Dual Temp

Sensors

Model TS510

Sleeping Area

Temperature

Sensor

Model TS520

Sleeping Area

Temperature

Sensor

Model TS520

Sleeping Area

Temperature

Sensor

Wire to 

the C365T21

Wire to 

the C365T21

Living

Tu

Day

Sleeping

Living

Airflow %

COOL

Schedule

AUTO

FAN

MENU

MODE

Cool

Set To

SYSTEM

AM

nP

 is displayed when there is 

no power to the system. If the 
message is displayed when 
the system is powered, check 
the wiring from the thermostat 
to the system for errors.

Living

Tu

Day

Sleeping

Living

Airflow %

COOL

Schedule

AUTO

FAN

MENU

MODE

Cool

Set To

SYSTEM

AM

nS

 is displayed when there is 

an error with the sensor(s). 
Check for open wires or 
shortages.

When the 

nS

 message is 

displayed, the thermostat will 
continue to control the 
system and automatically 
opens both dampers and 
disables airflow control until 
the sensor error is corrected.

No Power Message

Sensor Error Message 

Check for the following error messages:

i

Touch the 

UP/DOWN

 keys to change the 

MINUTE. Touch 

NEXT.

CHANGE THE MINUTE

Touch the 

UP/DOWN

 keys to change the 

DAY OF THE WEEK. 

Touch 

ENTER

 to save the day of the 

week and return to thermostat operation.

CHANGE THE DAY OF THE WEEK

We

AM

ENTER

AM

NEXT

ENTER

Set Time and Day

ENTER

AM

Touch the 

UP/DOWN

 keys to change the 

HOUR. Touch 

NEXT.

CHANGE THE HOUR

Living

Day

Sleeping

Living

Airflow %

COOL

Schedule

AUTO

FAN

MENU

MODE

Cool

Set To

SYSTEM

Touch here to change the 
time and day of the week.

Press  the  touchscreen  with  your  fingertip  only, 
using a firm touch. Do not use a sharp object such 
as a pen or pencil. 

!

Tu

AM

NEXT

4

Содержание Comfort365 C365T21

Страница 1: ...and schedule MORNING DAYTIME EVENING or NIGHT MENU Key Set Schedule Nighttime Airflow Options Clean Touch Screen Displays airflow to the Upstairs Sleeping Area Displays the heating or cooling setpoint...

Страница 2: ...the slots as shown and rotate to remove subbase from the C365 housing Turn off all power to the HVAC system before wiring or installing Comfort365 components READ THESE INSTRUCTIONS CAREFULLY AND COMP...

Страница 3: ...B Y Y1 Y Y1 G G W W2 or E Y2 Function Function 24VAC Power 24VAC Power Common Common Rev Valve Rev Valve Fan Fan Aux Heat Stg2 Compressor Compressor Stg1 Compressor R COM CLS OPN COM CLS OPN C W OB EQ...

Страница 4: ...e is displayed when the system is powered check the wiring from the thermostat to the system for errors Living Tu Day Sleeping Living Airflow COOL Schedule AUTO FAN MENU MODE Cool Set To SYSTEM AM nS...

Страница 5: ...setpoint Off 5 above setpoint o o o o 2 Cooling On 1 above setpoint Off 1 below setpoint Heating On1 below setpoint Off 1 above setpoint Display Heat Cool rEV Cpr Cot HOt o O O S r V A C V A C Range G...

Страница 6: ...the sleeping and living area airflow Touch or UP DOWN NEXT ENTER Option This is the frequency in minutes that the damper position is updated 14 Calibrate Sleeping Area Temperature Sensor 15 Airflow Up...

Страница 7: ...Airflow in Heating to the Living Area Factory Default 150 Range 100 to 160 23 Maximum Airflow in Cooling to the Living Area Factory Default 140 Range 100 to 160 24 Maximum Temperature Differential o...

Страница 8: ...ng Area 05 06 Testing Cooling Airflow Limits In Option 5 the system is Off Touch to go to Option 6 to activate cooling Verify the equipment is operating To determine the maximum allowable airflow to t...

Страница 9: ...pace Simply touch the airflow area and use the UP and DOWN keys to adjust the airflow to sleeping or living space After 3 hours the airflow returns to automatic operation See Using Your Comfort365 The...

Страница 10: ...tures are set by the user No schedule is used Setpoint temperatures are kept at the vacant temperatures set by the installer Changing the Setpoint Temperature The UP DOWN keys are used to change the s...

Страница 11: ...eating Setpoint Touch NEXT SETTING THE MORNING SCHEDULE HEATING TEMPERATURE Touch the UP DOWN keys to change Morning Schedule Cooling Setpoint Touch NEXT SETTING THE MORNING SCHEDULE COOLING TEMPERATU...

Страница 12: ...ol Touch the UP DOWN keys to adjust the airflow Touch the MENU key to save and go to next option or touch the ENTER key to save the options NEXT ENTER MENU MENU NEXT ENTER MENU ENTER NEXT MENU ENTER N...

Отзывы: