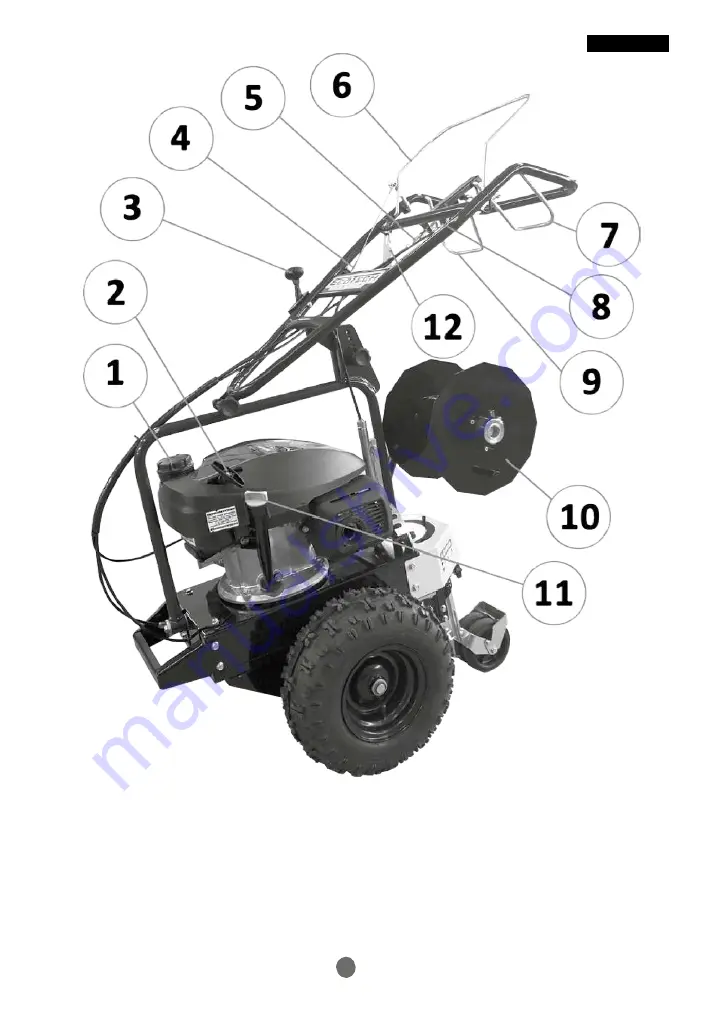
Eco Tech DW 45 Скачать руководство пользователя страница 5

5


Fig.1 

1.


Fuel tank cap 

2.


Engine starting contactors 

3.


Gas lever 

4.


Cutter adjuster 

5.


Forward motion adjuster 

6.


Cutter start lever 

7.


Handlebar oscillation control lever 

8.


Oscillation control adjuster 

9.


Forward motion lever 

10.


Cable winder 

11.


Engine oil plug 

12.


Blade scrapper 

   ENGLISH  


Содержание DW 45

Страница 1: ...FESJONALNA MASZYNA DO JEDNOCZESNEGO UK ADANIA DW CH KABLI PODZIEMNYCH PROFESSIONAALNE TOPELTKAABLI PAIGALDUSMASIN MODELLO MODEL MOD LE MODEL MODELO MODELL MALLI MODEL MUDEL DW45 MANUALE DI USO E MANUT...

Страница 2: ...before using the machine the operator must ensure no one is present in an area of at least 20 meters around the machine IMPORTANT This machine has been manufactured according to CE standards and is c...

Страница 3: ...gravel stones and foreign bodies of various types since they can be ejected by the cutter thus being extremely dangerous to the persons or things nearby Keep the persons at least 20 meters away from...

Страница 4: ...M THE CUTTING ELEMENT Should the machine be used by other people make sure they are aware of the safety rules and of the instructions for use Before starting to work make sure there are no objects on...

Страница 5: ...contactors 3 Gas lever 4 Cutter adjuster 5 Forward motion adjuster 6 Cutter start lever 7 Handlebar oscillation control lever 8 Oscillation control adjuster 9 Forward motion lever 10 Cable winder 11...

Страница 6: ...ed in neutral position fig 1 n 6 n 9 Clean the air filter if there are impurities check the booklet of the engine Fill the machine with fuel using a funnel provided with filter Open the fuel tap check...

Страница 7: ...er fig 6 C position the reel on the tube of the winder and use the adapters fig 6 D if necessary then fit back the retainer and tighten completely the knob fig 6 E Once the cable has been positioned i...

Страница 8: ...ing of the cutter each time the machine has been used check CLEANING THE HEAD A B C Fig 8 HOW TO ADJUST THE BLADE CUTTING DEPTH To adjust the depth act on the knob fitted on the rear of the blade fig...

Страница 9: ...r inclination levels on the right and four on the left Fig 11 HOW TO LOCK THE SWIVELLING BLADE When the cable has to be laid over long straight sections it is possible to lock the swivelling blade fig...

Страница 10: ...he cable with a stake and continue with the cable over the soil up to the next point Fig D in the point indicated in the figure fasten the cable again on a stake Fig E continue by normally ploughing t...

Страница 11: ...ENGLISH 11 A B START START C D START START E F START START G H START STOP Fig 15...

Страница 12: ...dirt grass and dirty grease using a suitable solvent if necessary Fig 16 9 Clean with a suitable solvent all components and grease well every component Apply water repellent grease on the shaft of the...

Страница 13: ...13 1 2 4 5 7 8 Fig 16 ENGLISH 3 6 9...

Страница 14: ...s damaged the outlet spout of the cable on the blade is damaged Replace the blade the tube that contains the cable and which is part of the blade is dirty Clean it NEVER WORK ON THE CABLE ADJUSTERS UN...

Страница 15: ...rpm START UP recoil start recoil start TRANSMISSION mechanical gearbox with oil bath gears mechanical gearbox with oil bath gears CLUTCH belt type with pulley belt type with pulley SPEED AT MAXIMUM EN...

Страница 16: ...s by measuring the sound pressure Planning technical method in essentially free field with a reflective plane LwA LpA UNI EN ISO 20643 2012 Mechanical vibration Hand held and hand guided machinery Pri...

Отзывы: