background image

Town Map Operation

Using this function Town Map of a specified area can be displayed onscreen (data must be 
downloaded from the ECLIPSE E-iSERV web site prior to use).

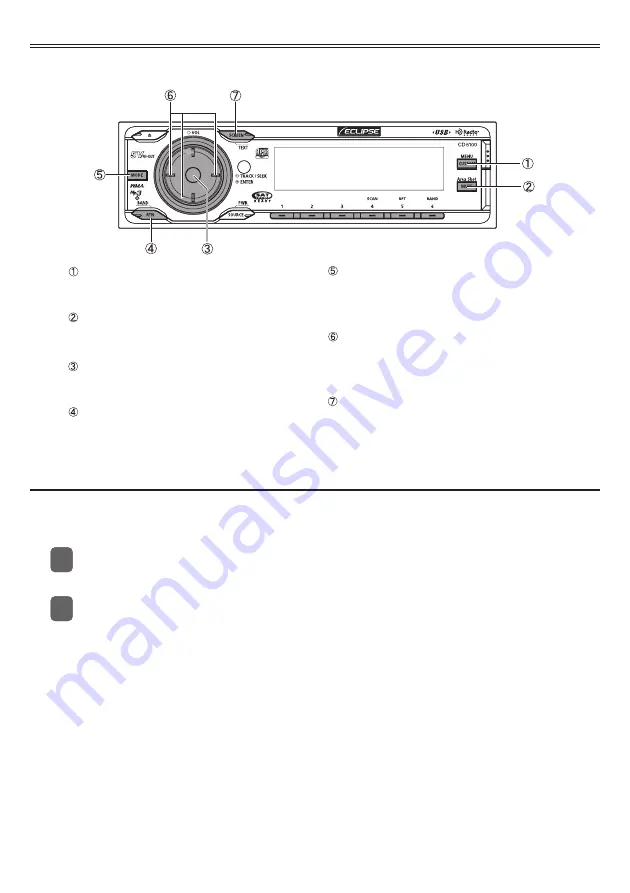
[CUSTOM/MENU] button : 
Activates Menu Selection mode 
(press and hold for more than 1 second).
[MUTE/Area Shot] button : 
Turns the Area Shot function ON/OFF 
(press and hold for more than 1 second).

[MODE] button : 
Switches between the Route Assist
mode and the Town map mode
(press and hold for more than 1 second).

[ENTER] button : 
Switches between OVERALL VIEW and 
CLOSE UP VIEW.
[RTN/BAND] button

Displays a map of the current position.

[SELECT] (Upper/Lower/Right/Left) button

Jumps to the next map in the corresponding 
heading. Moves the map selection frame in 
the corresponding direction.

[SCREEN/TEXT] button

Switches between Audio and Area Shot 
mode.

Displaying the Town Map

If the Area Shot data (Route Assist 

fi

 le, Town Map 

fi

 le) downloaded from E-iSERV website is read 

into the main unit with a USB memory or CD-R, the map display can be changed into Town Map 
screen. 

Activate Area Shot mode by pressing and holding the [MUTE/Area Shot] button for 

more than 1 second.

Press and hold the [MUTE/Area Shot] button for more than 1 second to switch from 
Route Assist to Town Map mode.

11

22

Содержание CD5100

Страница 1: ...We appreciate your purchase of this head unit Please read through this manual in order to ensure correct operation We suggest that after reading it you keep this manual in a safe place for future ref...

Страница 2: ...the Town Map and the Route Assist view ATTENTION When using a USB memory drive Data downloaded from the E iSERV web site should be saved to folders created in the USB drive as shown below NOTE in orde...

Страница 3: ...the unit is overwritten Area Shot Screen Configuration The following two functions can be displayed in the Area Shot mode Route Assist mode Displays the guidance by setting starting point and destina...

Страница 4: ...POI information in the current map 9 Arrow Indicates the next guidance direction 10 Directional indicator Displays the orientation of the map 11 Guidance point intersection enlarged map 1 When an opt...

Страница 5: ...te Number 3 Cursor Specifies the display area of the CLOSE UP VIEW 4 Manually selection icon 1 2 5 Scale indicator 6 Street name 1 Current position and Manually selection can be displayed only when GP...

Страница 6: ...nt intersection etc along the guidance route user input is required to move to the next Guidance map Previous Guidance maps can also be accessed manually If an optional GPS unit is connected the syste...

Страница 7: ...the SELECT Upper Lower buttons find the Area Shot item and press the ENTER button This accesses the Area Shot settings menu Using the SELECT Upper Lower buttons find the POI Select item and press the...

Страница 8: ...names guidance directions and distances to guidance point for the next 3 Guidance Points from current location Using the following controls the user can switch back and forth between map view and list...

Страница 9: ...de is selected This allows you to confirm the route to your destination While in Area Shot mode press and hold the CUSTOM button for more than one second This activates the Menu Selection mode Using t...

Страница 10: ...operation see GPS information display in the Owner s Manual Automatic map switching When an optional GPS unit is connected your vehicle position will be displayed on the map The map will automatically...

Страница 11: ...map Display switches back to Route map Display continues to alternate between Guidance Point route map and Guidance Point map view The route map may not be displayed if the distance to the guidance p...

Страница 12: ...dius to inform you of the guidance point ATTENTION Two kinds of guidance tone are provided When the map is switched A sound that inform you of switching the area When entering the vicinity of a guidan...

Страница 13: ...LOSE UP VIEW RTN BAND button Displays a map of the current position SELECT Upper Lower Right Left button Jumps to the next map in the corresponding heading Moves the map selection frame in the corresp...

Страница 14: ...ng direction Press the ENTER button to switch the Town Map View In OVERALL VIEW mode pressing the ENTER button will display a CLOSE UP VIEW map of the area specified by the map selection frame Pressin...

Страница 15: ...e area where your vehicle position mark is not included is displayed with the SELECT Upper Lower Right Left button the icon is displayed When the optional GPS unit is connected if the display is switc...

Страница 16: ...RV shoule be saved in folders on the USB memory as follows NOTE in order for the system to properly recognize and load DISP data the user must create and name their folders as shown in the diagram bel...

Страница 17: ...ion Picture Wallpaper and SlideShow created using the Cutting Board can also be written to the USB memory or CD R Load the downloaded data from the USB memory or CD R to the unit For details of the op...

Страница 18: ...shown below NOTE in order for the system to properly recognize and load steering remote data the user must create and name their folders as shown in the diagram below ECLIPSE DATA File extension XXXX...

Страница 19: ...s of the operation see Reading steering remote data U S A only in the Owner s Manual ATTENTION This function is available only for the vehicles that have steering remote with the voltage detection typ...

Отзывы: