


– 6 –
JA
P
ANESE
ENGLISH
G
ERMAN
F
RENCH
IT
ALIAN
S
P
ANISH
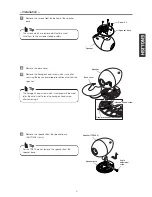
Speaker
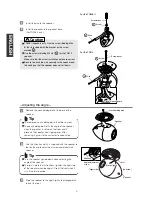
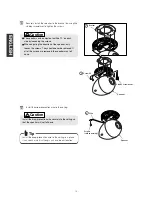
Remove the neck holding bolt at the base of the
speaker.
7
Neck holding bolt
Use the Allen key which is supplied with the speaker to
loosen the angle adjustment screw underneath the
speaker.
8
Speaker
Angle adjustment
screw
Allen key
Joint
Slide the speaker to the right slightly to disengage the
tabs of the joint.
9
•
•
The removed neck holding bolt will not be re-used.
•
•
The neck holding bolt limits the angle of the speaker
when the speaker is set up on the floor, and it
prevents the speaker from tipping over. After
removing it, give it to the customer to keep safely.
•
•
Turn the speaker upside-down when adjusting the
angle of the speaker.
•
•
The right side in the instructions signifies the right side
of the speaker when looking at it from the front when it
is in its normal position.
Move slightly
[Right side]
[Left side]
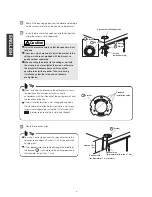
Install the wire to the speaker.
5
•
•
TD508 II speakers only: Use the screw (binding M5 x
8) that is included with the bracket as the screw
marked .
•
•
Use the screws (binding M4 x 8) for the TD510
speaker.
Make sure that the screw installation holes are correct.
•
•
Be sure to attach the wire securely to the speaker and
the ceiling so that the speaker does not fall down.
Wire
3
Screw
5
For the TD510
Screw mounting hole
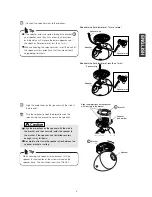
Install the speaker to the speaker base.
(For TD508 II only)
6
Screwdriver
For the TD508 II
Screw
6
Screwdriver
Wire
3
Caution
Tip
Tip
5
6
– Adjusting the angle –


