background image


8


T.O.C

PRE
CAUTI

O

N

PACK

AGE 

CO

N

TE

N

TS


DE

SC

RIP
TIO

N


&


FEATUR

ES


IN

ST

ALL
 

&


CO

N

N

EC

ST

ART

-UP
 

&


O

PE

RATI

O

N


PANE

FUN

CT

IO

N

TE

CH

N

IC

AL 

DATA


4.


INSTALL & CONNECT 

4.1


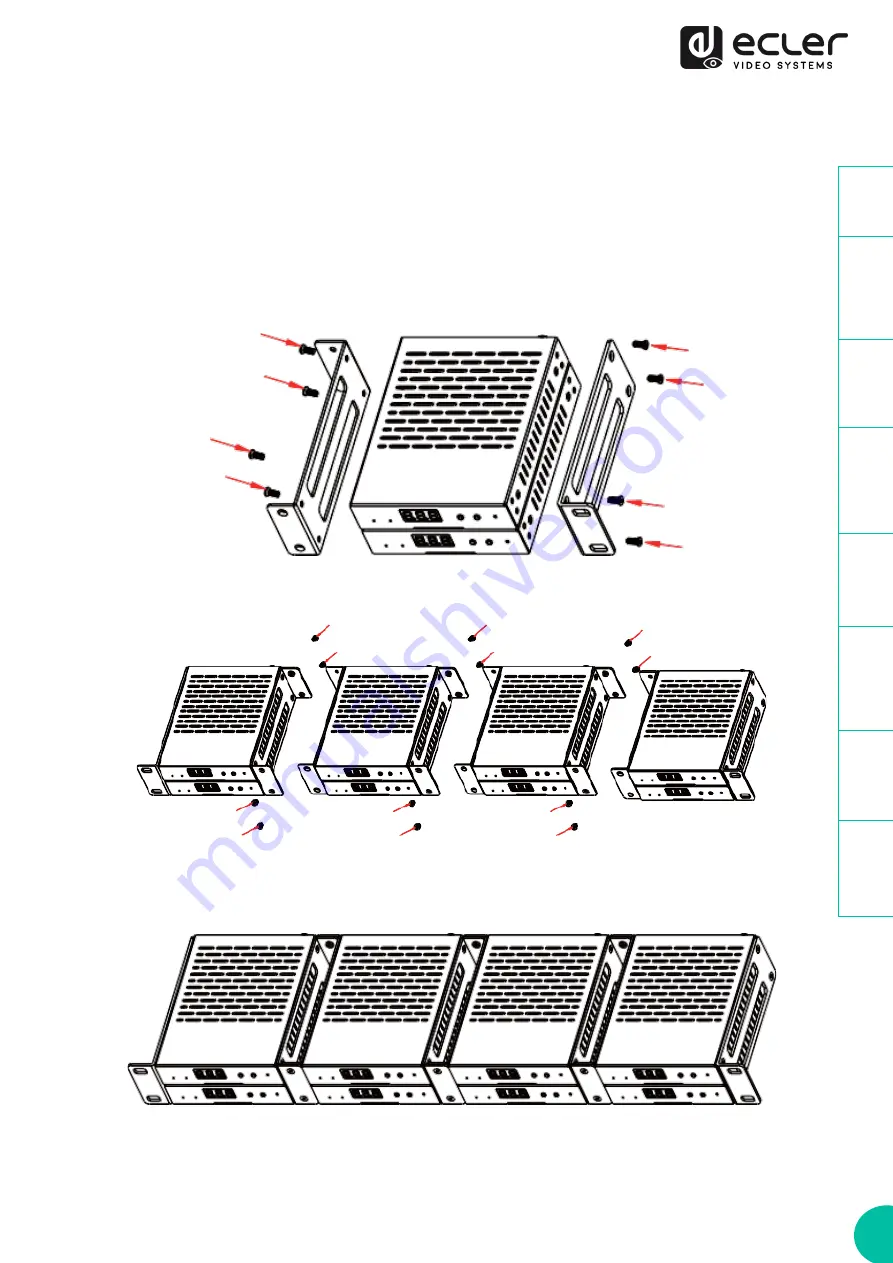
RACK MOUNTING 

This product 

can be


mounted in a standard rack

1.


Stack two products on top of each other. Then use the included screws to fix two 1U 
mounting ears on the products. 


2.


Place four pairs of products together with each other using the provided screws. 


3.


Fasten screws between each pair to mount eight products together. 


Содержание VEO-XTI1CG2

Страница 1: ...XRI1CG2 EN VEO XTI1CG2 VEO XRI1CG2 VIDEO DISTRIBUTION OVER IP H 265 Full HD over IP Video Extenders USER MANUAL PRECAUTIONS PACKAGE CONTENTS DESCRIPTION FEATURES INSTALL CONNECT START UP OPERATION PA...

Страница 2: ...rt 10 4 2 3 Unicast mode 10 4 2 4 Multicast mode 11 5 START UP and OPERATION 12 5 1 Configuration using Web Interface 12 5 1 1 Information 12 5 1 2 Video Settings 13 5 1 3 Led 17 5 1 4 Settings 18 5 1...

Страница 3: ...e use of ready made leads or cords WARNING To prevent fire or shock hazard do not expose this equipment to rain or moisture WARNING A device with Class I construction shall be connected to a mains soc...

Страница 4: ...n or pinched particularly at the plugs convenience receptacles and at the point where they exit from the device 11 Only use attachments accessories specified by the manufacturer 12 Unplug the device d...

Страница 5: ...lightly wet with water and neutral liquid soap only then dry it with a clean cloth Be careful that water never gets into the unit through any hole Never use alcohol benzine solvents or abrasive substa...

Страница 6: ...pment To ensure optimal operation of this device we strongly recommend that its maintenance be carried out by our authorised Technical Services Ecler VEO XTI1CG2 and VEO XRI1CG2 come with a 5 year war...

Страница 7: ...mpositing or remote control such as educational commercial or corporate installations where flexible and scalable AV systems are in need Furthermore this encoder and decoder can be paired with VEO XCT...

Страница 8: ...ONNECT 4 1 RACK MOUNTING This product can be mounted in a standard rack 1 Stack two products on top of each other Then use the included screws to fix two 1U mounting ears on the products 2 Place four...

Страница 9: ...The default IP address for transmitters and receivers is auto IP in the range 169 254 x x or it is dynamically assigned by the VEO XCTRLG2 controller in case it is present in the network For further...

Страница 10: ...the same channel as the transmitter broadcasting the desired source audio and video content The ID channel can be selected in four different ways By front panel buttons of the devices By using the We...

Страница 11: ...ource devices to the HDMI ports of the VEO XTI1CG2 transmitters 3 Connect the HDMI endpoints to the HDMI ports of the VEO XRI1CG2 receivers 4 Connect Audio IN OUT to a sound device and select the requ...

Страница 12: ...of the chosen device into a web browser The default credentials to log in are User name admin Password admin Once the login credentials have been filled out correctly the menus of the web settings pag...

Страница 13: ...Format the user can select PCM or AAC audio for the mainstream Resolution it shows the HORITZONAL and VERTICAL resolution for the mainstream This setting follows the input resolution of the video sou...

Страница 14: ...VEO XTI1CG2 transmitter For further details refer to Additional functionalities of CH select buttons for both VEO XTI1CG2 VEO XRI1CG2 chapter to check the available options EDID ID EDID Description 0...

Страница 15: ...LTICAST as the chosen network transmission protocol 2 Scaler Setting This parameter sets the output resolution scaling up on the HDMI OUT of the VEO XRI1CG2 receiver Resolution ID Resolution Descripti...

Страница 16: ...rameter sets the ID Channel for the VEO XRI1CG2 receiver from the 1 762 available profiles Max Channel ID this parameter sets the range of ID Channel that will be available in the VEO XRI1CG2 devices...

Страница 17: ...or both VEO XTI1CG2 and VEO XRI1CG2 1 Front Panel Power LED Flash This parameter selects the status of the Front Panel LED as follows ON The LED remains permanently lighted OFF After 90s the LED is sw...

Страница 18: ...Web Port The Network Settings can be set only when the MODE button is set to Static After any changes to the network settings username or password the user will have to log in the Web GUI again with...

Страница 19: ...device to the factory default settings 3 Reboot This will reboot the device 5 1 5 2 VEO XRI1CG2 UPDATE 1 Firmware Update Browse This will import the upgrade file Update This will start the upgrade pro...

Страница 20: ...sion are Baud rate 115200 Data bits 8 Stop bits 1 Parity None Flow control None 5 2 1 2 COMMAND LIST It is important to add carriage return CR r 0x0D and line feed LF n 0x0A characters at the end of e...

Страница 21: ...Hz 15 HDMI 1366x768 60Hz 16 HDMI 1440x900 60Hz 17 HDMI 1600x1200 60Hz 18 HDMI 1680x1050 60Hz 19 HDMI 1920x1200 60Hz Set OUTPUT xxx SCALE to yyy OUT xxx PM yyy RESPONSE Set RX ID xxx to max TX ID numbe...

Страница 22: ...p 60Hz Audio 2CH PCM 2 DVI 1280x1024 60Hz Audio None 3 DVI 1920x1080 60Hz Audio None 4 DVI 1920x1200 60Hz Audio None 5 HDMI 1920x1200 60Hz Audio 2CH PCM 6 User EDID 1 7 User EDID 2 Set INPUT xxx EDID...

Страница 23: ...G2 controller module in the system This unit will allow the user to manage and operate all the transmitters and receivers from a unique Web interface including Preview mode Matrix control Video Wall m...

Страница 24: ...ble video signal resolution or frame rate are greater than native 3 STATUS DISPLAY indicates current ID channel and further device information When clicking the SHOW ME option on the VEO XCTRLG2 the s...

Страница 25: ...selected the audio port acts as an output audio extraction from HDMI 8 LAN PoE CONNECTOR Connect the 1Gb network port to an Ethernet switch to begin data transmission When PoE on the Ethernet switch i...

Страница 26: ...signal resolution or frame rate are greater than native 3 STATUS DISPLAY indicates current ID channel and further device information When clicking the SHOW ME option on the XCTRLG2 the status display...

Страница 27: ...AN PoE CONNECTOR Connect the 1Gb network port to an Ethernet switch to begin data transmission When PoE on the Ethernet switch is available the device will not need to be locally powered 9 LINK indica...

Страница 28: ...el number e g 001 Configuration and Pressing and holding and buttons together at the same time for 5 seconds will enter the Configuration mode with CFN displaying on the status display Further long pr...

Страница 29: ...RLG2 Pressing and holding and buttons both together for 5 seconds will confirm the selected EDID ID and exit EDID Settings mode EDID ID EDID Description 00 Video HDMI 1080p 60Hz Audio Stereo PCM 01 Vi...

Страница 30: ...Output Resolution Settings mode Resolution ID Resolution Description 00 Pass through 01 1080p 60Hz 02 1080p 50Hz 03 1080p 30Hz 04 1080p 25Hz 05 1080p 24Hz 06 720p 60Hz 07 720p 50Hz 08 576 50Hz 09 480...

Страница 31: ...EO Cables Audio Performances Audio Input Connectors Transmitter 3 pin Euroblock Stereo Unbalanced Audio Output Connectors Receiver and Transmitter 3 pin Euroblock Stereo Unbalanced Audio Formats LPCM...

Страница 32: ...19 Included Accessories 2x 3pins Euroblock connector 4x M3 screws 4mm 2x Mounting Ears 1x 12V PSU Optional Accessories VEO RACK19 Dimensions WxHxD 95 x 21 5 x 120mm 3 74 x 0 85 x 4 72in each one TX an...

Страница 33: ...33 T O C PRECAUTIONS PACKAGE CONTENTS DESCRIPTION FEATURES INSTALL CONNECT START UP OPERATION PANEL FUNCTIONS TECHNICAL DATA 7 2 MECHANICAL DIAGRAM 7 2 1 VEO XTI1CG2 7 2 2 VEO XRI1CG2...

Страница 34: ...oduction tolerances NEEC AUDIO BARCELONA S L reserves the right to make changes or improvements in the design or manufacturing that may affect these product specifications For technical queries contac...

Отзывы: