


Echoflex Installation Guide
ElahoAccess Interface
Installation
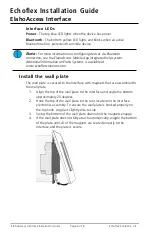
Back box
The Interface can be mounted into a single gang RACO 690 back box
(provided by others) or surface mounted back box (sold separately and
available from Echoflex.)
Multi-gang back boxes can be accommodated by using the required metal
alignment bracket. One bracket is included with each Interface.
•
For multi-gang installations, multi-gang faceplates are required but
not included.
•
You may also use standard third party decorator style faceplates.
Note:
Installation must follow all national and local codes for electrical
equipment.
Note:
NEC Class 2 product to be wired in accordance to NEC Article
725 and local jurisdiction requirements.
Install the back box plumb and square for best results. Ensure that the back
box is clean and free of obstructions and that all wiring is installed correctly.
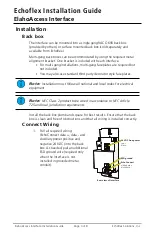
Connect Wiring
24 VDC Aux power
red +
black -
EchoConnect
white data +
black data -
Rear view of Interface
ESD ground
1.
Pull all required wiring
(EchoConnect data +, data - and
Auxiliary power positive and
negative 24 VDC) into the back
box. As needed, pull an additional
ESD ground wire (required only
when the Interface is not
installed in grounded metal
conduit).
ElahoAccess Interface Installation Guide
Page 3 of 8
Echoflex Solutions, Inc.


