manualshive.com logo in svg
background image

5.If the SCART connection is not successful, 

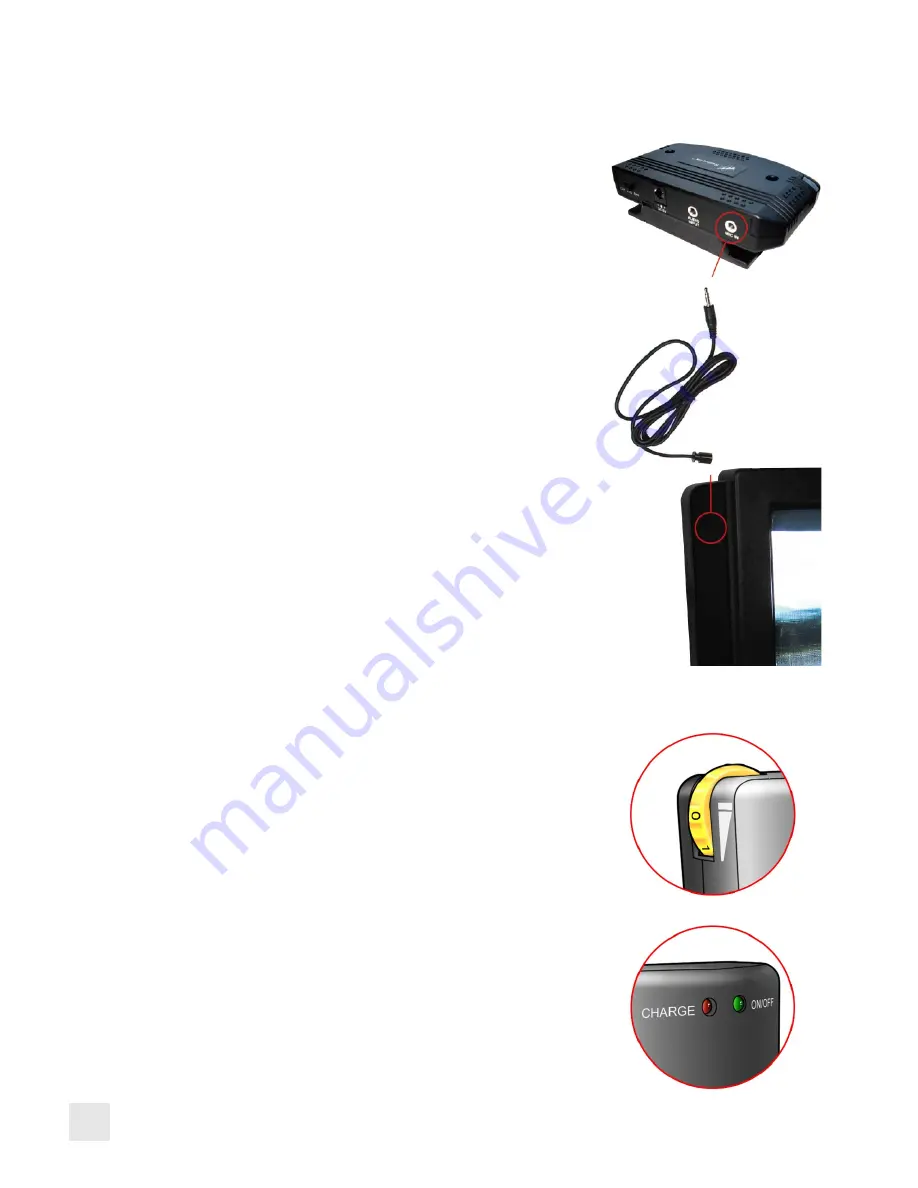
connect the microphone.Simply plug the 

3.5mm plug of the microphone cable into 

the Mic socket on the transmitter (see Fig 

5) and then fix the microphone onto the 

TV speaker using the Velcro.

6.The transmitter base has a switch that 

allows you to switch between stereo and 

mono operation. Leave the switch set to 

mono.

7.Plug the 6VDC mains power adapter into 

a standard electrical power socket, then 

plug the power lead into the EchoLink (IR) 

TM charging cradle socket (see fig 2). 

8.Rotate the volume wheel ON/OFF switch 

until  the  ON/OFF  LED  is  off  on  the 

receiver  and place the receiver on the 

charging base. 

9.When charging the charge LED on the 

receiver will be red, when fully charged 

the  charge  LED  will  turn  to  green. 

Remove  from  base  and  fully  insert 

the Headset or Neckloop plug into the 

receiver phone jack . 

10.Put on Headset or Neckloop, ensure the 

volume control is at zero then adjust the 

volume to a comfortable level (the ON/

OFF LED will be GREEN).

Fig 5

6

Содержание EchoLink (IR)

Страница 1: ......

Страница 2: ...ions and Precautions 3 Setup and User Instructions 4 Replacement Parts 5 Technical Specifications 6 Conformity EchoLink IR TM Aid for Living Infrared System Universal Receiver Please read and follow t...

Страница 3: ...1 Accessories Picture Receiver Charger Transmitter SCART 12 VDC Power adapter 6 VDC Power adapter Headset Phono plugs Neckloop...

Страница 4: ...to the headset socket before turning the unit on Failure to do so can result in high sound levels that could adversely affect your hearing Using this product inappropriately could adversely affect you...

Страница 5: ...cause a tripping hazard The unit may get warm when being used Ensure the unit has adequate ventilation Please refer all servicing to qualified personnel ONLY Do not attempt to open the unit The batte...

Страница 6: ...s a clear line of sight between the transmitter and receiver with no obstruction 2 Plug the 12VDC power adapter into an electrical power socket then plug the power lead into the transmitter DC socket...

Страница 7: ...Fig 3 Fig 4 Fig 2 5...

Страница 8: ...a standard electrical power socket then plug the power lead into the EchoLink IR TM charging cradle socket see fig 2 8 Rotate the volume wheel ON OFF switch until the ON OFF LED is off on the receiver...

Страница 9: ...when connected to mains This indicates that power is available for the receiver 15 The receiver can also be recharge by plugging the 6VDC power lead directly into the receiver socket 16 When the batte...

Страница 10: ...l RX 570 1000 01 12 VDC 1 500mA power supply no plug 570 1008 01 6 VDCm 1 000mA power supply no plug 202 M 01 Omni microphone on a 1 5m lead 306 B 01 phono phono combi lead 201 B 01 Scart phono plug 5...

Страница 11: ...o or mono mode of operation 1 060mAh LI ION battery receiver not serviceable by the end user Volume dB 0 20dB receiver Noise cancelation circuit for optimum performance Dimensions transmitter 115x75x2...

Страница 12: ...ecycle more co uk or Hearing Products International Limited for full details www hear4you com Hearing Products International Limited Echo House 26 27 Haigh Park Stockport SK4 1QR England Tel 44 0 161...

Отзывы: